
Yes, and most owners who spend real time in their shed insulate the roof and the floor. Here is exactly how each one is built up, what to buy, and why the walls are a different story.
In a hurry?
The short version
Your shed is solid wood, 1 1/8" to 1 3/4" thick, single wall, and it does not come insulated. The wood alone buffers enough that a space heater keeps it comfortable down to around 40°F. If you want more than that, seal the draughts first, it is the biggest comfort gain per dollar on any small building, and then:
Insulate the floor
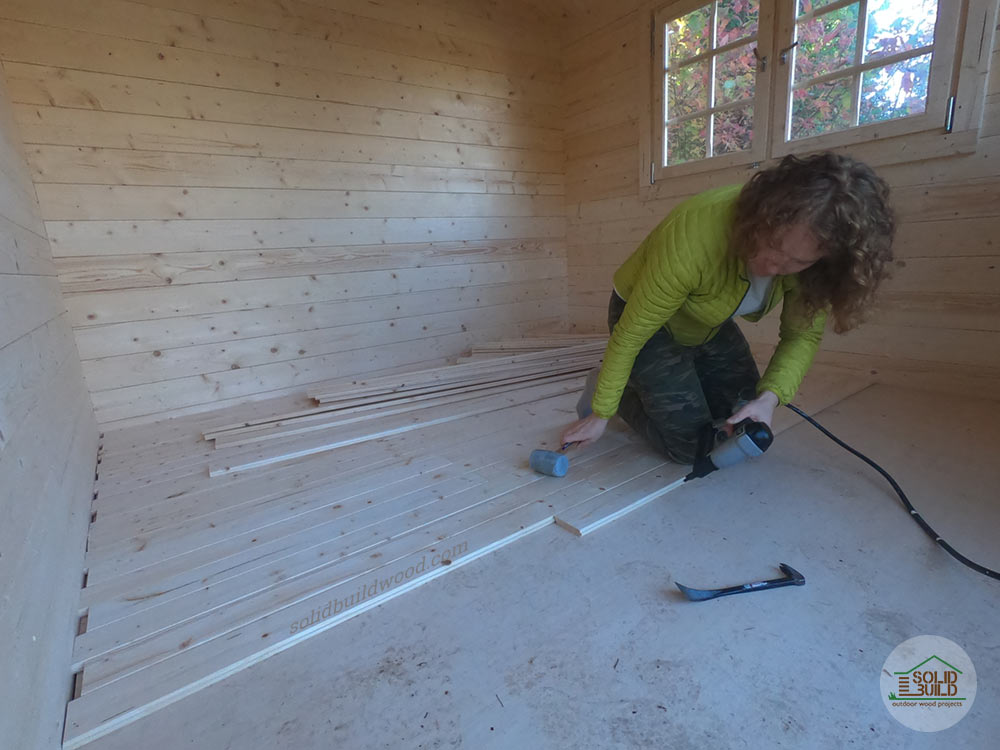
The insulation goes between the floor joists as the floor goes in, then floorboards on top, with an optional plywood subfloor between. Two slightly different methods depending on your foundation.
Insulate the roof
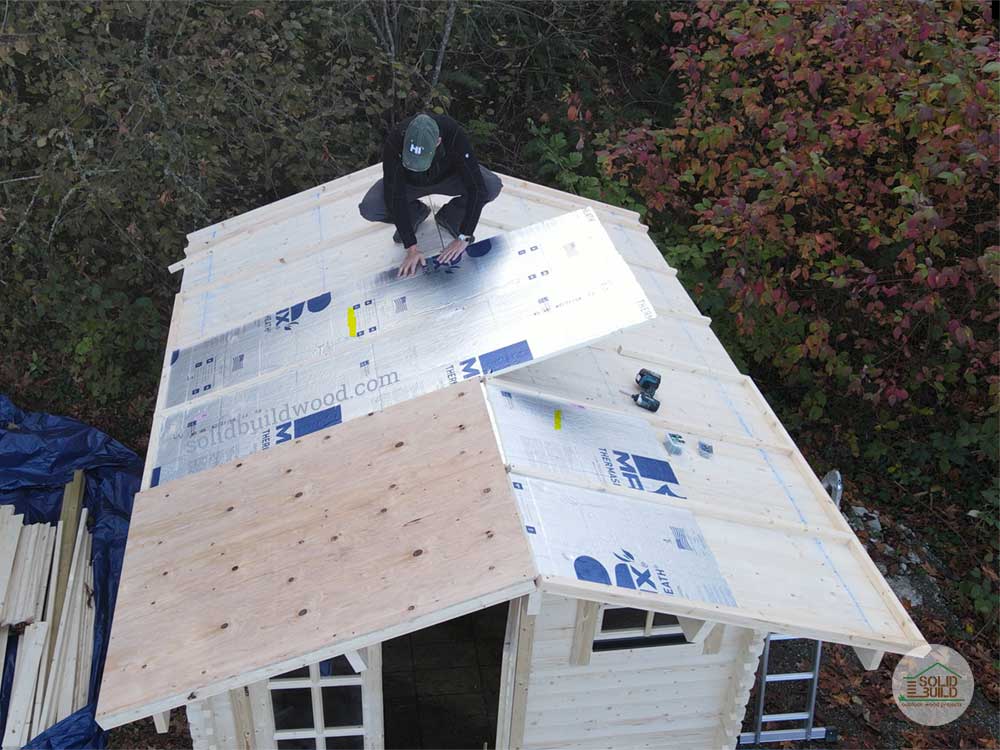
A grid of 1x2, 2x3 or 2x4 studs on top of the roof boards, insulation in the cavities, plywood over the lot, then your roofing. Deeper stud, thicker insulation.
Leave the walls
Roof and floor together get you roughly 20°F to 100°F. The walls are the smallest gain of the four surfaces and the only complicated one, and over ten years they rarely pay for their own materials.
Everything below is the detail: how to seal the draughts, the two floor methods, the roof build-up including what happens at the fascia and to your snow rating, why the walls stay as they are, and the numbers behind that.
First, the one thing that governs everything
Your shed is alive
There is no stud frame in these buildings. The walls are machined tongue and groove boards that stack and interlock, and they are meant to float. Two kinds of movement never fully stop. In the first 12 to 18 months the boards dry and shrink, and a full height wall settles by up to 2". Every year after that the wall breathes with the humidity, growing and shrinking roughly 1/4" to 3/8", for the life of the building.
That single fact is why the floor and the roof are straightforward to insulate and the walls are not. The floor sits below the movement and the roof rides on top of it, so both can be built up freely. Fix anything rigid across the wall boards and the wall can no longer settle, so gaps open between the courses instead.
It is the same reason we ask you to use flexible conduit for any electrical run through a wall. Nothing rigid should ever span the courses.
What this means in practice
Floor and roof insulation are part of the build, done as the shed goes up. The walls are left as they are, and the section on them below explains why that is the right call for almost everyone.
Before any insulation
Seal the draughts first
On a small building this is the biggest comfort gain per dollar there is, and it costs almost nothing. Air does not come through the boards. It comes through the doors, the windows, any wall course that has not closed, and the corners and board ends. Work through them in that order.
Adjust the doors
Most of the draught is here. Turn the hinge adjusters with the 4M Allen wrench until the reveal is even all round and both leaves sit flush where they meet, and check the rubber weatherstrip runs unbroken on all four sides of the frame. The door needs re-adjusting as the building settles and again with the seasons. That is normal, not a fault.
Check the windows
Close each opening sash onto its weatherstrip and look for daylight. The gaps behind the window and door trims are meant to be there, they are the settling room, so never caulk or foam them. If they whistle, a loose tuck of mineral wool behind the trim stops the wind and still lets the frame slide.
Let the walls close
Daylight between two boards means something is holding the wall up: wind studs sitting at the top of their slots, corner studs, a shelf or pegboard screwed across several courses. Loosen it, tap the corner paddles down with a mallet, walk the roof at the corners, and let the wall settle. Then re-set the slotted brackets at mid slot.
Do not caulk the seams to stop the draughts. The assembly manual puts this in a red box for a reason. Caulk glues the courses together, the wall can no longer settle, and you get splits and permanent gaps instead of a snug one. If you ever must caulk, wait 6 to 12 months, use log home caulk only, and only in cracked knots, board ends and corners. Never the horizontal laps.
The corners and board ends are the last stop, and the same treatment that keeps water out keeps air out: a clear end grain sealer on the board ends and a flexible check sealant in any knot that has cracked. Anywhere else you find daylight, the rule is the same as everywhere on this building. Fill it with something soft that compresses and lets the wood move, never with anything rigid.
Part one
Floor insulation
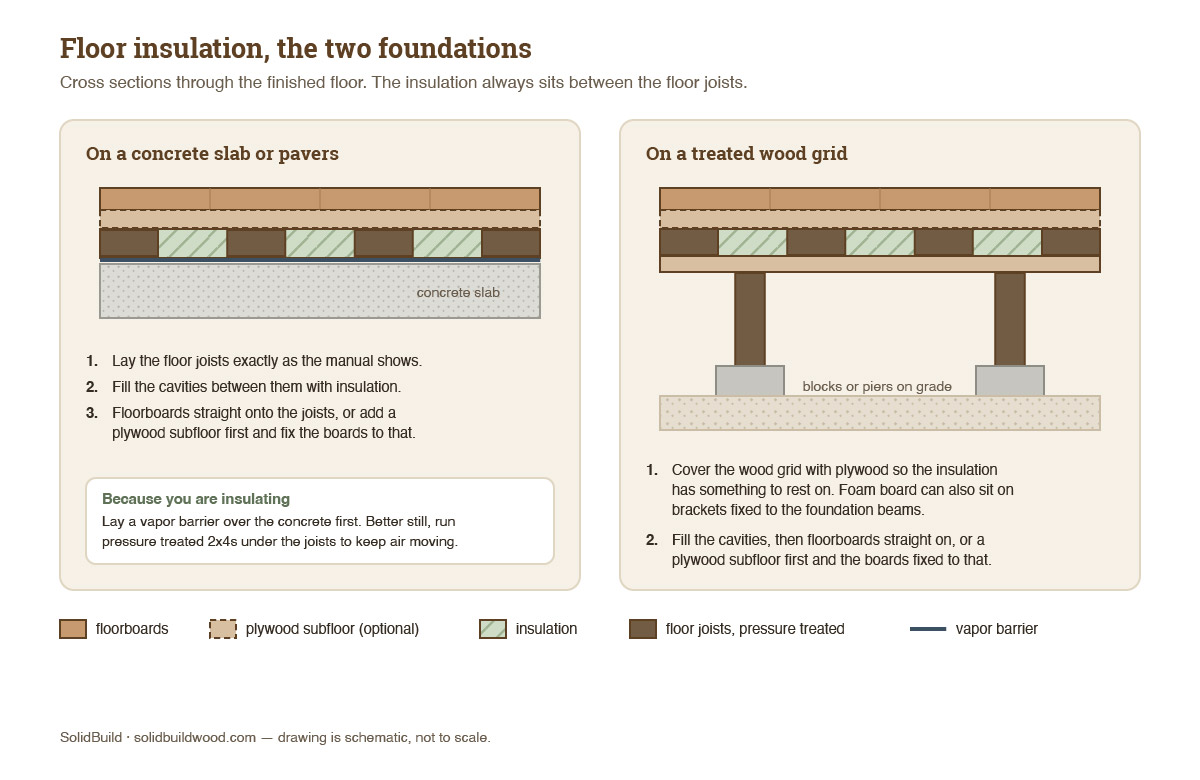
The insulation always ends up in the same place, in the cavities between the floor joists. How you get a surface for it to rest on is what changes with the foundation.
The simplest case
On a concrete slab or pavers
- Lay out the floor joists exactly as the assembly manual shows.
- Fill the cavities between the joists with your insulation.
- Either install the floorboards directly over the joists and insulation, or add a layer of plywood as a subfloor first and fasten the floorboards to that.
Two things worth doing because you are insulating. Lay a vapor barrier over the concrete before the joists go down. Better still, run pressure treated 2x4s perpendicular under the floor joists and set the joists on top, which keeps air moving under the building the way a bare floor does. Those 2x4s add about 1.5" to the overall height of the shed, and they do not raise the floor inside.
Blocks, piers or similar
On a treated wood grid
- Cover the treated wood grid with plywood, so the insulation has a surface to rest on. If you are using foam board, brackets fixed to the foundation beams are enough to carry it instead.
- Fill the cavities with insulation.
- Install the floorboards directly over the foundation beams and insulation, or add a plywood subfloor first and fasten the floorboards to that.
If it is easier, cover the wood grid with plywood to make one solid platform and then follow the concrete method above. It comes to the same thing.


Part two
Roof insulation
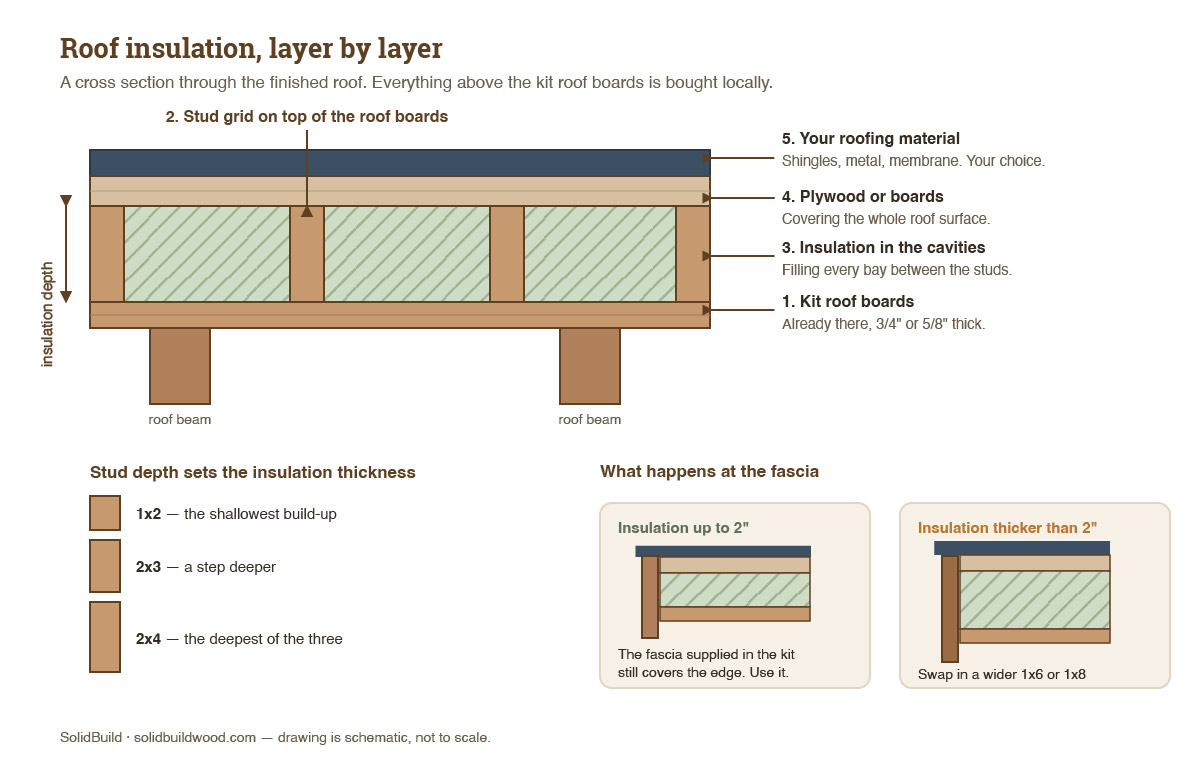
The roof boards that come with your kit stay exactly where they are. Everything else is a sandwich built on top of them, and it all goes on before your roofing material does.
Build the grid
Frame a grid of studs across the whole roof surface, on top of the roof boards supplied with the kit.
Fill the cavities
Pack every bay of the grid with your insulation.
Close it up
Cover the whole surface with plywood or other wood boards, then install the roofing material of your choice on top.
Stud size is your insulation thickness. Use 1x2, 2x3 or 2x4 lumber for the grid. Each one allows incrementally more insulation than the last, so choose the size that matches the thickness you want rather than the other way round.
What happens at the fascia. Insulation up to 2" thick is still covered by the fascia boards supplied with the kit, so use them as they come. If you go thicker than 2", the kit fascia will no longer cover the edge, so buy a wider appearance board locally, a 1x6 or 1x8 depending on your insulation thickness, and swap it for the front and back fascia provided.
Mind your snow rating. Everything you add above the roof boards is weight the roof has to carry, and it comes straight out of the snow load allowance. If you are in snow country, run the grid studs on edge, directly over the roof beams, and screw through the deck into them. Done that way the studs act as reinforcement and pay for the weight they add. Check your model's rating before and after either way.
Two things people ask next
Roofing nails. Normally you size the nail to the roof board plus two overlapping layers of shingle. Once there is insulation and plywood up there, nail length stops being critical, because any extra simply runs into the build-up. Almost any sensible length works.
Roofing material. If your shed sits in strong sun and heat, a metal roof with insulation underneath is the combination that reflects the most heat. Asphalt shingles are not the best choice in that climate.
Part three
The walls, and why we leave them
Most owners never insulate the walls, and we think that is the right call. Here is the honest reasoning, and what to do if you are the exception.
Of the four surfaces, the walls are the smallest gain and the only complicated one. The floor and the roof are static, so you fill a cavity and move on. A wall that settles 2" and then breathes every year cannot have anything rigid fixed to it, so a proper wall retrofit is an interior floating liner on sliding fixings, with flexible insulation, a taped vapor control layer, and every window and door reveal detailed so nothing bridges the moving wall and the still liner. Done right it costs 2 1/2" to 3" of room on every wall, two to three days of careful work, and about $1,100 in materials before you have lifted a tool.
Against that, the electricity it saves is modest. The figures in the next section put it at somewhere between a small loss and a small gain over ten years in most of the country. That is why this article no longer describes the method. It is a job that has to be done exactly right on a building that is still moving, and the reward does not match the risk of getting it wrong.
If you truly want insulated walls, talk to us first. We will tell you what the build actually involves for your model and your climate. And if what you are really after is a year round living space in a cold climate, the honest answer is often a building designed for that from the start rather than a retrofit of this one. We would rather help you choose the right building than sell you the wrong project.
Two things never to do to the walls. Never screw a rigid frame, furring or foam board to the wall boards, the boards hang on the screws instead of settling onto each other and daylight opens between them. And never wrap the outside in insulation and cladding, it reopens every flashing on a moving wall and stops the logs drying outward.
The evidence
What insulation costs, and what it saves
We modelled our California 13x11 as a home office, heated and cooled 50 hours a week, in three US climates, at $0.18 per kWh. The insulation is R-10 foam board in every case. First, what each step costs to do, in materials and in your own time.
| Step | Materials, including fasteners, brackets and trim | Your time |
|---|---|---|
| Insulate the roof and the floor | about $950 | 1 to 1½ days, done during assembly |
| Insulate the walls as well | $1,100 minimum | 2 to 3 days, done a year after assembly |
Then what the building costs to run each year, and what the wall insulation is worth over ten years once its materials are paid for. A negative number means it has not paid for itself in ten years.
| Heating and cooling with | Climate | Electricity per year | Adding the walls: net saving over 10 years, materials deducted | ||
|---|---|---|---|---|---|
| No insulation | Roof and floor | Roof, floor and walls | |||
| Mini-split heat pump | Hot (Phoenix) | $280 | $220 | $150 | −$410 |
| Moderate (Sacramento) | $220 | $170 | $115 | −$530 | |
| Cold (Minneapolis) | $420 | $330 | $200 | +$180 | |
| Space heater and window AC | Hot (Phoenix) | $430 | $340 | $230 | $0 |
| Moderate (Sacramento) | $435 | $340 | $220 | +$120 | |
| Cold (Minneapolis) | $1,000 | $775 | $465 | +$2,000 | |
Read the last column. With a heat pump the wall insulation is still in the red after ten years in a hot or moderate climate, and only just ahead in a cold one. With a plain space heater it breaks even in a hot climate and clears about $120 in a moderate one. Only cold climate plus resistance heat makes it clearly worthwhile, and that is the one case where the building itself, not the insulation, is the wrong choice for the job. None of this counts the two to three days of work or the 2½" to 3" of room lost on every wall.
The roof and floor are a different question, and not a money one. They are what turns a three season building into a year round one. They cut the heating load at 20°F from 3.6 kW to 2.7 kW, the difference between a space heater keeping up and not, and in full sun they take the roof from the hottest surface in the building to a quiet one, which you feel long before it shows up on a bill. That is why they are part of the build and the walls are not.
How the numbers were produced: a steady state heat loss model of the California using its actual dimensions, 1 3/8" spruce walls, dual pane windows, the roof and floor as supplied, and a typical leakage rate for a log building that insulation does not change. The building is kept at 68°F in winter and 75°F in summer while in use and allowed to drift the rest of the time. Sun exposure is the middle case, part of the day in shade with a light coloured roof. The wall figures assume the insulation is built as an interior floating liner, which is the only method that survives the wall's movement. Electricity is rounded to the nearest $5 a year and the ten year figures to the nearest $10. Material prices are 2026 estimates and include fasteners, brackets and trim but not labour. Your own numbers will differ with your climate, your electricity rate and how much you use the building, but the relationship between the columns holds.
Honest numbers
What insulation actually buys you
Based on what owners report back to us, across a lot of climates.
| How it is built | Comfortable range | What that means |
|---|---|---|
| No insulation, space heater | Down to about 40°F | Fine year round in the Pacific Northwest, the Southeast and similar moderate climates. |
| Roof and floor insulated | About 20°F to 100°F | The usual choice for an office, studio or workshop that gets used all year. |
| Walls insulated as well | A little beyond that | Rarely worth it at this size, see the numbers above. If your climate truly demands it, talk to us first. |
In deep winter areas an uninsulated shed is best thought of as a three season space. Seal the draughts, insulate the roof and floor, add a heat source, and it becomes a year round one.
A word on skill level. These alterations are relatively easy to do, but they are still carpentry, and you need at least average handyperson skills to carry them out. SolidBuild is not liable for injuries or damage to the product that may occur during such installation.
Common questions
Frequently asked questions
Do the sheds come insulated?
No. The walls are solid wood, 1 1/8" to 1 3/4" thick, single wall construction. There is no insulation in the kit, though the wood itself gives a useful amount of natural thermal buffering.
What size studs do I need for the roof grid?
1x2, 2x3 or 2x4, each allowing incrementally more insulation thickness. Pick the size that matches the insulation you want to fit.
Will I need to replace the fascia boards?
Only if your insulation is thicker than 2". Up to 2" the fascia supplied with the kit still covers the roof edge. Above that, buy a wider appearance board locally, a 1x6 or 1x8 depending on the thickness, and swap it for the front and back fascia provided.
Does roof insulation affect my snow rating?
Yes. The added layers are added weight, subtracted from the snow allowance, unless the grid studs are placed on edge over the roof beams and screwed into them, which makes them structural. Check your model's rating either way.
How do I seal the draughts?
Adjust the door hinges with the 4M Allen wrench until the leaves sit flush and the weatherstrip meets all round, close the opening windows onto their strips, and if you see daylight between wall boards, find what is holding the wall up and loosen it rather than filling the gap. Never caulk the seams. See the draughts section above.
Can I insulate the floor and roof after the shed is already built?
The floor insulation goes in as the floor goes down, so it belongs to the build. The roof build-up sits on top of the roof boards and under the roofing, so it needs to happen before the roofing goes on, or the roofing has to come off again.
Can the walls be insulated at all?
In principle, as an interior floating liner on sliding fixings, built after the shed has settled and designed to keep sliding for life. It is the smallest gain of the four surfaces, the only complicated one, and over ten years it rarely pays for its own materials. We do not publish the method. If you truly want it, contact us before you start.
Why do the walls make so little difference to the bill?
Because the building is small, it is used part time, and by the time the roof and floor are done the rest of the loss is spread across the windows, the door, the leakage a log building always has, and the walls. Insulating the walls takes a slice out of that, but on a heat pump in most of the country the slice is worth less over ten years than the materials cost to take it.
Can I use rigid foam boards?
In the floor and roof, yes, and it is what most people use. Never in the walls: a moving wall needs flexible, vapor open insulation and a taped vapor control layer inside, and foam board cannot follow the movement.
Is roof and floor insulation enough on its own?
For most owners, yes. It takes the building to roughly 20°F to 100°F with a heat source, and at this size wall insulation is rarely worth the trouble.
Does insulating change the height of the building?
The roof gets thicker by the depth of the stud grid you choose. The floor does not rise, because the insulation sits between joists that are already there. If you add pressure treated 2x4s under the joists for airflow, they lift the whole building about 1.5" without raising the floor inside.
Can I run electrical at the same time?
Yes, and it is far easier to plan it before assembly. The one rule that matters here is the same one that governs insulation: use flexible conduit for anything routed through a wall, because the wall moves.
Anything we have not covered? Email info@solidbuildwood.com and we will answer it, and add it here.
Insulating is optional. Plenty of owners run their shed exactly as it arrives, with a space heater in the cold months, and are perfectly happy. If you are planning an office, a studio or a workshop you will use all year, seal the draughts, insulate the roof and the floor while the building goes up, and leave the walls alone.
These are alterations you or your contractor carry out, so results depend on materials, workmanship and local conditions, and local building rules always apply.