How to build a shed foundation?
Your shed foundation matters. You can’t have your shed sitting on the ground, or it will rot from the moisture. And you want it stable, so it doesn’t get lopsided, and the doors and windows open and close properly.
Below is the detailed overview of foundation types we recommend for our sheds and when they are best used.
JUMP TO FOUNDATION SPECIFICATIONS FOR EACH SHED MODEL
Does My SolidBuild Wood Shed Need a Foundation?
The short answer is yes, and even the smallest Shiba 8x8 storage shed needs a level and firm foundation. If it sits directly on the ground, it will get wet from the soil moisture which will cause the wood to rot and may get the things stored in the shed damp as well.
In case the ground isn’t flat or is uneven (not level), it will affect the stability of the shed and cause the windows or doors to stick and prevent the wall boards from falling into their grooves thus, creating gaps between the boards. This can all be avoided by placing the shed on a good foundation.
All in all, a firm and level foundation will ensure your shed lasts longer. The question is, what type of foundation is best?
Difference Between On-Grade and Permanent Foundation
An “on-grade” foundation is one that rests on the surface of the ground. It can be a treated wood frame, gravel, concrete block, or similar construction which can be removed easily when moving/removing the shed. This type of foundation is sufficient for all of the SolidBuild™ sheds up to 160 sq ft.
A “permanent foundation” is the kind that can not be removed or dismantled easily. It's usually a concrete slab or concrete piers. However, concrete piers are much easier to remove than a slab and are easier to DIY as well.
On-grade Shed Foundation Options:
Concrete Paver Foundation
This type of foundation is adequate for any of our sheds under 160 sq ft. Concrete pavers are easy to install and are very budget-friendly. However, this foundation is only good if your shed site is level.
You can anchor the shed to the pavers using concrete anchors, but in high wind areas, they likely won’t be enough. Bigger pavers are more substantial and would offer a better anchoring base.
To ensure proper drainage and easy leveling, you’ll need to dig out 1-2” of dirt to level the ground and fill the hole with gravel. As you install each paver, double-check the level of the whole platform.
Difficulty level: easy
Cost: cheap
Best for:
- Flat and level ground
- Firm, well-draining soil
Not suitable for:
- Large sheds
- Heavy equipment (think treadmill, a lawnmower is fine)
- Sloped areas
- Soft or soggy soil
Main drawbacks:
- May shift over time
- The area is limited to what can be achieved based on the size of each block. I.e., 24” x 24” blocks can make an 8’x8’, 10’x’12, 12’x’14, etc. size pad, while our shed foundation sizes are a bit more precise, such as 9’ 1.5” x 9’ 1.5”, so you’ll have some room around the shed perimeter. You can always add a few feet extra and have a walkway around the shed though!
Tip: Use landscape fabric or gardening cloth under the gravel to prevent growth.
Treated Wood Frame Filled With Gravel
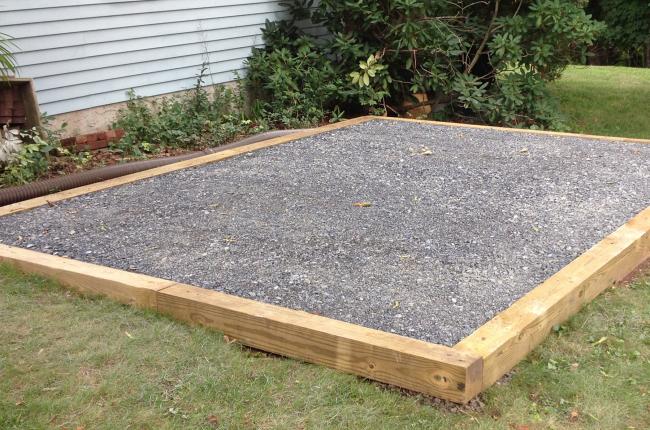
It’s another versatile yet straightforward foundation option. You can build it level with the ground or as a raised bed, and also build it on a small slope by layering up the lumber on the slope side. This foundation takes a bit more gravel, which has to be really well compacted, otherwise it will shift.
A wood frame and gravel foundation offers excellent drainage, but if it’s built where water tends to puddle, you may need to dig a small trench around for drainage.
For shed models that don’t include flooring, you’ll have to acquire pressure treated 2x4s to sit under the shed to serve as floor joists (the specifications for each model are below the overview of foundation types).
Difficulty level: relatively easy
Cost: cheap to average (depends on the amount of gravel)
Best for:
- Flat ground
- Small slopes
- Firm soil
Not suitable for:
- Soft soil
Main drawback:
- May shift over time, especially on wet/soft soil
Tips:
- Use landscape fabric and gravel to prevent growth under the shed
- Use galvanized rods drilled through the corners of the 4x4s of the wood frame to hold the layered lumber from shifting.
Treated Wood Frame on Concrete Blocks
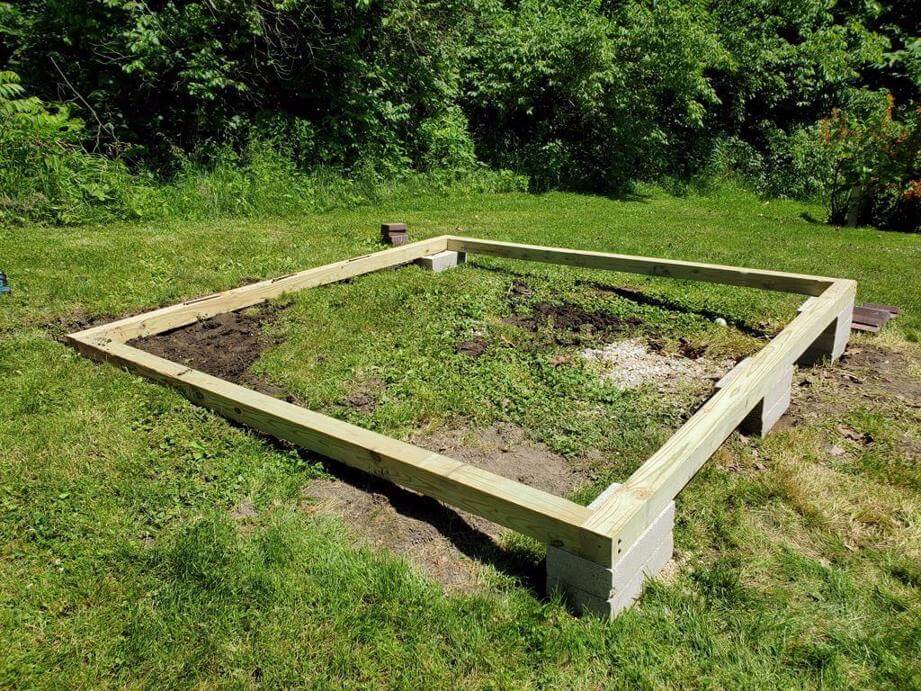
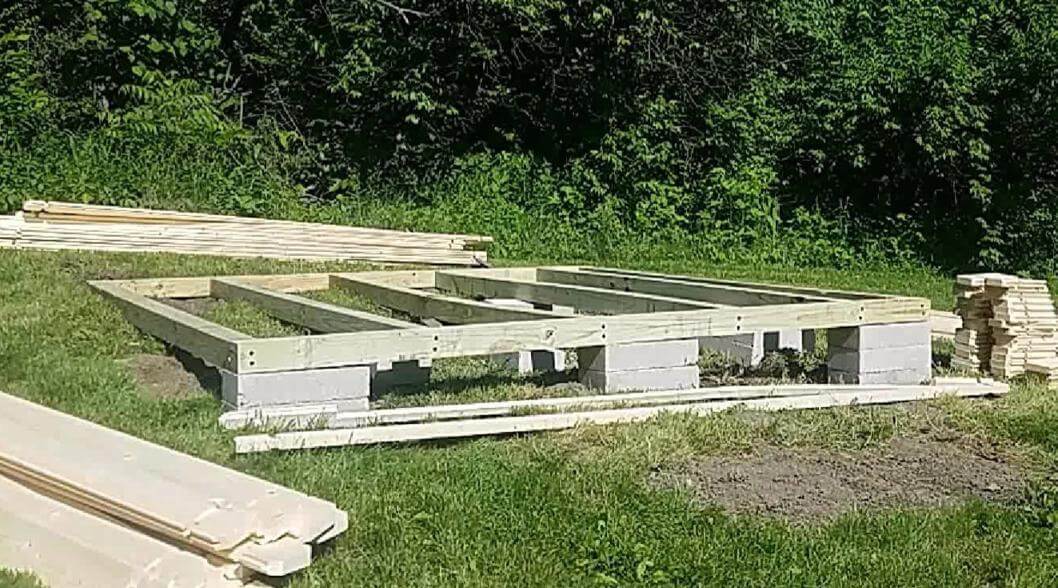
Another easy foundation type that’s also budget-friendly and offers additional flexibility compared to concrete pavers. Unlike the pavers, the concrete blocks can be stacked to accommodate a small slope and provide sufficient stability in areas with low winds. We suggest opting for this type of foundation if your shed site has a slope of up to 6 degrees. The one pictured above is just at the limit.
With this type of foundation, you will only need to dig out 4”-6” of dirt under the footing of each block stack and fill them with gravel. The block stacks should be spaced every 6’ - 8’. You’ll have to construct a pressure-treated wood grid which can be anchored to the blocks, and the shed can sit on that grid directly. You don’t need to use the floor joists supplied with the kit if your shed comes with a floor. It’s an excellent option for sheds that don’t come with the floor - just put down some plywood and install the flooring of your choice.
The nice thing about this foundation option is that you can make it precisely to the size of the recommended foundation of your shed model — more about the recommended foundation size below.
Difficulty level: easy
Cost: cheap
Best for:
- Flat ground
- Slopes up to 6 degrees
- Firm soil
Not suitable for:
- Soft soil
- Shed used for movement activities (think gym shed, dance studio shed, and such)
Main drawbacks:
- May sink over time
- Blocks may shift due to vibrations from intense activity, as mentioned above.
Tips:
-
Use landscape fabric and gravel to prevent growth under the shed.
-
You can use either 4x4 or 2x6 treated lumber. The 4x4s will save 2 inches in shed elevation; both offer sufficient support for smaller sheds. For anything over 160 sq ft, use 2x6s.
A similar alternative is a skid foundation on concrete blocks. All the same rules apply, except instead of the treated wood frame, you’d just use the treated 2x4s resting on the concrete blocks. In this case, you will need to use the floor joists supplied with the shed kit (if your shed comes with the floor). The skids and floor joists must rest perpendicular to one another. It’s a slightly less stable option, so is best used for smaller sheds with lighter applications. The image is below.
Treated Wood Frame on Concrete Pier/Deck Blocks
Tom’s, our former sales rep’s, shed in progress - built on concrete deck blocks and treated wood frame
Yet another easy foundation type. Takes about the same effort to build as the one with concrete blocks. The main difference is that it works best on level ground, same as the paver foundation, but is an excellent solution if the location you want to have your shed at collects water - the blocks offer a bit of a lift to keep the shed away from sitting in a puddle. They are more stable on level ground than simple blocks since they are not stacked and have fitted channels for the lumber to rest on.
The pier blocks and deck blocks are very similar in design. The pier blocks usually come with a metal bracket that accommodates lumber of specific dimensions, and the lumber has to be fixed to the bracket with wood screws. Deck blocks have a built-in channel in which the lumber just rests without the screws. Both serve the same purpose.
Difficulty level: easy
Cost: cheap
Best for:
- Flat ground and level ground
- Firm soil
Not suitable for:
- Soft soil
- Sloped areas
Main drawback:
- May sink over time
Tip:
-
Use landscape fabric and gravel to prevent growth under the shed.
Permanent Foundation Options
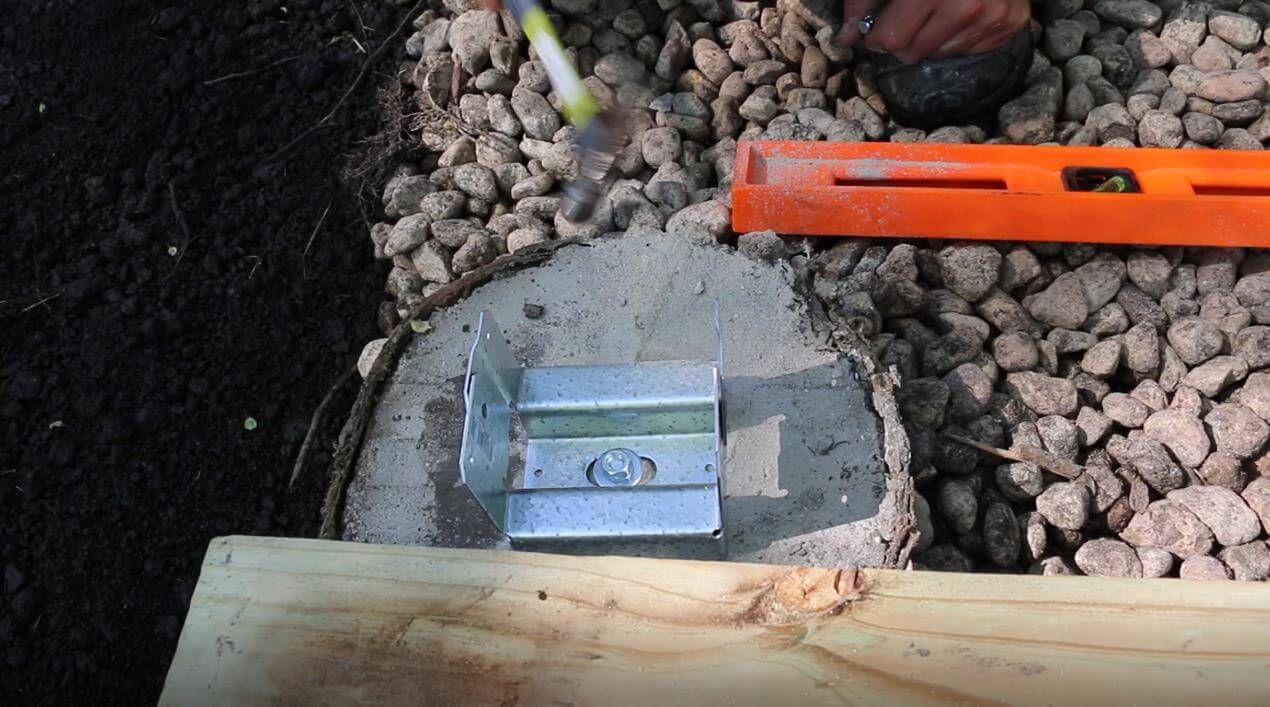
Treated Wood Frame on Concrete Piers
It’s the most universal foundation type that can be done by a novice and suits a shed of any size on any kind of soil or slope. Even though it takes more work than anything listed above, it’s also the longest-lasting foundation that even though considered a permanent one can still be relatively easily removed, or landscaped over. And it won’t break your bank.
There are multiple approaches to the concrete pier foundation. The image above shows the piers poured into cardboard tubes and 4x4 treated lumber stilts attached with metal brackets. The brackets are set into the wet concrete.
The image below shows a concrete pier with a 4x4 slot designed for horizontal treated wood frame installation, like all the previous options with concrete blocks, or deck blocks. This angle is attached with a concrete wedge anchor.
The video in this link (https://www.youtube.com/watch?v=Z6fBHCBYyJY), which we absolutely recommend watching regardless of the foundation you decide to build, demonstrates the concrete poured directly into the holes in the ground.
In every case, you’ll have to dig holes. The depth of the hole depends on the freeze line in your area. This website has the frost line information for all of the US. Add 4”- 6” of depth for the gravel below the piers for drainage.
Concrete pier foundation will raise your shed higher and you will need stairs or a ramp. The piers themselves have to be at least 6” above the ground level, plus the height of your wood frame.
The beautiful thing about a pier foundation is that it has enough access underneath to install an electrical junction box so you can have the cables discretely routed under the shed floor, and outlets installed at the floor level.
Difficulty level: average to difficult
Cost: average
Best for:
- Flat ground
- Big and small slopes
- Soft and firm soil
- Small and large shed
- Indeed, there are no circumstances this won’t work.
Main drawback:
- May need to dig pretty deep in colder climates.
Tips:
-
Use landscape fabric and gravel to prevent growth under the shed.
-
Ensure the corner piers keep square. Watch that video we recommended earlier; it talks about squareness at the beginning.
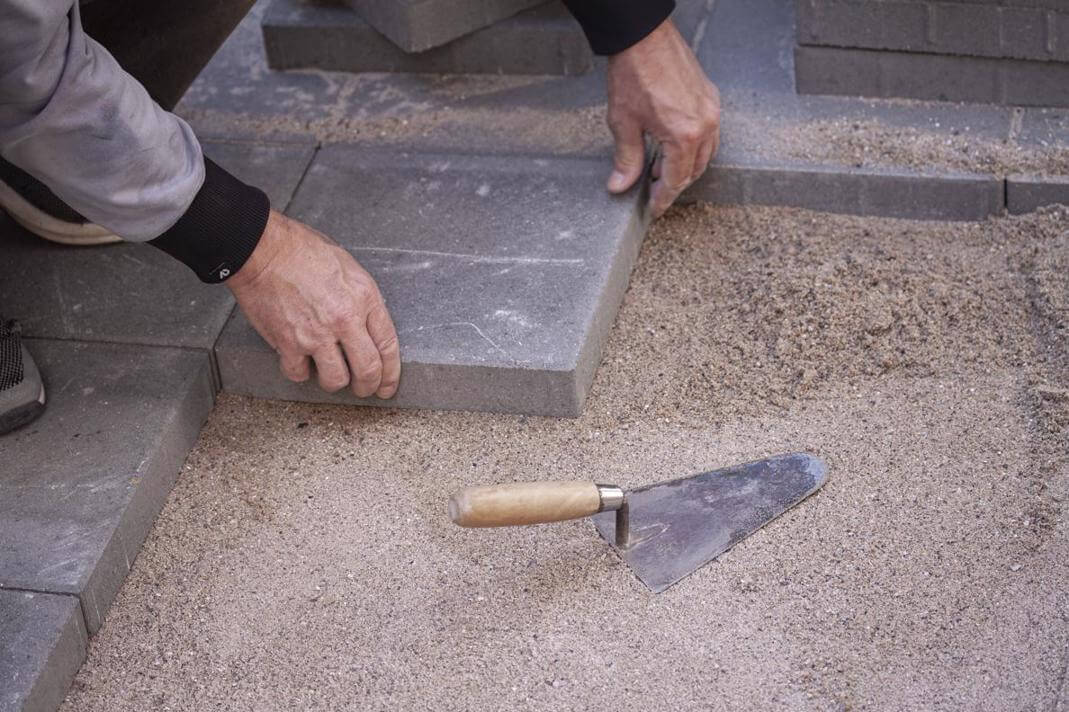
Concrete Slab Foundation
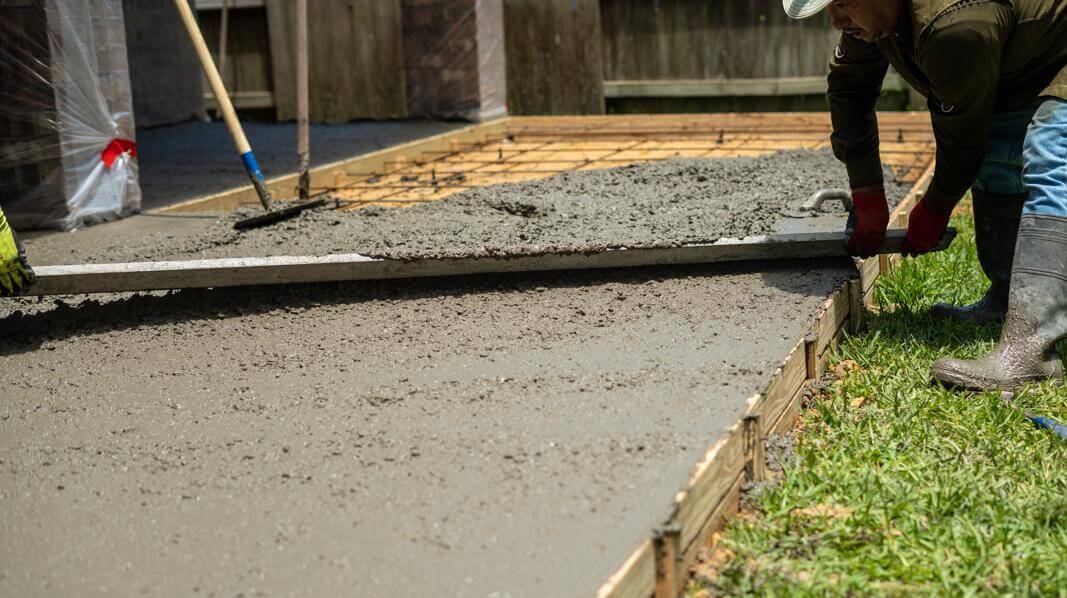
A truly permanent foundation option. And something that a beginner likely won’t be able to build, which makes it the most expensive option too.
You will need to pour it just as deep as the concrete piers, depending on the frost line in your area, so special machinery may be needed to excavate that much soil. Be prepared to do some serious landscaping if your frost line is deep!
Just like with the wood frame and gravel foundation, you will have to use pressure-treated skids for floor joists if your shed model does not come with the flooring.
Difficulty level: difficult
Cost: expensive (usually $1,000 and up)
Best for:
- Flat ground
- Small slopes
- Any soil type
- Any shed size
- Heavy loads
Not suitable for:
- Big slopes
Main drawback:
- May need to dig pretty deep in colder climates
- Can not be moved or dismantled easily
We’ll skip the tips since you’re either a pro or will be hiring one.
You May Need A Building Permit
Regardless of which foundation type you choose to build for your shed, make sure to check with your local building department whether you need a permit for your shed, or if there are any special requirements for the construction of the shed or foundation. Many municipalities that require building permits for sheds will also have restrictions on the foundation type. In some towns, you won’t need a permit for a shed, but you may need a permit for electrical work, and so on. So it’s always a good idea to contact your local building department to find out.
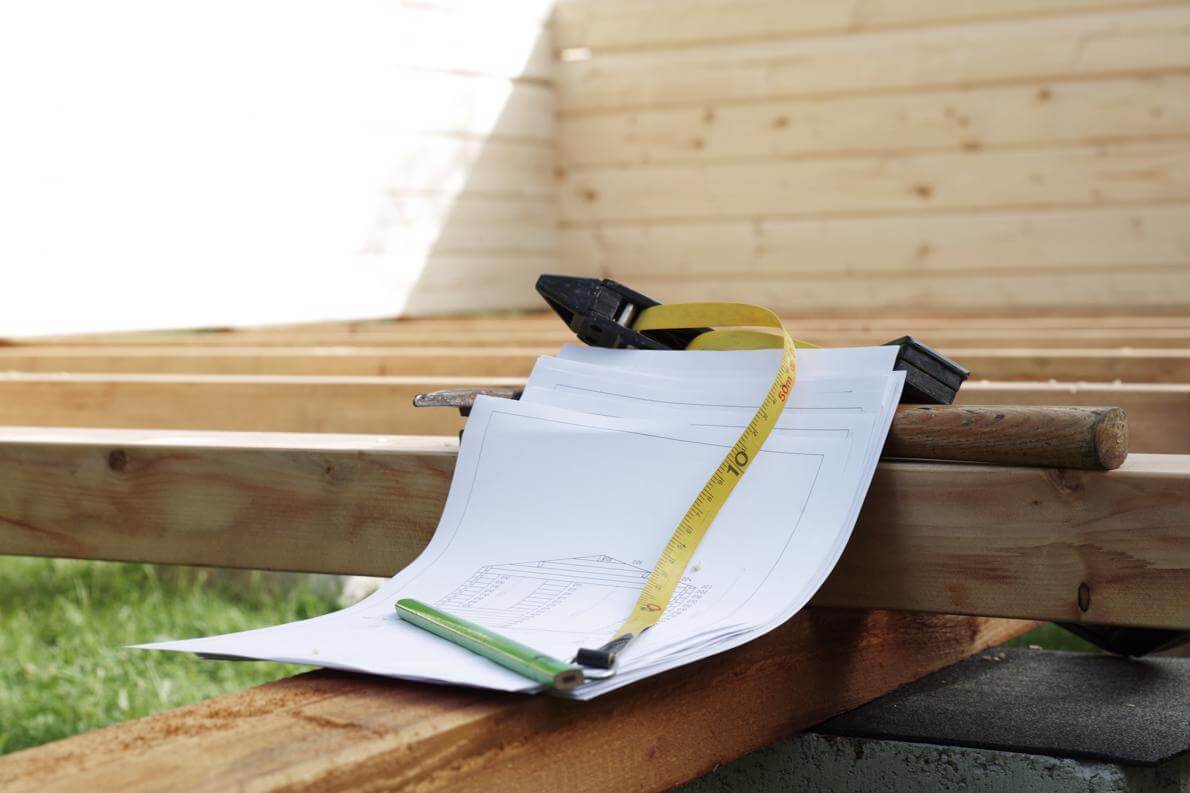
To be prepared for the call or visit to the building department, have a copy of the floor plan of the shed you are planning to build. The floor plan is available for download on each shed model page, next to the “measurements and technical information” on the desktop, or under the “measurements and technical information” on a mobile device. See the screenshot below.
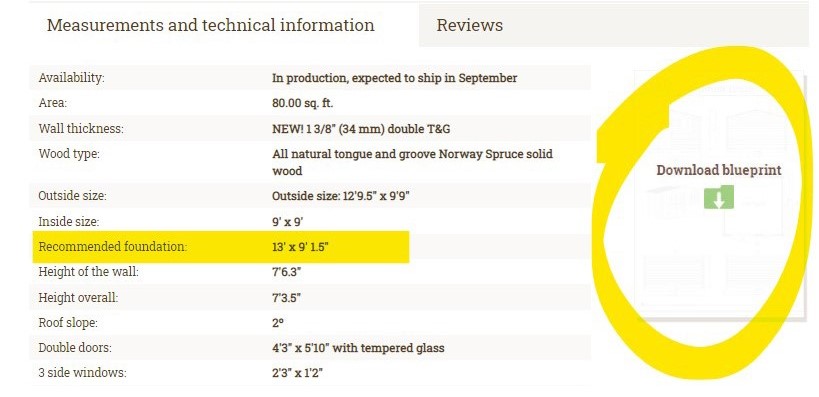
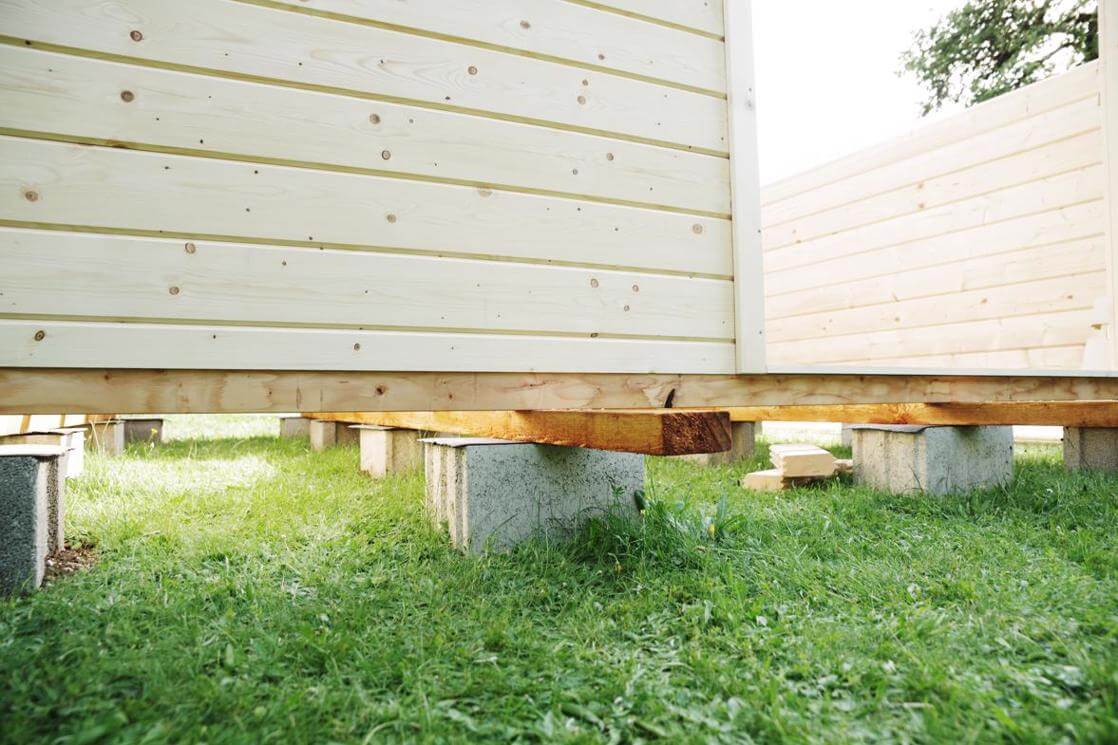
What Is "Recommended Foundation Size"?
You may notice that while our shed dimensions are 8 x 8, 10 x 10, etc., the recommended foundation size is smaller than the shed dimensions. Why is that? Take a look at the shed construction - the tongue and groove, log house style shed construction is held together by notches at the ends of boards interlocking perpendicular to each other. We call the board ends past the notch “paddles”. The recommended foundation size includes the shed area and wall thickness, without the paddles. This means the foundation sits flush with the perimeter of the exterior walls, allowing a continuous surface to extend all the way to the ground. See the photo example below.
There are two benefits of having the foundation made to recommended size:
- There is virtually no seam or surface for water to accumulate on, protecting the natural wood from getting into contact with soil and excessive moisture.
- This option is the most subtle aesthetically. You can design your landscaping without obstruction, or create a pathway around the shed as you please.
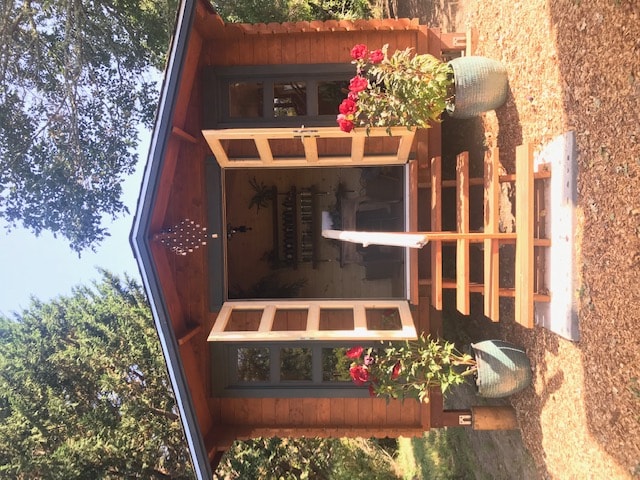
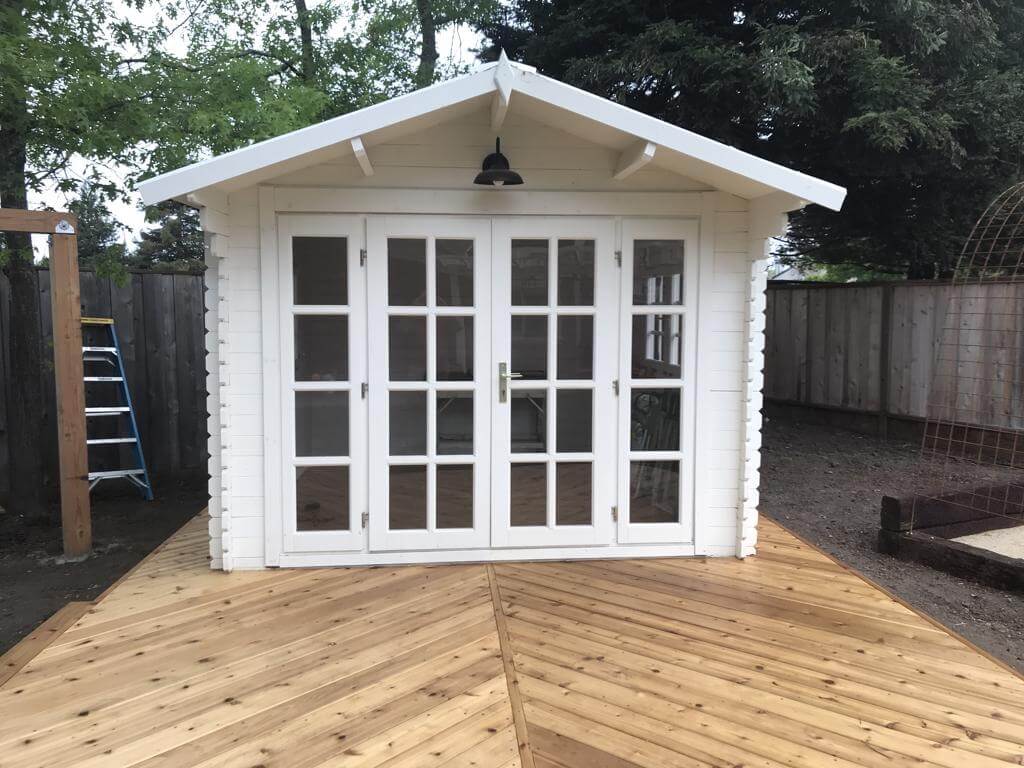
You can most certainly build a bigger foundation platform, especially if you are building a deck at the front. In that case, you can only add length to the depth of the recommended foundation size, which is always the second of the two numbers. For example, Aspen 12x10 garden shed is 12 ft wide at the front, and 10 ft deep, its recommended foundation size is 11’ 9 ¾” x 9’ 1 ½”. To add the deck at the front, you could build a foundation that’s 11’ 9 ¾” x 13’, which would give you 3’ 10½” worth of deck space. Or simply make a bigger than recommended foundation. See the photo below for illustration. This applies to any foundation type you build.
Recommended Foundation Size by Model
Below are listed our most popular garden and storage sheds with the foundation specifications. Each shows the diagram with measurements and a starter-row view on the foundation.
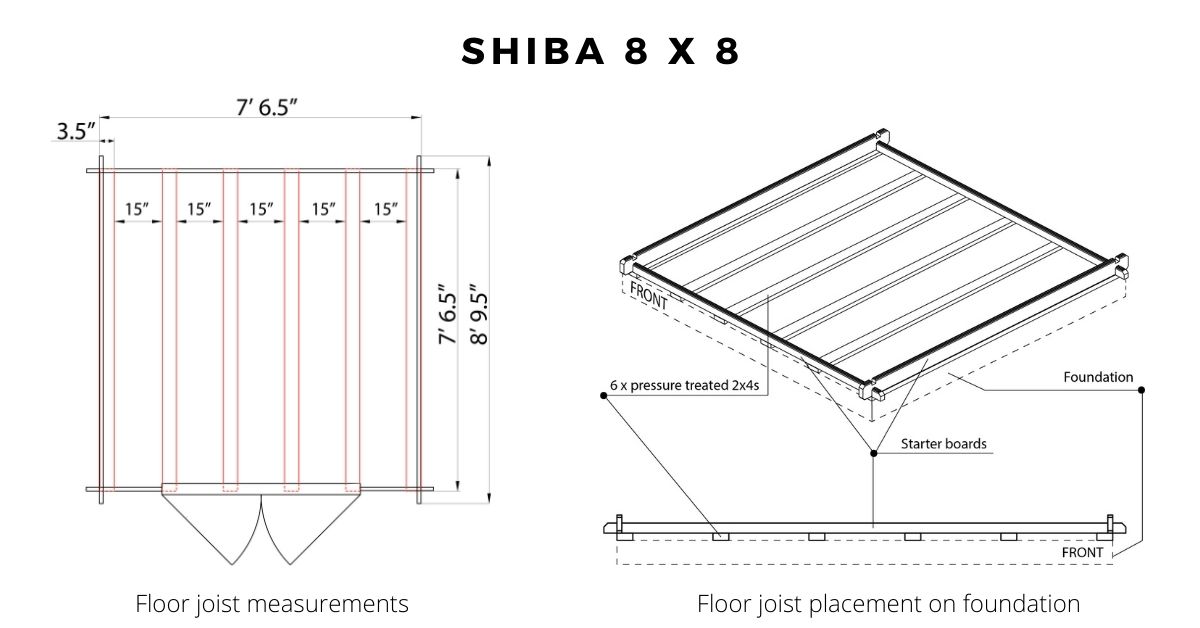
Shiba 8x8 storage shed
 Recommended foundation size: 7’ 6 ½” x 7’ 6 ½“
This shed model comes without flooring. If building on a foundation other than a treated wood frame, you will need to acquire 6 units of 8ft long pressure-treated 2x4s to put under the shed for floor joists, and shorten them to 7’ 6.5”. See the diagrams below. Alternatively, you may add a floor kit to your purchase, ask us about the availability.
For the floor, install plywood sheets inside the shed. Then, either leave it bare, or put in plank flooring, hardwood, carpet, or anything else that suits your application. If you are using your shed for storage, an OSB board is typically sufficient.
If you wish to build your shed directly on the concrete slab, you must lay down a barrier between the concrete and the natural wood starter boards, such as pressure-treated 2x2s under the perimeter of the wall boards.
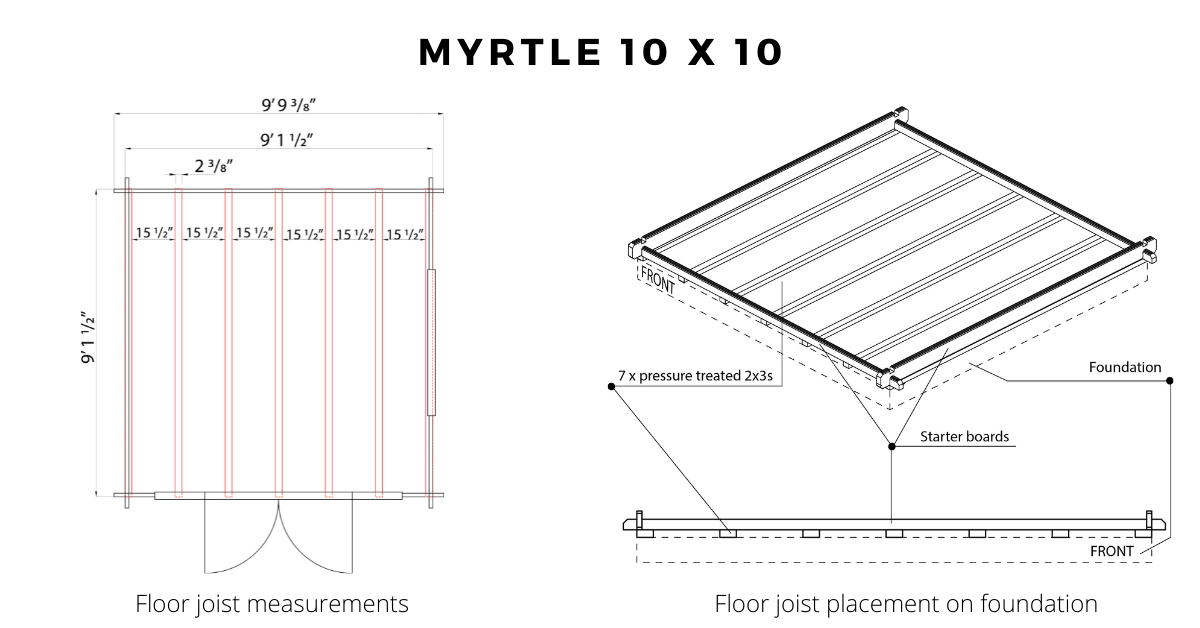
Myrtle 10x10 garden shed
 Recommended foundation size: 9’ 1 ½” x 9’ 1 ½”
This shed model comes with tongue and groove spruce flooring and can be built on any of the foundation types listed above. If building on any option using a treated wood frame, skip the floor joists supplied and assemble your shed directly on the wood foundation.
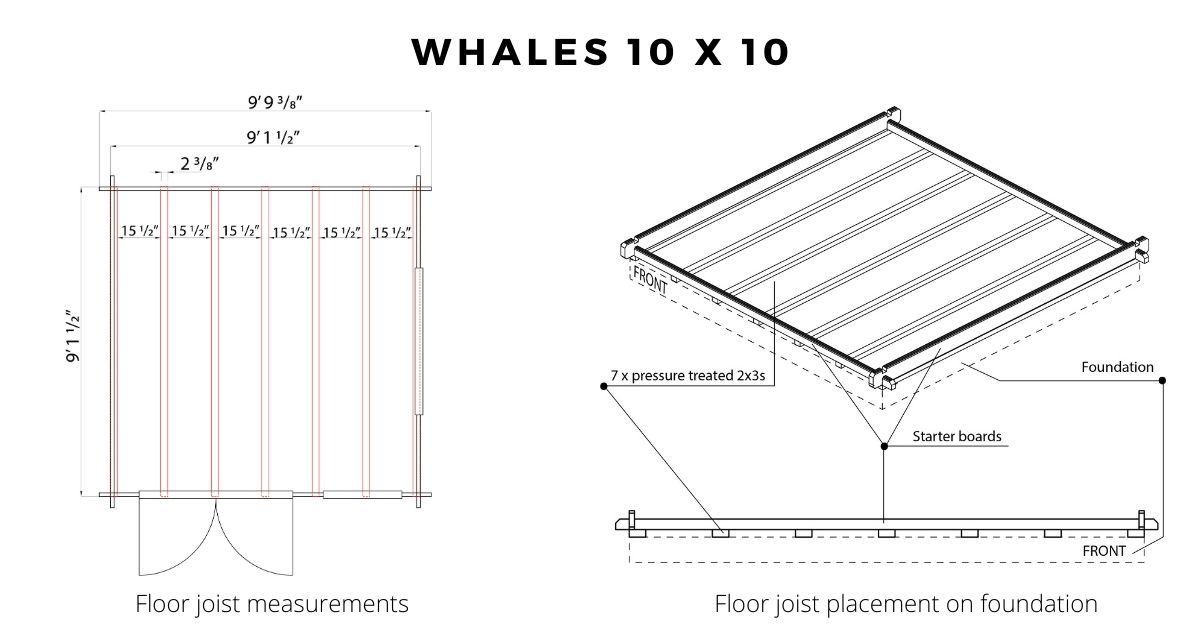
Whales 10x10 garden shed
 Recommended foundation size: 9’ 1 ½” x 9’ 1 ½”
This shed model comes with tongue and groove spruce flooring and can be built on any of the foundation types listed above. If building on any option using a treated wood frame, skip the floor joists supplied and assemble your shed directly on the wood foundation.
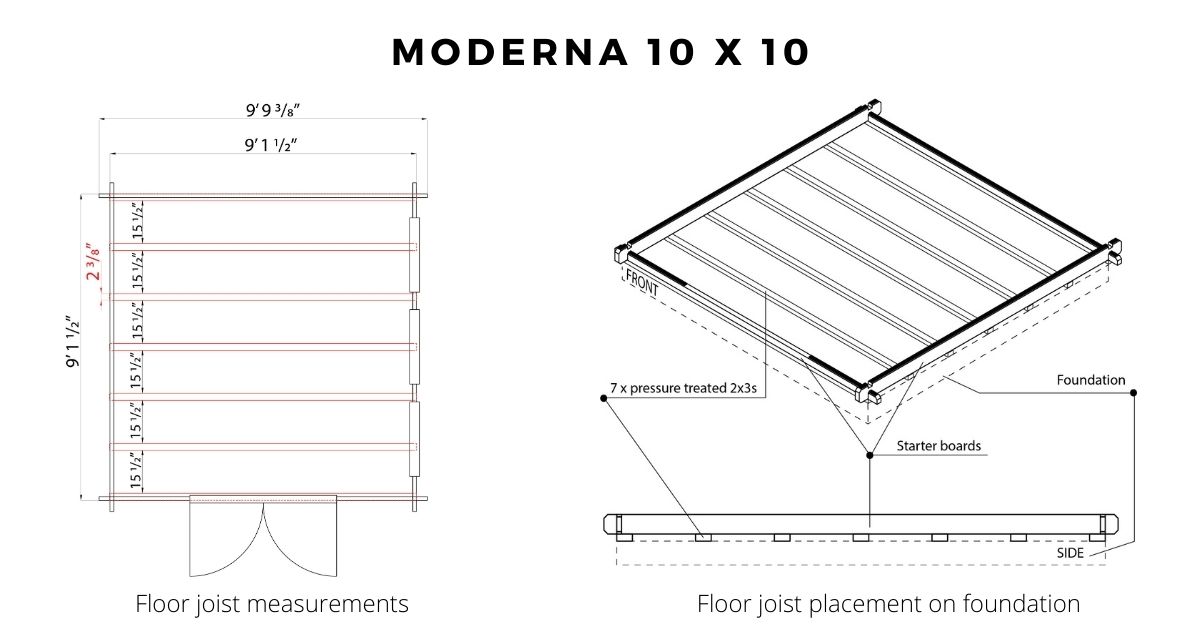
Moderna 10x10 modern garden shed
 Recommended foundation size: 9’ 1 ½” x 9’ 1 ½”
This shed model comes with tongue and groove spruce flooring and can be built on any of the foundation types listed above. If building on any option using a treated wood frame, skip the floor joists supplied and assemble your shed directly on the wood foundation.
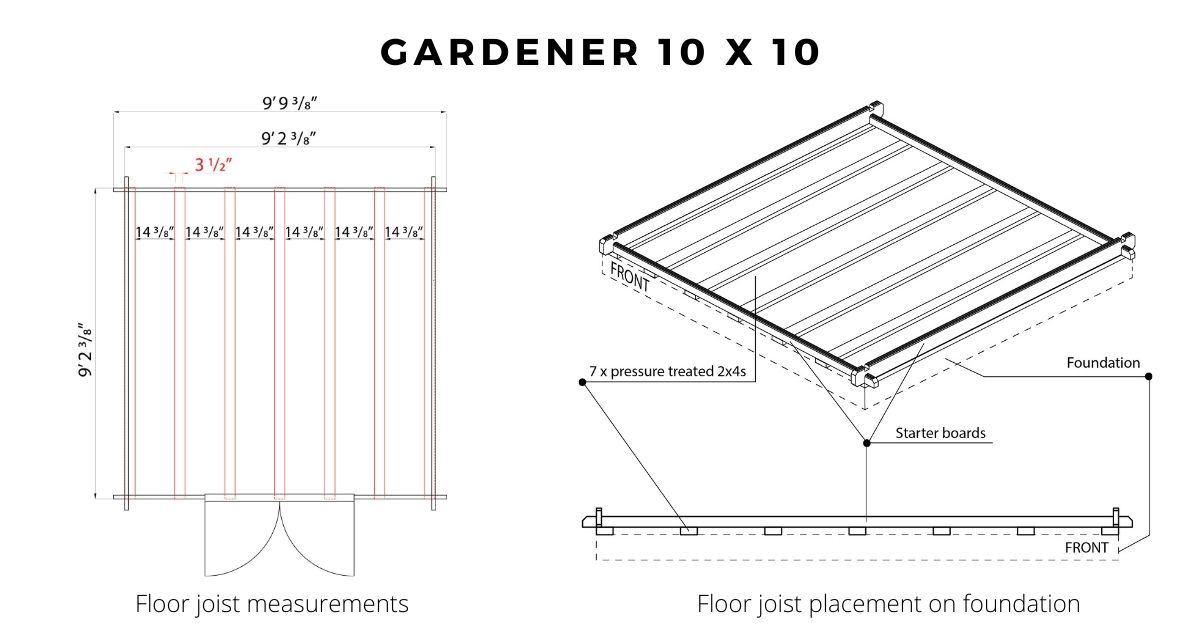
Gardener 10 x 10 storage shed
 Recommended foundation size: 9' 2 3/8" x 9' 2 3/8"
This shed model comes without flooring. If building on a foundation other than a treated wood frame, you will need to acquire 7 units of 10 ft long pressure-treated 2x4s to put under the shed for floor joists, and shorten them to 9’ 2 3/8”. See the diagrams below. Alternatively, you may add a floor kit to your purchase, ask us about the availability.
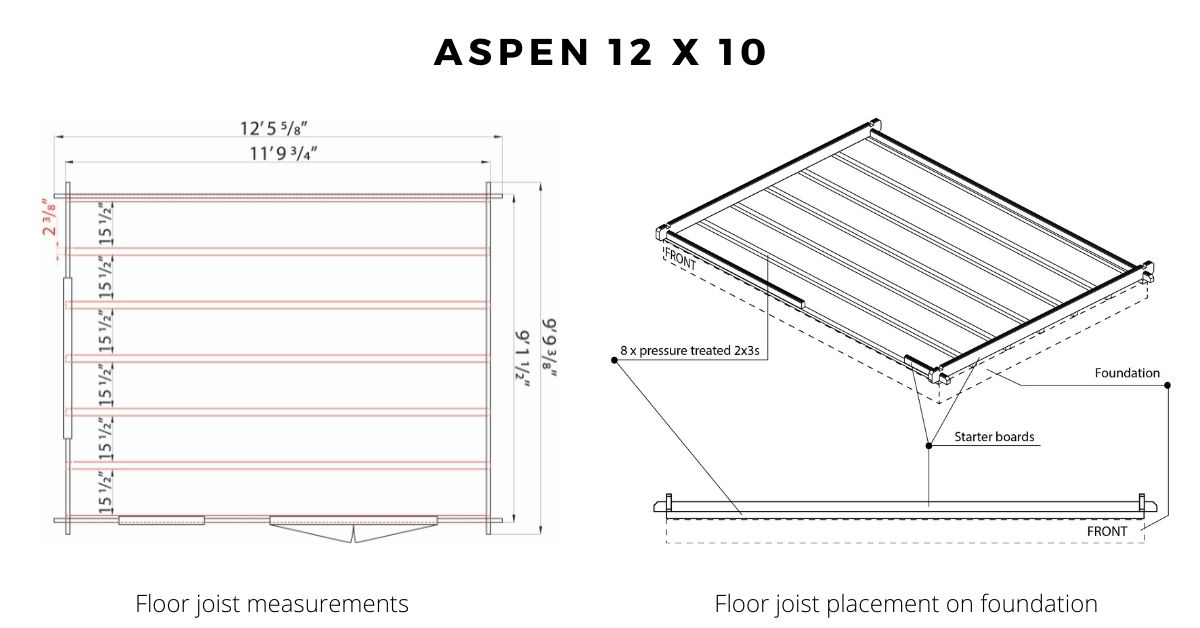
Aspen 12 x 10 garden shed
 Recommended foundation size: 11' 9 3/4" x 9' 1 1/2"
This shed model comes with tongue and groove spruce flooring and can be built on any of the foundation types listed above. If building on any option using a treated wood frame, skip the floor joists supplied and assemble your shed directly on the wood foundation.
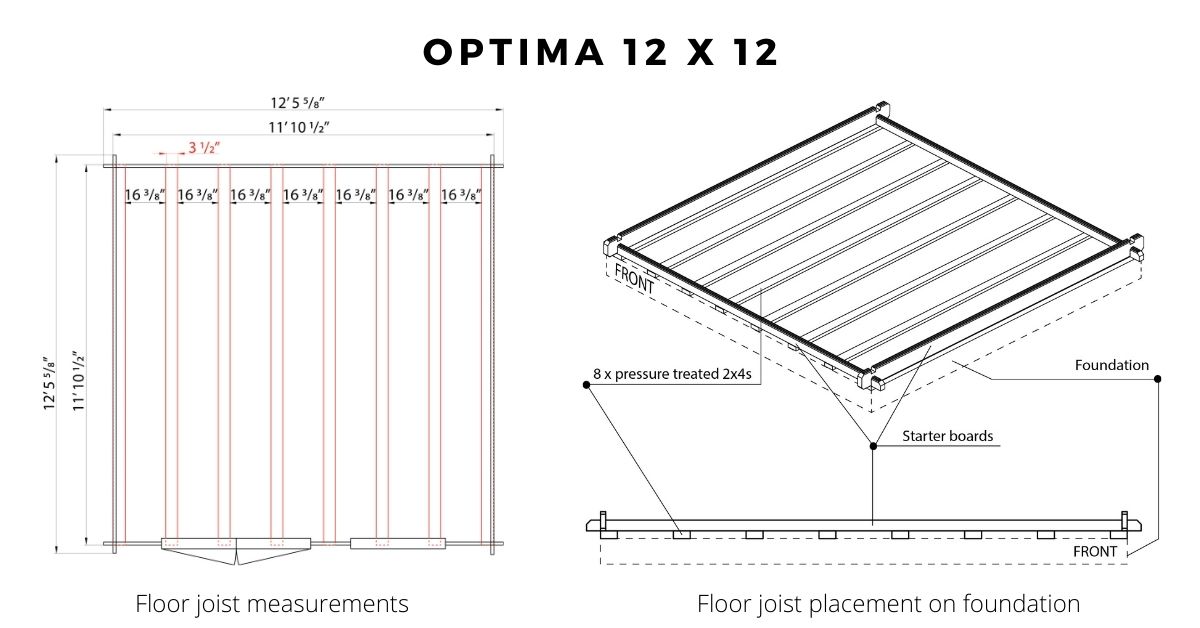
Optima 12 x 12 storage shed
 Recommended foundation size: 11' 10 1/2" x 11' 10 1/2"
This shed model comes without flooring. If building on a foundation other than a treated wood frame, you will need to acquire 8 units of 12 ft long pressure-treated 2x4s to put under the shed for floor joists, and shorten them to 11’ 10.5”. See the diagrams below. Alternatively, you may add a floor kit to your purchase, ask us about the availability.
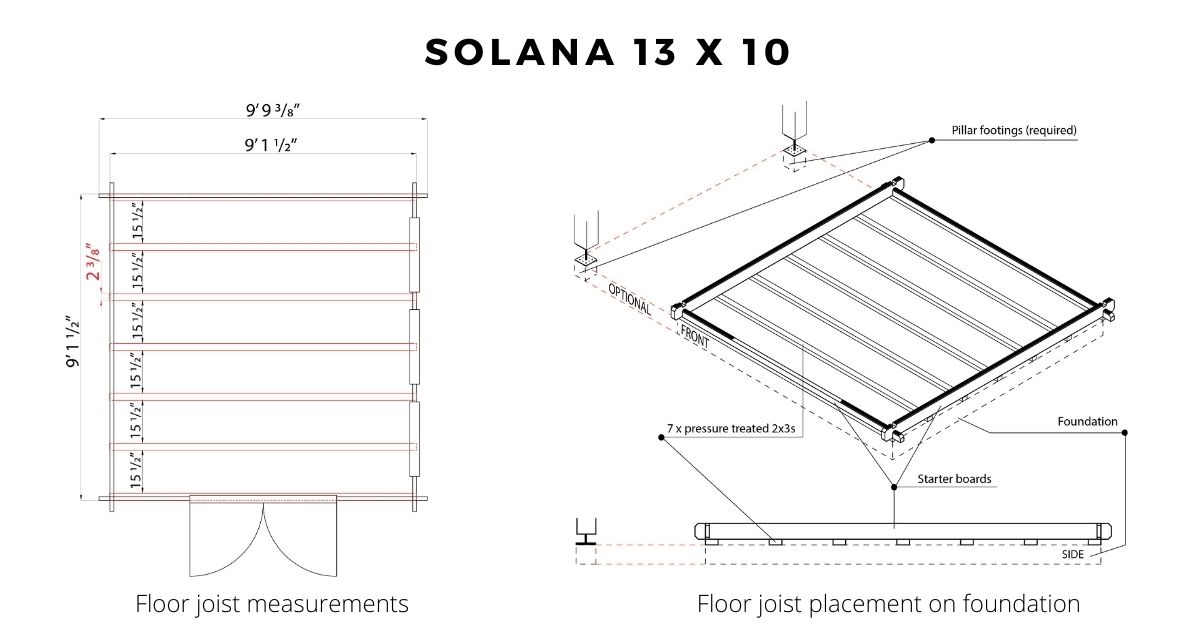
Solana 13 x 10 modern garden shed
 Recommended foundation size: 9’ 1 1/2" x 12’ 5 1/2” or 9’ 1 1/2” x 9’ 1 1/2” & 2 pillar footings 4” x 2 3/4”
This shed model comes with tongue and groove spruce flooring and can be built on any of the foundation types listed above. There are two options for sizing foundation for this shed model - you may either construct a single platform that accommodates shed body and the pillars, or have a fitted foundation for the shed body and two footings for the pillars. If building on any option using a treated wood frame, skip the floor joists supplied and assemble your shed directly on the wood foundation.
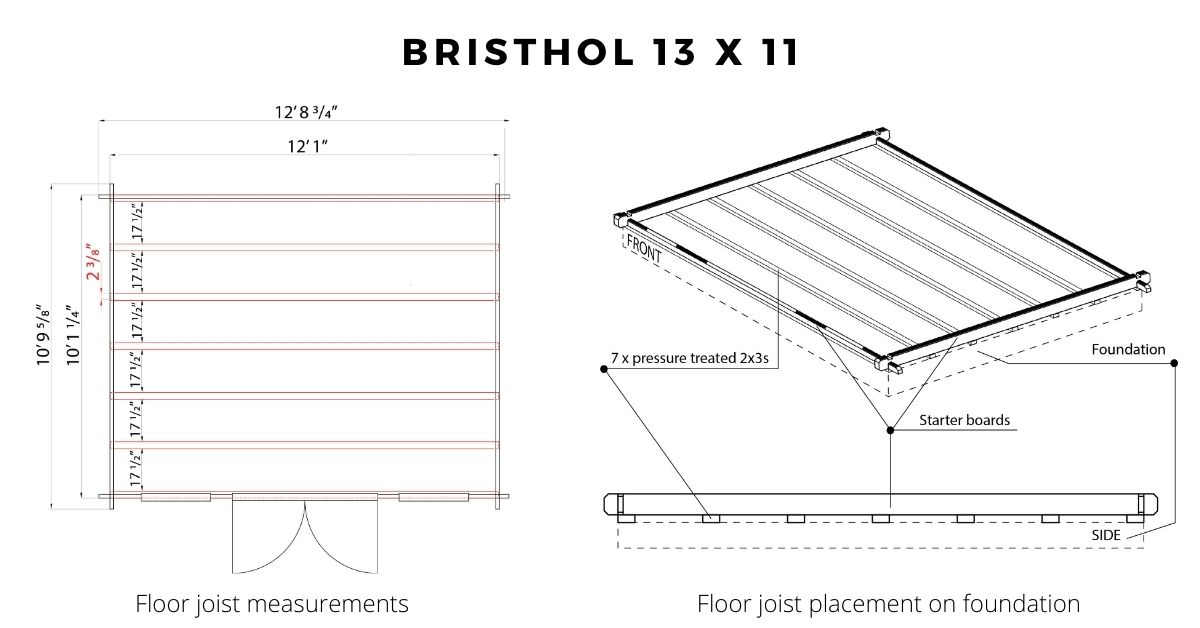
Bristhol 13 x11 garden shed
 Recommended foundation size: 12' 1" x 10' 1 1/4"
This shed model comes with tongue and groove spruce flooring and can be built on any of the foundation types listed above. If building on any option using a treated wood frame, skip the floor joists supplied and assemble your shed directly on the wood foundation.
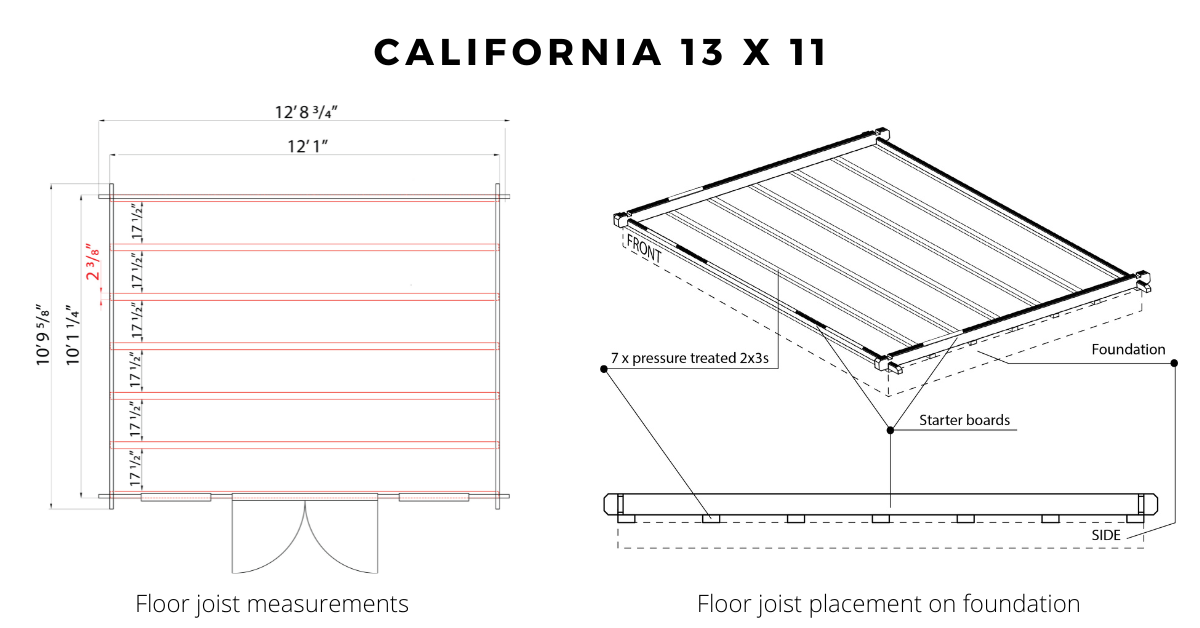
California 13 x11 garden shed
 Recommended foundation size: 12' 1" x 10' 1 1/4"
This shed model comes with tongue and groove spruce flooring and can be built on any of the foundation types listed above. If building on any option using a treated wood frame, skip the floor joists supplied and assemble your shed directly on the wood foundation checking that your foundation beam spacing matches the original floor joist spacing. You may install a subfloor (such as plywood or OSB board) directly on your foundation platform. In this case, foundation beam spacing does not need to match the original floor joist spacing.
Foundation Related Questions and Answers
Should I put any underlayment under the floor?
You can, as a precautionary measure, but it’s not necessary as floor joists allow the air to circulate under the shed. If you use plywood as subfloor, it is chemically treated to contain moisture barrier-like qualities.
You can, as a precautionary measure, but it’s not necessary as floor joists allow the air to circulate under the shed. If you use plywood as subfloor, it is chemically treated to contain moisture barrier-like qualities.
What can I do to cover the gap between the floor joists?
The most common way to cover the gap is using a fine wire mesh which protects from fallen leaves getting under the shed, potential nesting location for critters and still allows plenty of air circulation.
If you insulate between the floor joists, the open ends between the floor joists should have wood slats as brackets enclosing the insulation material, which also eliminates the gap underneath.
What type of foundation is the best for SolidBuild shed kits?
All foundation types listed above are great. Choose based on your preferred shed site, budget and confidence level if you’re doing it yourself.
All foundation types listed above are great. Choose based on your preferred shed site, budget and confidence level if you’re doing it yourself.
What type of flooring can I install for the sheds that don’t come with the T&G floor kit?
From what our customers have shared, the most common approach is laminate flooring on a plywood base. Plywood or any other flat base is required for any type of flooring you choose, so it goes:
- Foundation
- Floor joists (pressure treated 2x4s)*
- Plywood or other flat wood base
- Flooring of your choice
Notice the star (*) by the #2. You will only need the floor joists if you are building on some other foundation that treated wood, such as concrete pavers or concrete slab. When building on a treated wood frame, no matter what’s supporting it, you can put the plywood directly on the foundation. And if you are building on a wooden deck, you could even keep the deck as your floor!
IMPORTANT! If you’d like to keep the concrete slab as your floor, you still need a barrier between the first row of the shed walls and the concrete to ensure the natural wood is not in direct contact with the concrete. For that, you can put pressure treated 2x2s just under the perimeter of the walls, anchor those to the concrete with Tapcon screws, and then anchor the starter boards (first row of wall boards) to the 2x2s.
Are there any questions left unanswered? Email us at info@solidbuildwood.com. We’ll happily answer them, and add them to this list.