
A door that rubs, won't latch, or sits crooked can almost always be fixed with an Allen wrench, by adjusting the hinges. No cutting, planing or extra parts are needed.
Double doors often need a small tweak after assembly, and sometimes again as the seasons change. Solid wood swells in damp months and shrinks in dry ones, and a new shed settles on its foundation over its first weeks. That's why every door panel hangs on three adjustable hinges.
Allen wrench
One that fits the hinge screws.
A helper
To lift the door panels off and back on.
Your phone
For a "before" photo from the outside.
Two words used in this guide. Viewed from outside, one door panel is the fixed panel: it has the slide bolts that lock into the frame at the top and bottom. The other is the active panel: it has the handle and opens day to day.
First things first
Before you start: check the door frame
Hinges can only correct a door that hangs in a straight frame. If the frame itself leans, fix that first, or you'll be chasing the problem from hinge to hinge.
- Check the sides with a level. Hold a level against each vertical side of the door frame. On both sides the bubble should sit in the center.
- Measure the diagonals. Measure inside the frame from the top-left corner to the bottom-right corner, then from the top-right to the bottom-left. If the two numbers match, the frame is square.
- If it's out of square, move the frame back. The level shows which way it leans. Push the top of the frame the opposite way, or the bottom of the frame toward the lean. If it won't budge by hand, tap it with a rubber mallet, using a scrap of wood to protect the frame.
- Check again, then look at the doors. Repeat until both sides read level and the diagonals match. Often a very small shift of the frame brings everything into line, with no hinge adjustment needed.
- Frame square and plumb? Then go on to the hinges. If the frame keeps springing back out of square, send us a photo and we'll help you shim it.
Two more things to check first:
- Has the shed settled? If the shed is newly built, give it a few weeks to settle before fine-tuning.
- Is the frame screwed to the walls? The door frame is designed to float with the wall boards. Extra screws that pin it in place can pull it out of square as the wood moves.
The hardware
Meet your hinges
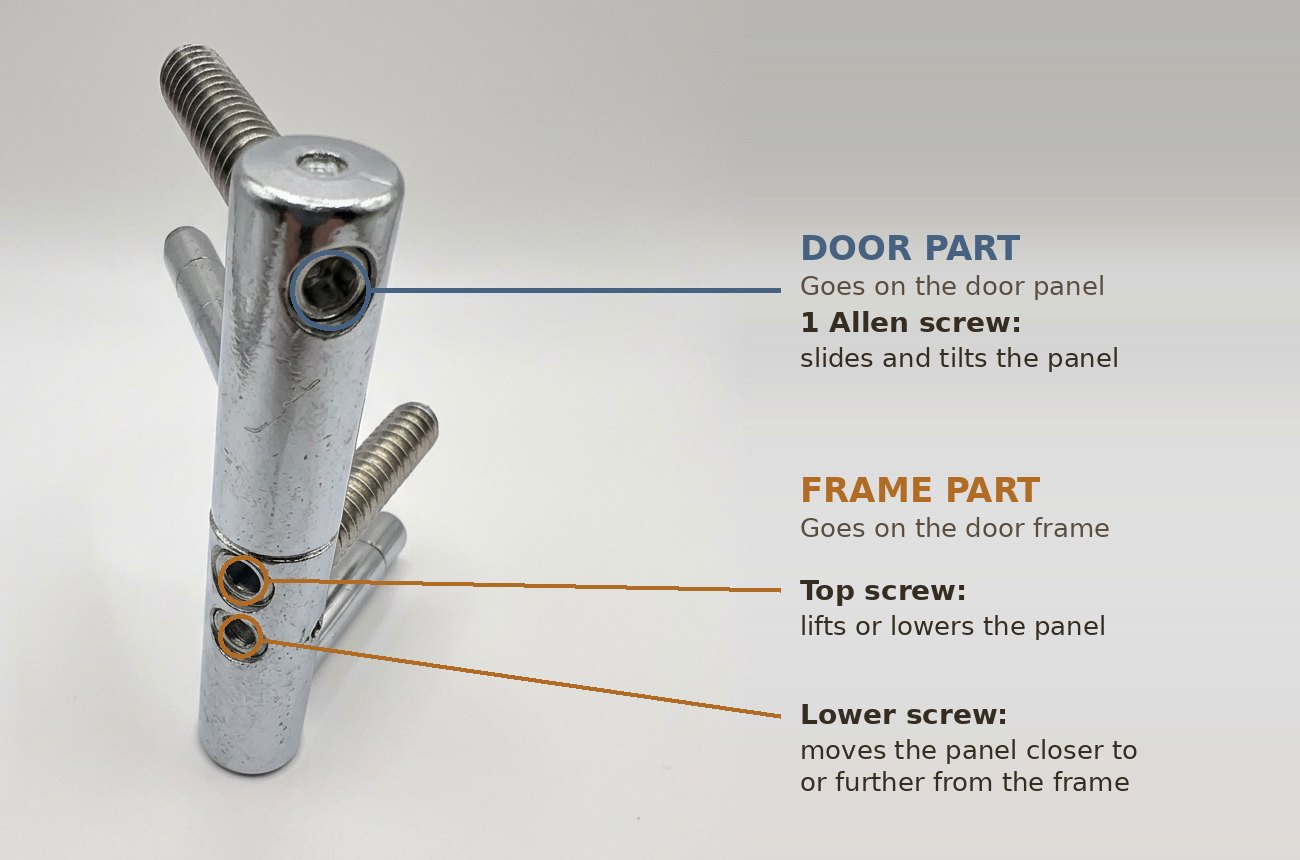
Each panel hangs on 3 hinges, and every hinge has two halves that slot together on a pin. Both halves adjust with an Allen wrench.
Door part
Sits on the edge of the door panel and has one Allen screw. It slides the panel sideways, and tilts it when the three are turned by different amounts.
Frame part
Sits on the door frame and has two Allen screws. The top screw lifts or lowers the panel. The lower screw moves the panel closer to or further from the frame, which is rarely needed.
Which way to turn
Turn one full turn at a time, and count.
Let outcounterclockwiseThat corner moves toward the middle
Screw inclockwiseThat corner moves toward the frame
TightenclockwiseThe whole panel goes up
LoosencounterclockwiseThe whole panel goes down
Tighten (clockwise): the panel moves closer to the frame. Loosen (counterclockwise): it moves away.Rarely needed. Small turns, all 3 hinges by the same amount.
Most crooked doors are fixed with the door parts alone. The frame parts are for a panel that hangs too low or too high as a whole, or rubs the frame on its hinge side.
Diagnose
Find your problem
Close the doors, step back, and look at them from the outside. Find the line below that matches what you see. "Let out" means turning the door part's Allen screw counterclockwise. "Screw in" means turning it clockwise.
| What you see | Adjust | What to do (starting point) |
|---|---|---|
| Doors don't latch, or there's a big gap in the middle that's even from top to bottom | Door parts | Let out all 3 door parts on the panel by the same amount, 1 full turn each. If both panels are off, do both. |
| Doors pinch or rub where they meet in the middle | Door parts | Screw in all 3 door parts on the panel by the same amount, 1 full turn each. |
| The middle gap is wider at the top than at the bottom | Door parts | Let out the top door part 1 full turn and the middle one ½ turn. Leave the bottom. |
| The middle gap is wider at the bottom than at the top | Door parts | Let out the bottom door part 1 full turn and the middle one ½ turn. Leave the top. |
| One panel's inner edge sits lower than the other's (the tops don't line up, or it scrapes the floor near the middle) | Door parts, low panel | Pivot it up: let out the bottom door part 1–2 turns, the middle one half as much, and screw in the top one 1 turn if needed. |
| One panel's inner edge sits higher than the other's | Door parts, high panel | Pivot it down: screw in the bottom door part 1–2 turns, let out the top one the same amount, leave the middle. |
| A whole panel sits too low, or rubs along the bottom, even though the gap is straight | Frame parts, top screw | Turn the top screw on all 3 frame parts on that side clockwise, the same number of turns each. This lifts the panel. |
| A whole panel sits too high, or rubs the top of the frame | Frame parts, top screw | Turn the top screw on all 3 frame parts on that side counterclockwise, the same number of turns each. |
| A panel rubs the frame on its hinge side, or sits too far from it | Frame parts, lower screw | Rarely needed, so rule out the door parts first. Tighten the lower screw (clockwise) to bring the panel closer to the frame; loosen it to move the panel away. Small turns, all 3 by the same amount. |
| The slide bolts on the fixed panel don't line up with their holes | The door frame | Check the door frame first. |
The turns above are a starting point. If the door is only a little off, use less. If it's still off after re-hanging, repeat in the same direction.
The fix
Step by step
Work in this order: tilt first, then the gap, then the height. Each step changes what the next one needs, so fixing them in order saves you from undoing your own work.
Step 1. Take a "before" photo
Close the doors and photograph them from the outside, facing them straight on, with the whole door frame and all 6 hinges in the shot. Note which panel is off, and where the gap is widest.
Step 2. Straighten the tilt (door parts)
- With a helper, lift the panel straight up and off its hinges. Set it on its side on a clean surface.
- Turn each door part by the amount from the table. Count the turns out loud and write them down.
- Hang the panel back on, close the doors, and look again.
- Still tilted? Repeat with smaller amounts (½ turn at a time). Overshot? Back out by one turn.
Dashed outline: before. Solid: after. The tilt is exaggerated so you can see it.
Step 3. Close or open the gap (door parts)
Once both panels hang straight, even out the gap where they meet. Take the panel off and turn all 3 of its door parts by the same number of turns: let out to bring it closer to the other panel, screw in to move it away. If the gap is large, split the difference between both panels.
Aim for a gap of ⅛" to ¼" between the panels. In a damp climate, or going into fall and winter, stay closer to ¼": the doors will swell a little.
Step 4. Set the height (frame parts)
Only needed if a panel still sits lower or higher than the other, or rubs the floor or the top of the frame. The door can stay on for this. Support its weight with your foot under the bottom corner while you turn.
Turn the top screw on each frame part clockwise to lift the panel, counterclockwise to lower it. Give all 3 hinges on that side the same number of turns, so they share the weight evenly.
Rarely, a panel rubs the frame on its hinge side or sits too far from it. Only then use the lower screw: tightening it (clockwise) brings the panel closer to the frame, loosening moves it away. Go carefully: small turns, all 3 hinges by the same amount, and check after each round.
Step 5. Lock it in
When the doors close and latch easily, slide the bolts on the fixed panel into their holes at the top and bottom. The holes come predrilled. If a bolt no longer lines up with its hole after the hinge adjustments, you can drill a new hole where the bolt lands. Remove the metal bracket around the hole first, then put it back over the new hole. Engaging the bottom bolt also pulls the doors together for a better seal.
Good habits
Steps to make it easy
- Count every turn and write it down. Uncounted turns are how a quick fix turns into a guessing game.
- Small steps. No more than 1 full turn per hinge per round. Re-hang the door and check after every round.
- Equal turns move, unequal turns tilt. The same turns on all 3 door parts slide the panel sideways. Different turns pivot it.
- Frame parts always move together. All 3 on one side get the same number of turns, or one hinge ends up carrying the whole door.
- Door parts: door off. Frame parts: door on, supported.
- Sealing a gap. If you want a tighter seal after adjusting, add thin peel-and-stick weatherstripping (¼" thick or less) to the meeting edge of one panel only. Foam that makes the doors hard to close is too thick.
Don't cut or plane the doors. If a door still just barely scrapes after the hinges are set, lightly sand that spot on the edge. That's the last resort, not the first.
We're here to help
Still stuck? Send us one photo
We're happy to look at your door and mark up exactly which hinges to turn and by how much. To make that possible, please send a photo that is:
- Taken from the outside, with the doors closed
- Facing the doors straight on, not at an angle
- Showing the whole door frame and all 6 hinges
- Sharp and full-resolution (sent as an attachment, not a screenshot)
Email it to info@solidbuildwood.com or call 1 (800) 590-2508 ext. 1. If you'd rather be talked through it, we can also set up a video call.
Common questions
Door adjustment questions and answers
Why are my shed doors crooked after assembly?
Solid wood moves. It swells in damp months, shrinks in dry ones, and a new shed settles on its foundation over its first weeks. A door frame that has been pushed slightly out of square will also make the doors sit crooked. In nearly every case the doors can be brought back into line with the frame check and hinge adjustments in this guide.
Do I need to take the door off to adjust the hinges?
For the door part of the hinge (the half on the door panel), yes: lift the panel off its hinges, turn the Allen screw, and hang it back on. The frame part (the half on the door frame) can be adjusted with the door on. Support the door's weight with your foot while you turn.
Which way do I turn the hinge screws?
Door part: counterclockwise lets it out and moves that corner of the panel toward the middle; clockwise screws it in and moves that corner toward the frame. Frame part, top screw: clockwise lifts the panel, counterclockwise lowers it. Frame part, lower screw: clockwise brings the panel closer to the frame, counterclockwise moves it away. The lower screw is rarely needed.
How big should the gap between the two doors be?
Aim for 1/8" to 1/4". In a damp climate, or going into fall and winter, stay closer to 1/4", because the doors will swell a little.
Can I plane or cut the door to make it fit?
Please don't. Adjust the hinges first. If a door still just barely scrapes after the hinges are set, lightly sand that spot on the edge. That is the last resort, not the first.
Are there any questions left unanswered? Email us at info@solidbuildwood.com. We'll happily answer them, and add them to this list.