
We recommend a ductless mini split, or a window AC unit set in its own framed opening in the wall, never in a shed window. Both cool well only when the roof is insulated and the unit has a proper power supply. Both are fixed the way everything is fixed to a log wall: tight in one board, or hand-tight in slots, so the boards can slide.
Mini split or window unit?
Choose a mini split if you use the shed all year as an office or studio: it heats as well as cools, it is quiet, and it costs less to run. Choose a window unit if you only need cooling and want to spend less up front.
| Mini split | Window unit in its own opening | |
|---|---|---|
| Cools | Yes | Yes |
| Heats | Yes, as a heat pump. Ours works down to about 5°F outside. | No. Pair it with a space heater for winter. |
| Noise inside | Quiet: the compressor is outside. | Louder: the compressor is in the unit. A 5,000 BTU unit runs at about 52-55 dBA. |
| Running cost for heating and cooling* | About $170-$330 a year | About $340-$775 a year, with a space heater |
| To buy | See our product page for today's price. Installed by a contractor, about $3,000 is typical. | Small window units start at about $160. A model approved for a wall can cost more. |
| Power | Wired to its own 115 V circuit on a 20 A breaker | Plugs into an outlet of its own. A 5,000 BTU unit draws about 4 A. |
| Holes in the wall | One pipe hole, 3-1/2" | One opening, about 20" x 17" for a small unit |
| Work on the shed | A plywood backer on a French cleat or slots, the pipe hole, a pad outside | Cut the opening, build a U frame, fit two brackets outside |
*Our California used as a home office 50 hours a week, roof and floor insulated, in a hot, a mild and a cold US climate, at $0.18 per kWh. From our insulation guide.
A portable AC works too, but it needs a hole of about 4-5" in the wall for its exhaust hose, and it takes up floor space.
What size
For a window unit, start from the ENERGY STAR sizing chart: 5,000 BTU for up to 150 sq ft, and 6,000 BTU for 150-250 sq ft. Add 10% for a very sunny spot, take off 10% for heavy shade, and add 600 BTU for each person beyond two who uses the shed regularly.
| Model | Floor area inside | Window unit, from the chart |
|---|---|---|
| Shiba | 53 sq ft | 5,000 BTU, the smallest size made |
| Moderna, Whales, Myrtle | 79 sq ft | 5,000 BTU |
| Gardener | 81 sq ft | 5,000 BTU |
| Aspen | 103 sq ft | 5,000 BTU |
| California, Astoria, Bristhol | 117 sq ft | 5,000 BTU |
| Optima | 135 sq ft | 5,000 BTU |
| Washington | 191 sq ft | 6,000 BTU |
The chart is for a room in a house. Our walls are not insulated, so take the next size up if the shed stands in full sun, if its roof is not insulated, or if more people work in it.
Check that the unit's manual allows a wall installation (see "Window unit" below). If no small model does, choose a larger one that does and still weighs no more than 40 lb (50 lb on 1-3/4" walls; see "Window unit" below). If none does, choose a mini split.
For a mini split, the smallest MRCOOL DIY unit, 9,000 BTU on 115 V, is rated for up to 400 sq ft, more than any of our sheds.
What is different in a log shed
Three things make a SolidBuild shed different from a room in a house.
- The walls settle. The walls are solid wood boards stacked on top of each other, with no studs. In the first 2 weeks or so the boards seat into each other. Then the wood dries for up to a year, and a full-height wall drops by up to 2". After that it moves about 1/4" to 3/8" a year with the humidity. So nothing rigid may pin the boards together: not an AC frame, not a mounting plate, not a pipe cover, not a conduit.
- The walls are thin. They are 1-1/8" to 1-3/4" of solid wood. A 1-3/8" wall insulates about as well as R-2, a small part of what an insulated house wall gives. It is strong enough for an AC unit when the unit is hung the right way. It also means a window unit's side vents end up outside the wall, where they must be.
- The roof takes the sun. Most of the heat comes in through the roof, so insulate the roof first.
The rule for every part in this guide is the one in our shelf guide:
- Screw anything tight into one wall board only. That board moves down with the wall, so no boards are pinned together.
- If a bracket or strip has to reach over several boards, screw only its top end tight, into one board. Put each of its other screws through a vertical slot, with a washer, hand-tight, so the boards can slide behind it. The wind studs on your shed work this way.
- Never glue, foam or caulk anything to the wall boards, and never fix anything rigid from the floor to the roof.
Tight means you drive the screw until its head pulls the part firmly against the wall. Hand-tight means you drive the screw until its washer just touches the wood, then stop: you can still turn the washer with your fingers. The wind studs are the long upright wood strips bolted to the walls under the gables, near the corners: tight at the top bolt, hand-tight in the slots below.
You do not need to wait for the walls to settle before you install the AC. Our warranty does not cover gaps or splits caused by anything that pins boards together.
Insulation: roof first, then the floor
An AC in an uninsulated shed runs hard and still falls behind on a sunny day. Insulate the roof and the floor, and leave the walls as they are. With the roof and floor insulated, customers report the shed stays comfortable from about 20°F to 100°F.
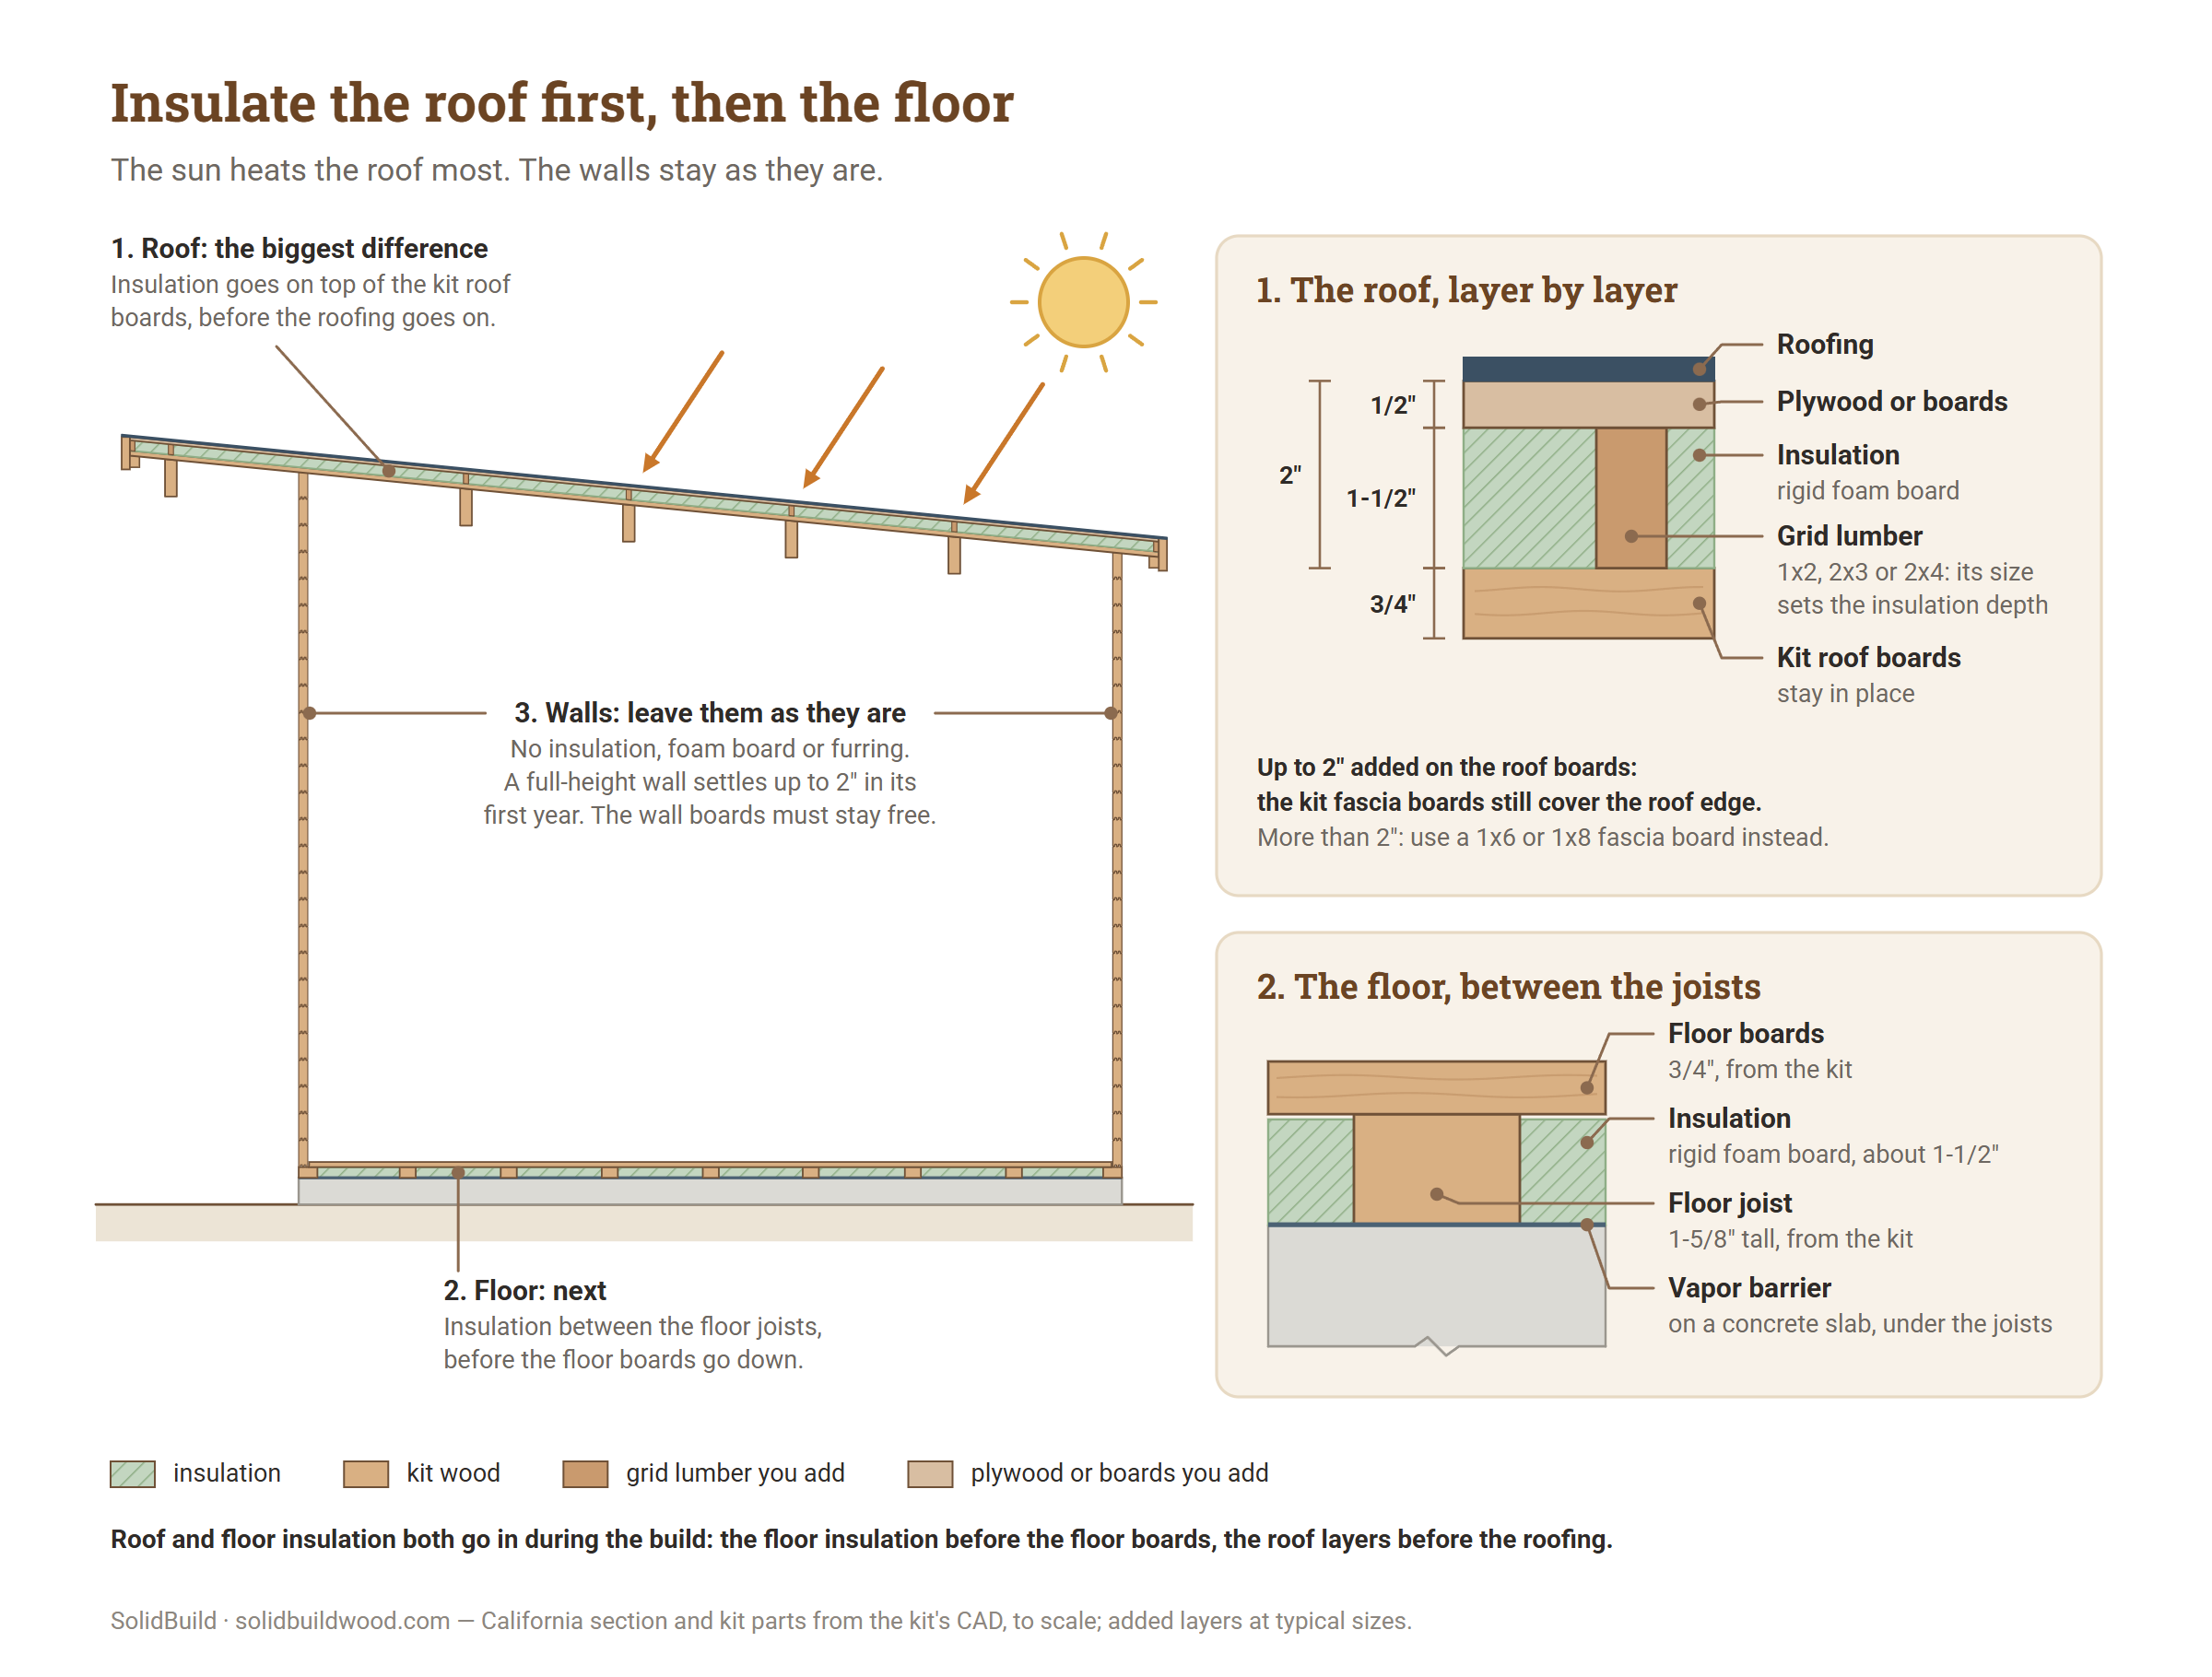
- Roof: build a grid of 1x2, 2x3 or 2x4 lumber on top of the kit roof boards. Fill it with rigid foam board, cover it with plywood or boards, then lay the roofing. Do it during assembly, before the roofing goes on.
- Up to 2" of added thickness, the fascia boards from the kit still cover the roof edge. Above 2", use a 1x6 or 1x8 board for the fascia.
- Everything you add to the roof counts against its snow load rating.
- In strong sun, a metal roof over the insulation reflects the most heat.
- Floor: fill the spaces between the floor joists with rigid foam board as the floor goes in. On a concrete slab, lay a vapor barrier over the concrete first.
- Walls: do not insulate them. Never screw a frame, furring strips (thin wood strips) or foam board to the wall boards: it stops the walls settling, and gaps open between the boards.
Our insulation guide gives the full method, the costs, and what it saves on running costs.
Electricity
A licensed electrician does all the wiring, and most towns need a permit for it. Plan the route before you build: it is far easier than adding it later. Our electrical guide has more.
Power to the shed. List everything you will run: the AC, a space heater for winter, lights and tools. A mini split needs a circuit of its own, so a shed with AC usually needs a feeder (a larger cable from the house) to a small breaker panel in the shed. The electrician sizes it. They follow the code your area has adopted, including its GFCI (ground-fault protection) rules for outdoor AC units, which changed in 2026.
When. Book the electrician early. An outlet in the floor, or a cable under it, goes in before the floor boards; conduit on the walls can go on later.
Window unit:
- Plug it into an outlet of its own, on a circuit of its own if you can (LG asks for a dedicated circuit, GE for an outlet of its own). Put the outlet close enough for the unit's own cord.
- Never use an extension cord, a power strip or an adapter.
- A 5,000 BTU unit draws about 4 A at 115 V.
Mini split:
- It has no plug. It is wired to its own 115 V circuit on a 20 A breaker.
- A disconnect switch goes within sight of the outdoor unit: on a post beside it, clear of its fan, or on the wall, fixed to one board. A disconnect whose screws would reach into two boards goes on the post, or on a small backer screwed tight in one board with slots below.
On the log walls:
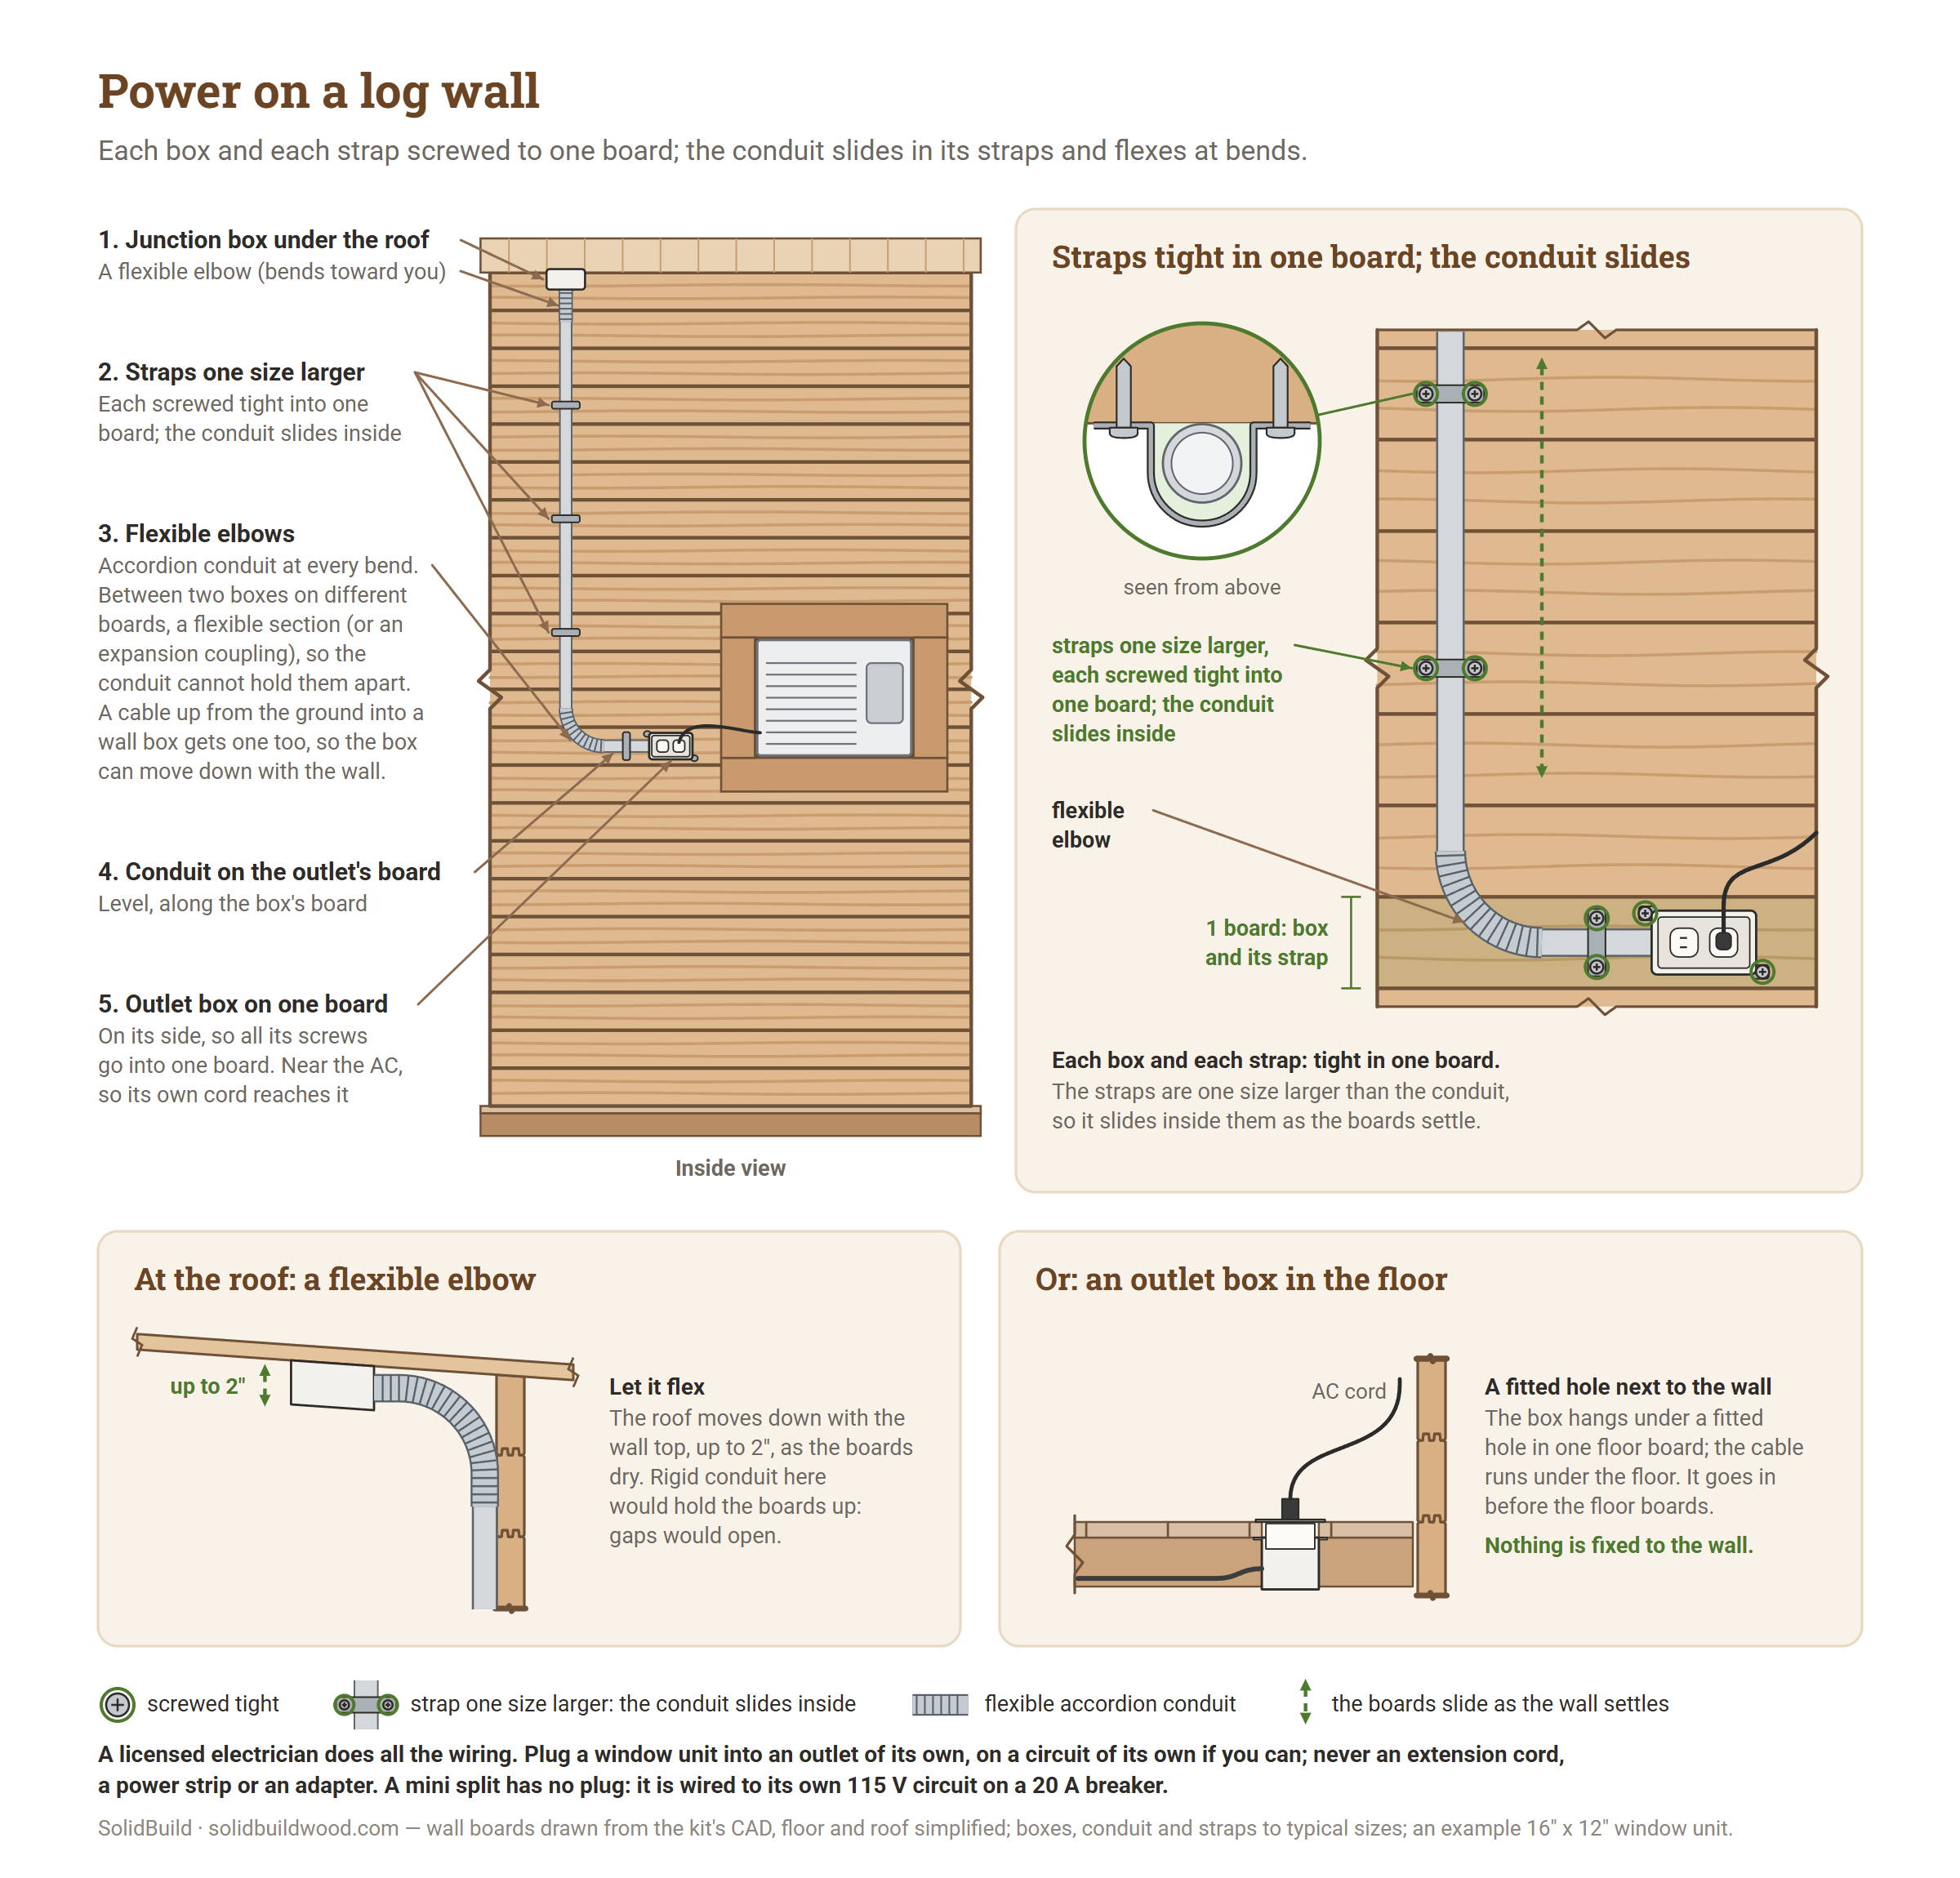
- Run the conduit on the surface of the walls, and fix each box to one board: turn it on its side so all its screws go into that board.
- At every elbow where the conduit turns, for example from the wall onto the inside of the roof boards, use flexible, accordion-type conduit, not rigid conduit.
- Hold upright runs in straps one size larger than the conduit. Screw each strap tight into one board; the conduit slides inside it. A rigid conduit fixed from the bottom of a wall to the top holds the boards up, and gaps open between them.
- Between two boxes on different boards, put a flexible section or an expansion coupling in the conduit, so it cannot hold the boxes apart.
- Where a cable comes up from the ground into a box on the wall, give it a flexible section, so the box can move down with the wall.
- Or put the outlet in the floor next to the wall: cut a fitted hole in a floor board and fit the box underneath.
Mini split: hanging the indoor unit, the pipes and the outdoor unit
The mini split we sell is the MRCOOL DIY Easy Pro 5th Gen 9k BTU: 9,000 BTU cooling, 10,000 BTU heating, 115 V. Its indoor unit weighs about 24 lb. Its line set, the copper pipes and cable between the two units, comes pre-charged with quick-connect fittings.
Before you start:
- Who connects the lines. The EPA says connecting a mini split's pre-charged lines needs a technician with Section 608 certification. Have a certified technician connect them.
- Read MRCOOL's warranty terms for your unit before you start: they say who may install it and how.
- Plan where both units go, within the length of the line set. Never cut the line set: unwind only what you need and leave the rest coiled.
- Check the height. MRCOOL asks for the unit's bottom at least 71" [1.8 m] above the floor, its top at least 6" below the roof boards, and 5" clear at each side. So the wall must be about 89" tall there, and the backer's top sits at least 84" above the floor and at least 4-1/2" below the roof boards. Where the roof comes down to the top of a wall, that wall is usually too low: use a wall under the peak of the roof (a gable wall), or the tall end of a wall under a single sloping roof.
- Keep the backer, the pipe hole and the line-set cover clear of the wind studs near the corners. Never screw through a wind stud or rest anything on it.
- Have the circuit ready: its own 115 V circuit on a 20 A breaker (see Electricity).
- Follow the unit's own manual. This guide adds what a log wall needs.
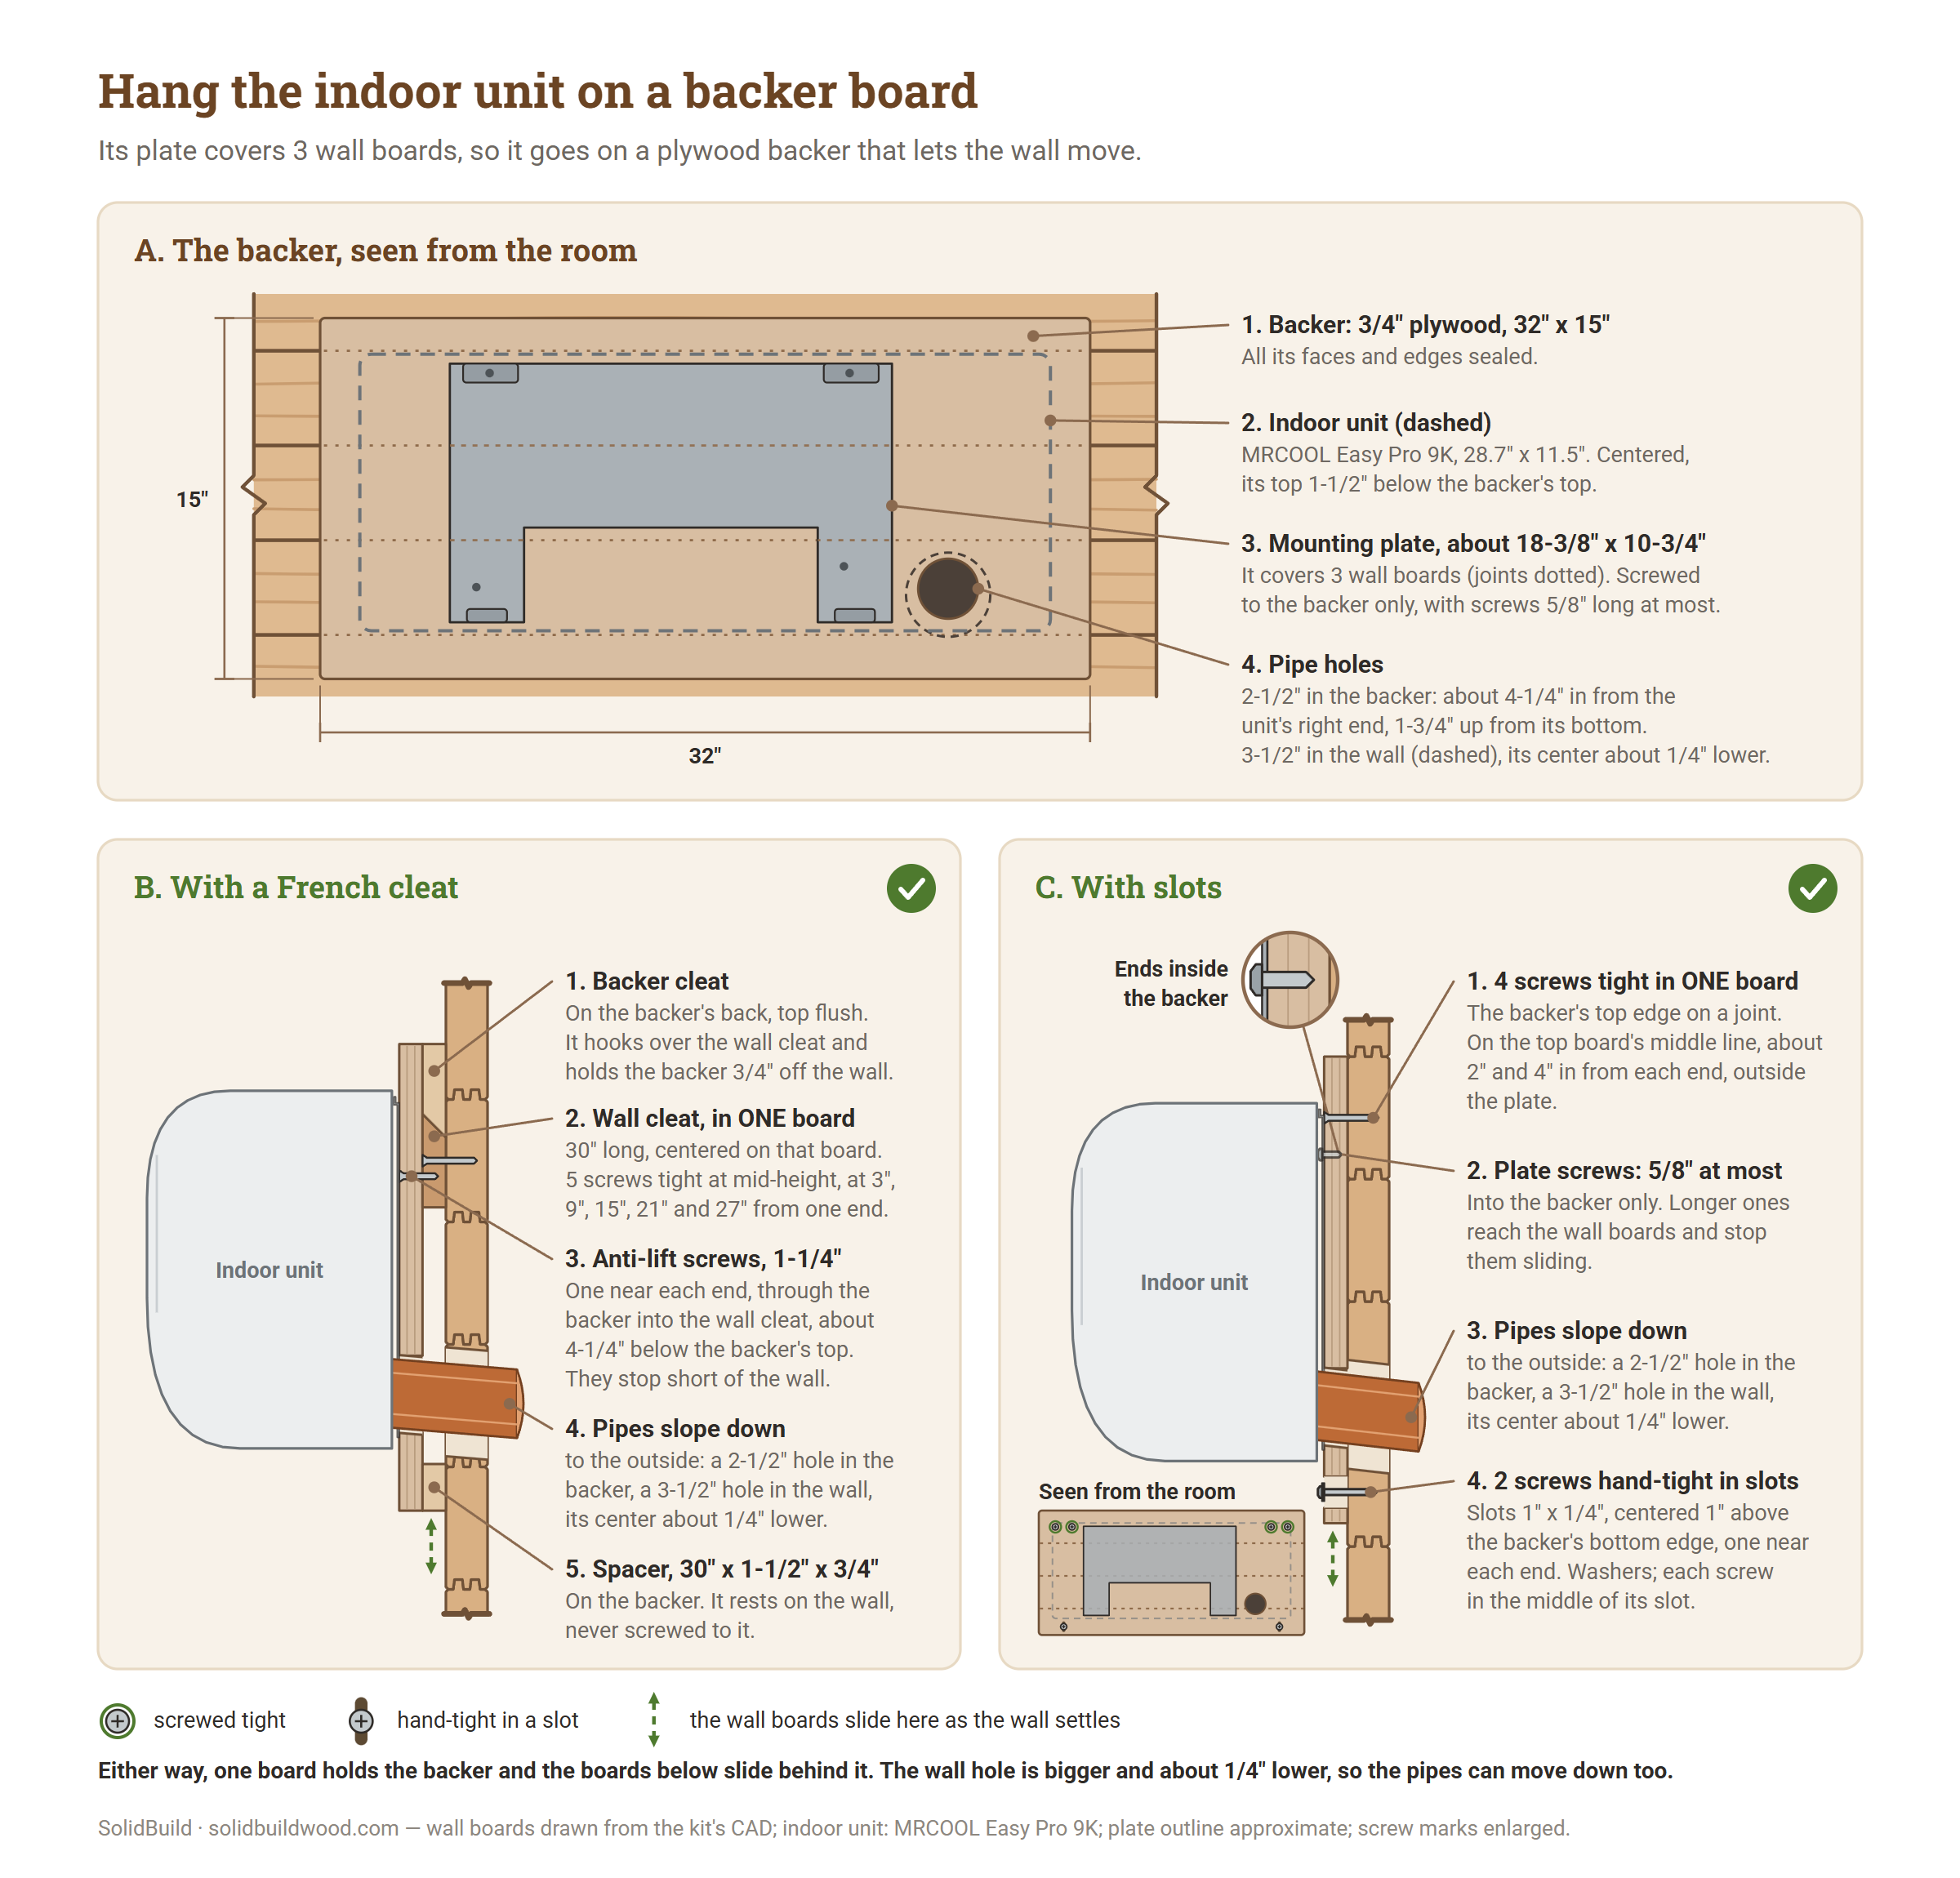
Why a backer? The mounting plate is about 18-3/8" wide and 10-3/4" tall, so its screws would land in 3 wall boards. Screwed straight to the wall, it would pin those boards together. So the plate goes on a plywood backer, and the backer is hung in a way that lets the wall slide: on a French cleat (method A) or with slots (method B). Once the unit hangs on its plate, you cannot reach the screws behind it. So method A has nothing to adjust, and method B keeps its two slot screws below the unit, where you can see and reach them.
Make the backer (sizes for our MRCOOL Easy Pro 9K):
- Cut a backer from 3/4" [19 mm] plywood, 32" x 15" [813 x 381 mm]. Seal all its faces and edges, so it does not cup.
- Lay MRCOOL's cardboard template on the backer: it shows the unit's outline, the plate and the pipe hole. Center the unit outline left to right, with its top 1-1/2" [38 mm] below the backer's top, and level. Mark the plate's screw holes and the pipe hole (at the lower right, seen from the room). Use the template, not the bare plate: the plate is not centered under the unit.
- Cut the pipe hole in the backer, 2-1/2" [65 mm] across.
- Screw the plate to the backer only, with screws no longer than 5/8" [16 mm], so they cannot reach the wall.
Method A: French cleat (nothing to adjust later)
- Saw a 30" [762 mm] piece of 1x6 down the middle at 45°, as in our shelf guide. This gives the two cleats, about 3" tall.
- Glue and screw one cleat to the back of the backer, its top flush with the backer's top, with its sloped edge at the bottom: the sharp edge points down, on the wall side.
- Glue and screw a spacer strip, 30" x 1-1/2" x 3/4" [762 x 38 x 19 mm], along the back of the backer's bottom edge. It rests on the wall and is never screwed to it. For a unit this shallow, the 11" between the cleat and the spacer is enough.
- Choose the board for the wall cleat. When the backer hangs on it, the backer's top ends up about 2-1/4" above the wall cleat's top, and it must land in the height range above.
- Center the wall cleat on that one board, level, with its sloped edge on top, sloping down toward the wall, so its sharp edge is at the top, away from the wall.
- Pre-drill and drive 5 screws at the cleat's mid-height, at 3", 9", 15", 21" and 27" from one end, tight.
- Hang the backer on the wall cleat. Mark the pipe hole on the wall through the backer's hole, then lift the backer off again.
Method B: slots (like the wind studs)
- Hold the backer flat on the wall, level, with its top edge on a board joint in the height range above. Mark the middle of the top board on the backer, and take the backer down.
- Tight screws: drill 4 round holes on that middle line, about 2" and 4" in from each end, outside the plate. Use a 1/4" bit for #10 screws, 3/16" for #8, so the screws pass freely.
- Slot screws: cut 2 vertical slots 1" [25 mm] long and 1/4" wide, centered 1" above the backer's bottom edge, one near each end. Drill holes side by side and clean out the wood between them, as in our shelf guide. These slots sit below the unit, where you can see them.
- Hold the backer up again, its top edge on the same joint. Pre-drill into the wall through the round holes and through the middle of each slot. Mark the pipe hole on the wall through the backer's hole, and take the backer down.
Pre-drill every screw into the wall, no deeper than the screw will go (mark the bit with tape), and keep each screw at least 3/4" from a board joint. Use these screws through the 3/4" cleat or backer:
| Your wall | Screw | Pre-drill |
|---|---|---|
| 1-1/8" [28 mm] | #8 x 1-5/8" | 3/32" |
| 1-3/8" [34 mm] | #10 x 1-3/4" | 7/64" |
| 1-3/4" [44 mm] | #10 x 2-1/4" | 7/64" |
Then, for both methods:
- Drill the pipe hole through the wall, 3-1/2" [90 mm] across, its center about 1/4" below the center of your mark, sloping down to the outside. The wall hole is larger than the backer's, and set lower, because the backer moves down with its top board while the wall lower down moves less: about 1/4" in the first year.
- Put the backer back on the wall.
- Method A: hang it on the cleat. Then drive one screw 1-1/4" long near each end, through the backer into the wall cleat, about 4-1/4" below the backer's top, so the backer cannot be lifted off. These screws stop short of the wall.
- Method B: drive the 4 top screws tight, and the 2 slot screws with washers at the middle of their slots, hand-tight.
- Feed the pipes, the cable and the drain hose through the backer and the wall, and hang the unit on its plate. If you use the plastic wall sleeve from the box, let it sit loose in the wall hole: never glue or foam it in.
- Pack the gap around the pipes in the wall with the soft seal or putty that comes with the unit. Never use spray foam or other hard foam.
- Method B: look at the 2 slot screws below the unit after the first 3 months, then once a year. If one has moved near the end of its slot, take it out, pre-drill a new hole at the middle of the slot, and drive it there, hand-tight.
Outside:
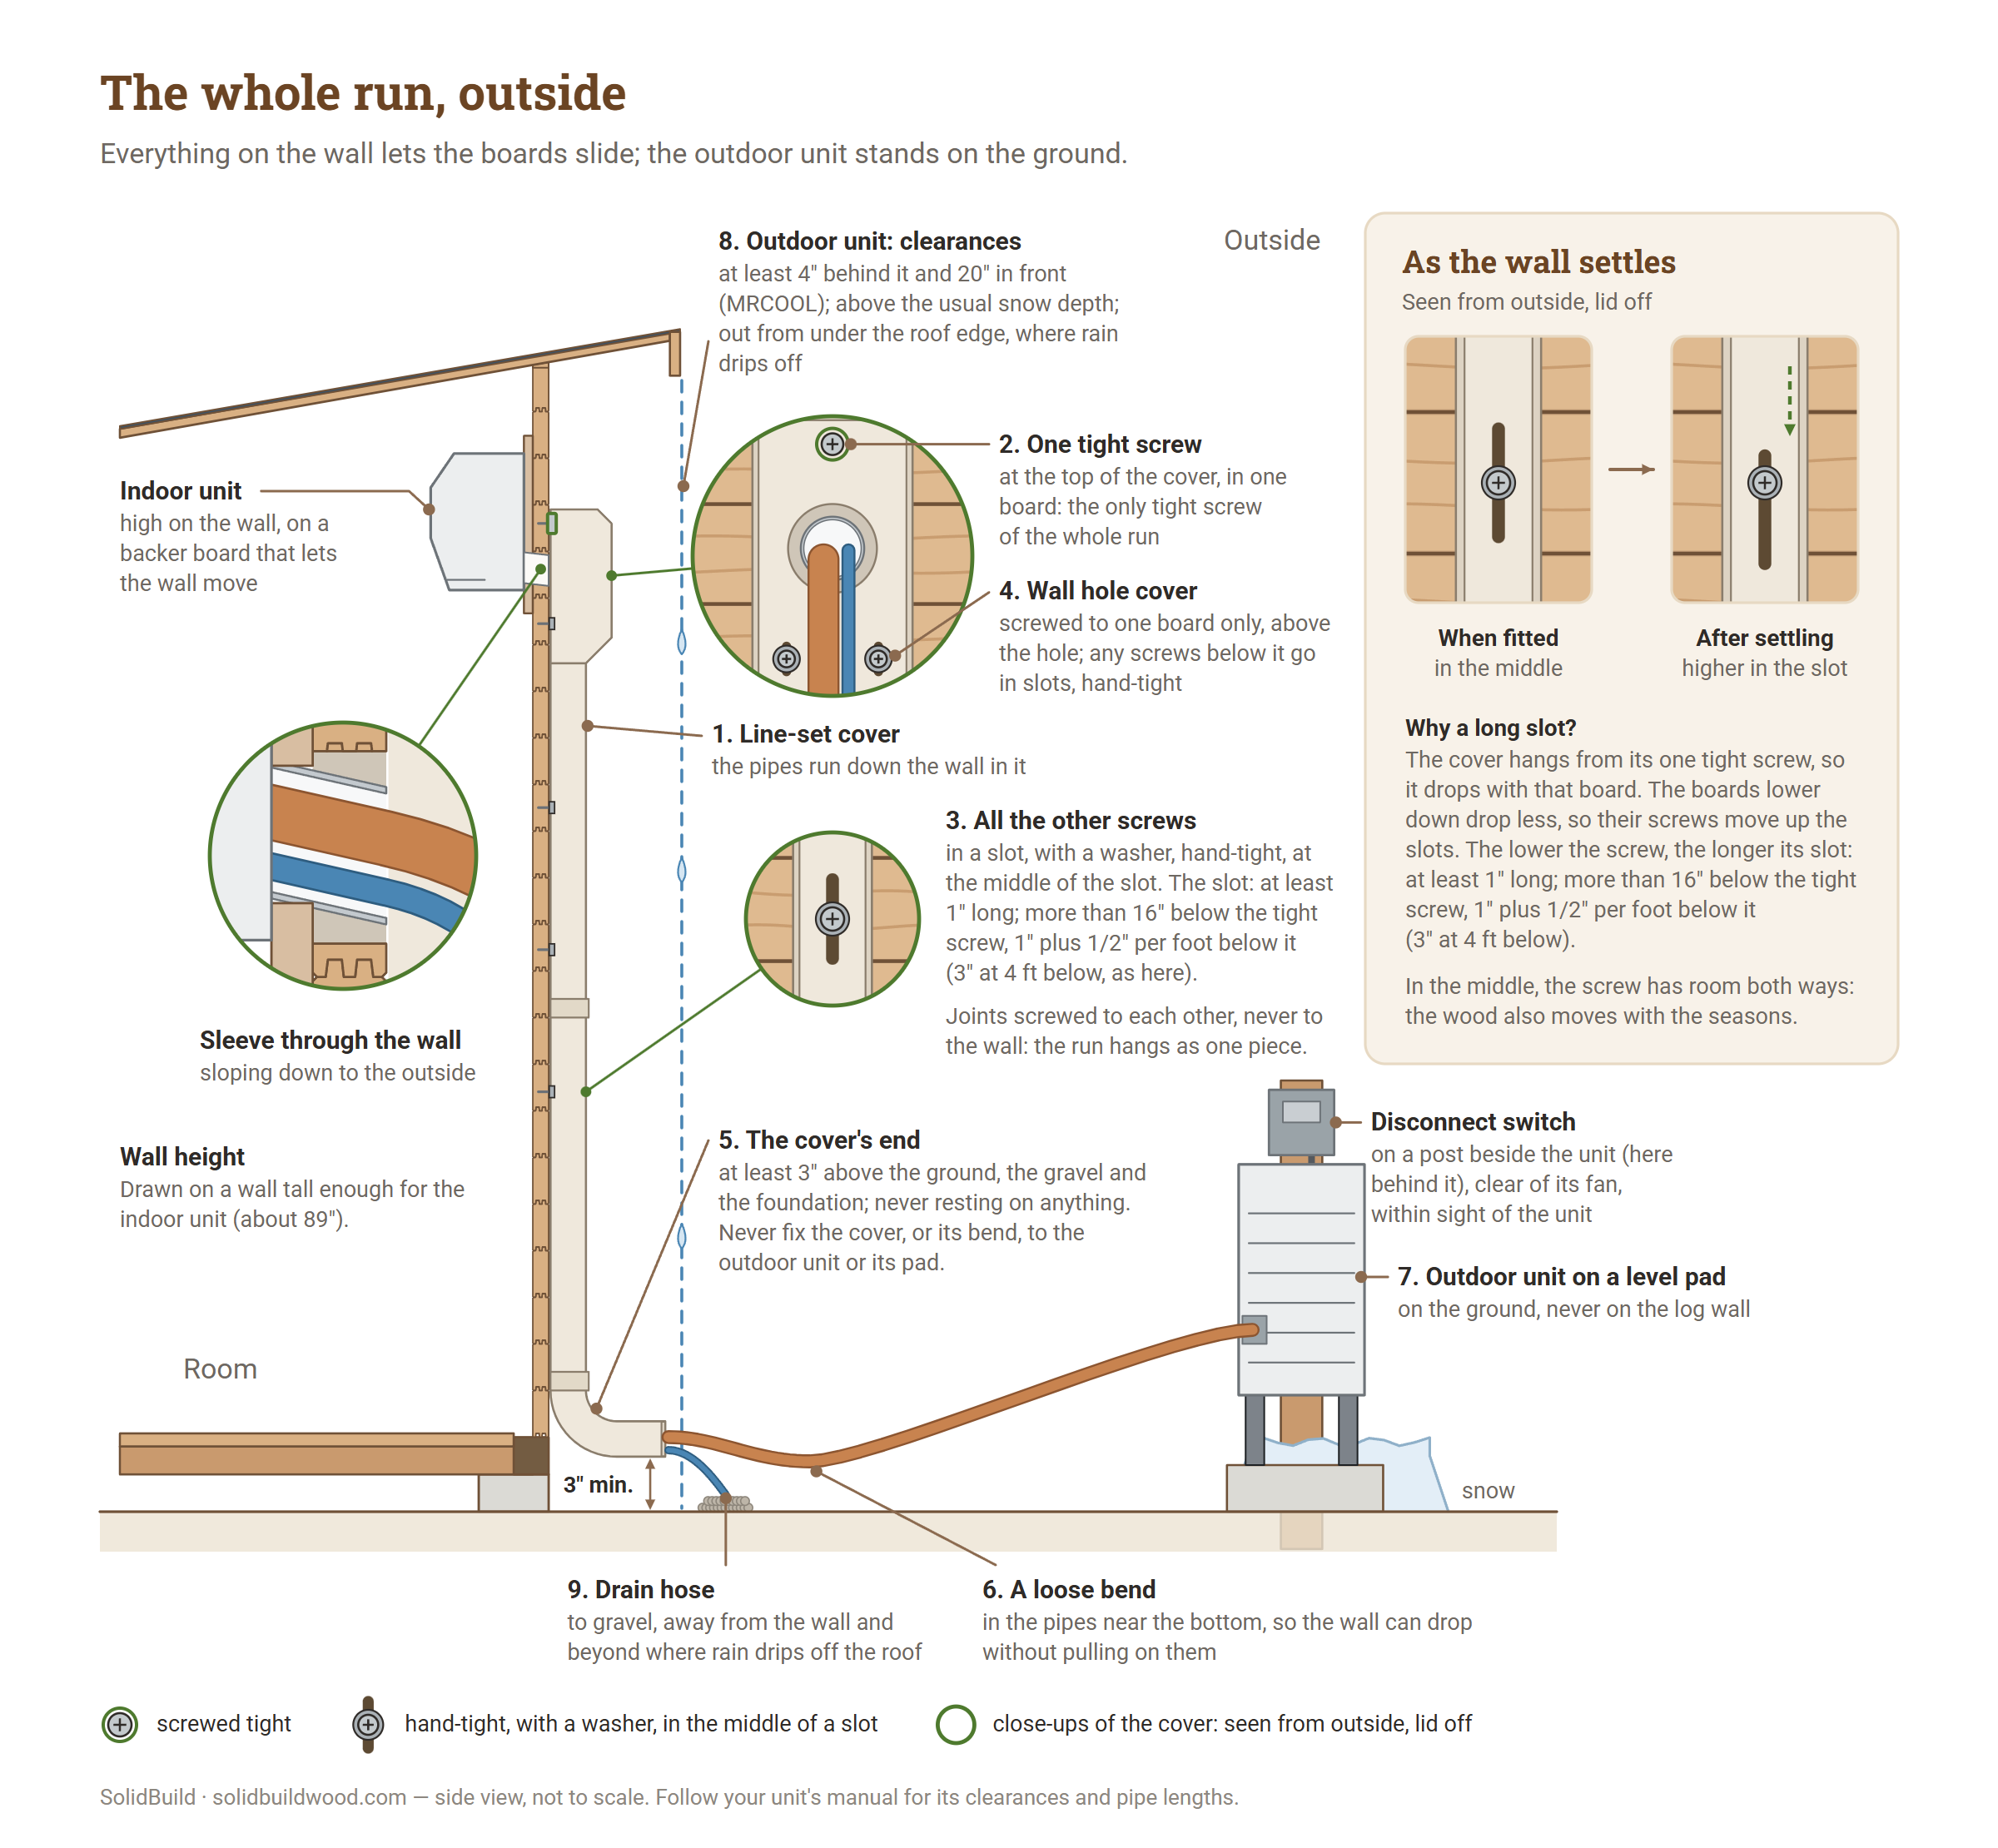
- Run the pipes down the wall in a line-set cover.
- Join every joint of the run so it hangs as one piece: screw each coupler to the lengths on both sides, and the first length to the wall hole cover, with short screws that do not reach the wall.
- Hang the whole run from one tight screw: the wall hole cover's screw above the hole, in one board. No other screw of the run is tight.
- Put each of the other screws (of the wall hole cover and of every cover length) in a vertical slot, with a washer, hand-tight, at the middle of the slot. Cut the slots in the cover's plastic base: drill a hole at each end and cut out between them with a utility knife. Make each slot at least 1" long; more than 16" below the tight screw, 1" plus 1/2" for every foot below it (3" at 4 ft below), as in our shelf guide. As the wall settles, these screws move up their slots. A cover screwed tight can bend and hold the wall up.
- End the cover, and its bend, at least 3" above the ground, the gravel and the foundation. Never let it rest on anything, and never fix it to the outdoor unit or its pad.
- Leave a loose bend in the pipes near the bottom, so the wall can drop without pulling on them.
- Stand the outdoor unit on a level pad on the ground, never on the log wall. MRCOOL allows wall brackets only on solid brick, concrete or a similarly strong wall.
- Keep its clearances (MRCOOL: at least 4" behind it and 20" in front). Keep it above the usual snow depth, and out from under the roof edge, where rain drips off.
- Lead the indoor unit's drain hose to gravel, away from the wall and beyond where rain drips off the roof.
The unit has a dry mode too, which takes moisture out of the air on humid days.
Window unit: its own U frame
The shed's opening windows tilt and swing inward, so a window AC cannot sit in them. Cut a fitted opening in the wall instead, frame it, and support the unit outside. You also get to choose the best spot.
The frame copies the shed's own windows and doors. Their frames float in the wall: a trim on each face makes a U-shaped channel around the cut board ends, the trims are screwed to the frame only, and there is a gap above the frame. As the wall settles, the boards slide down inside the U.
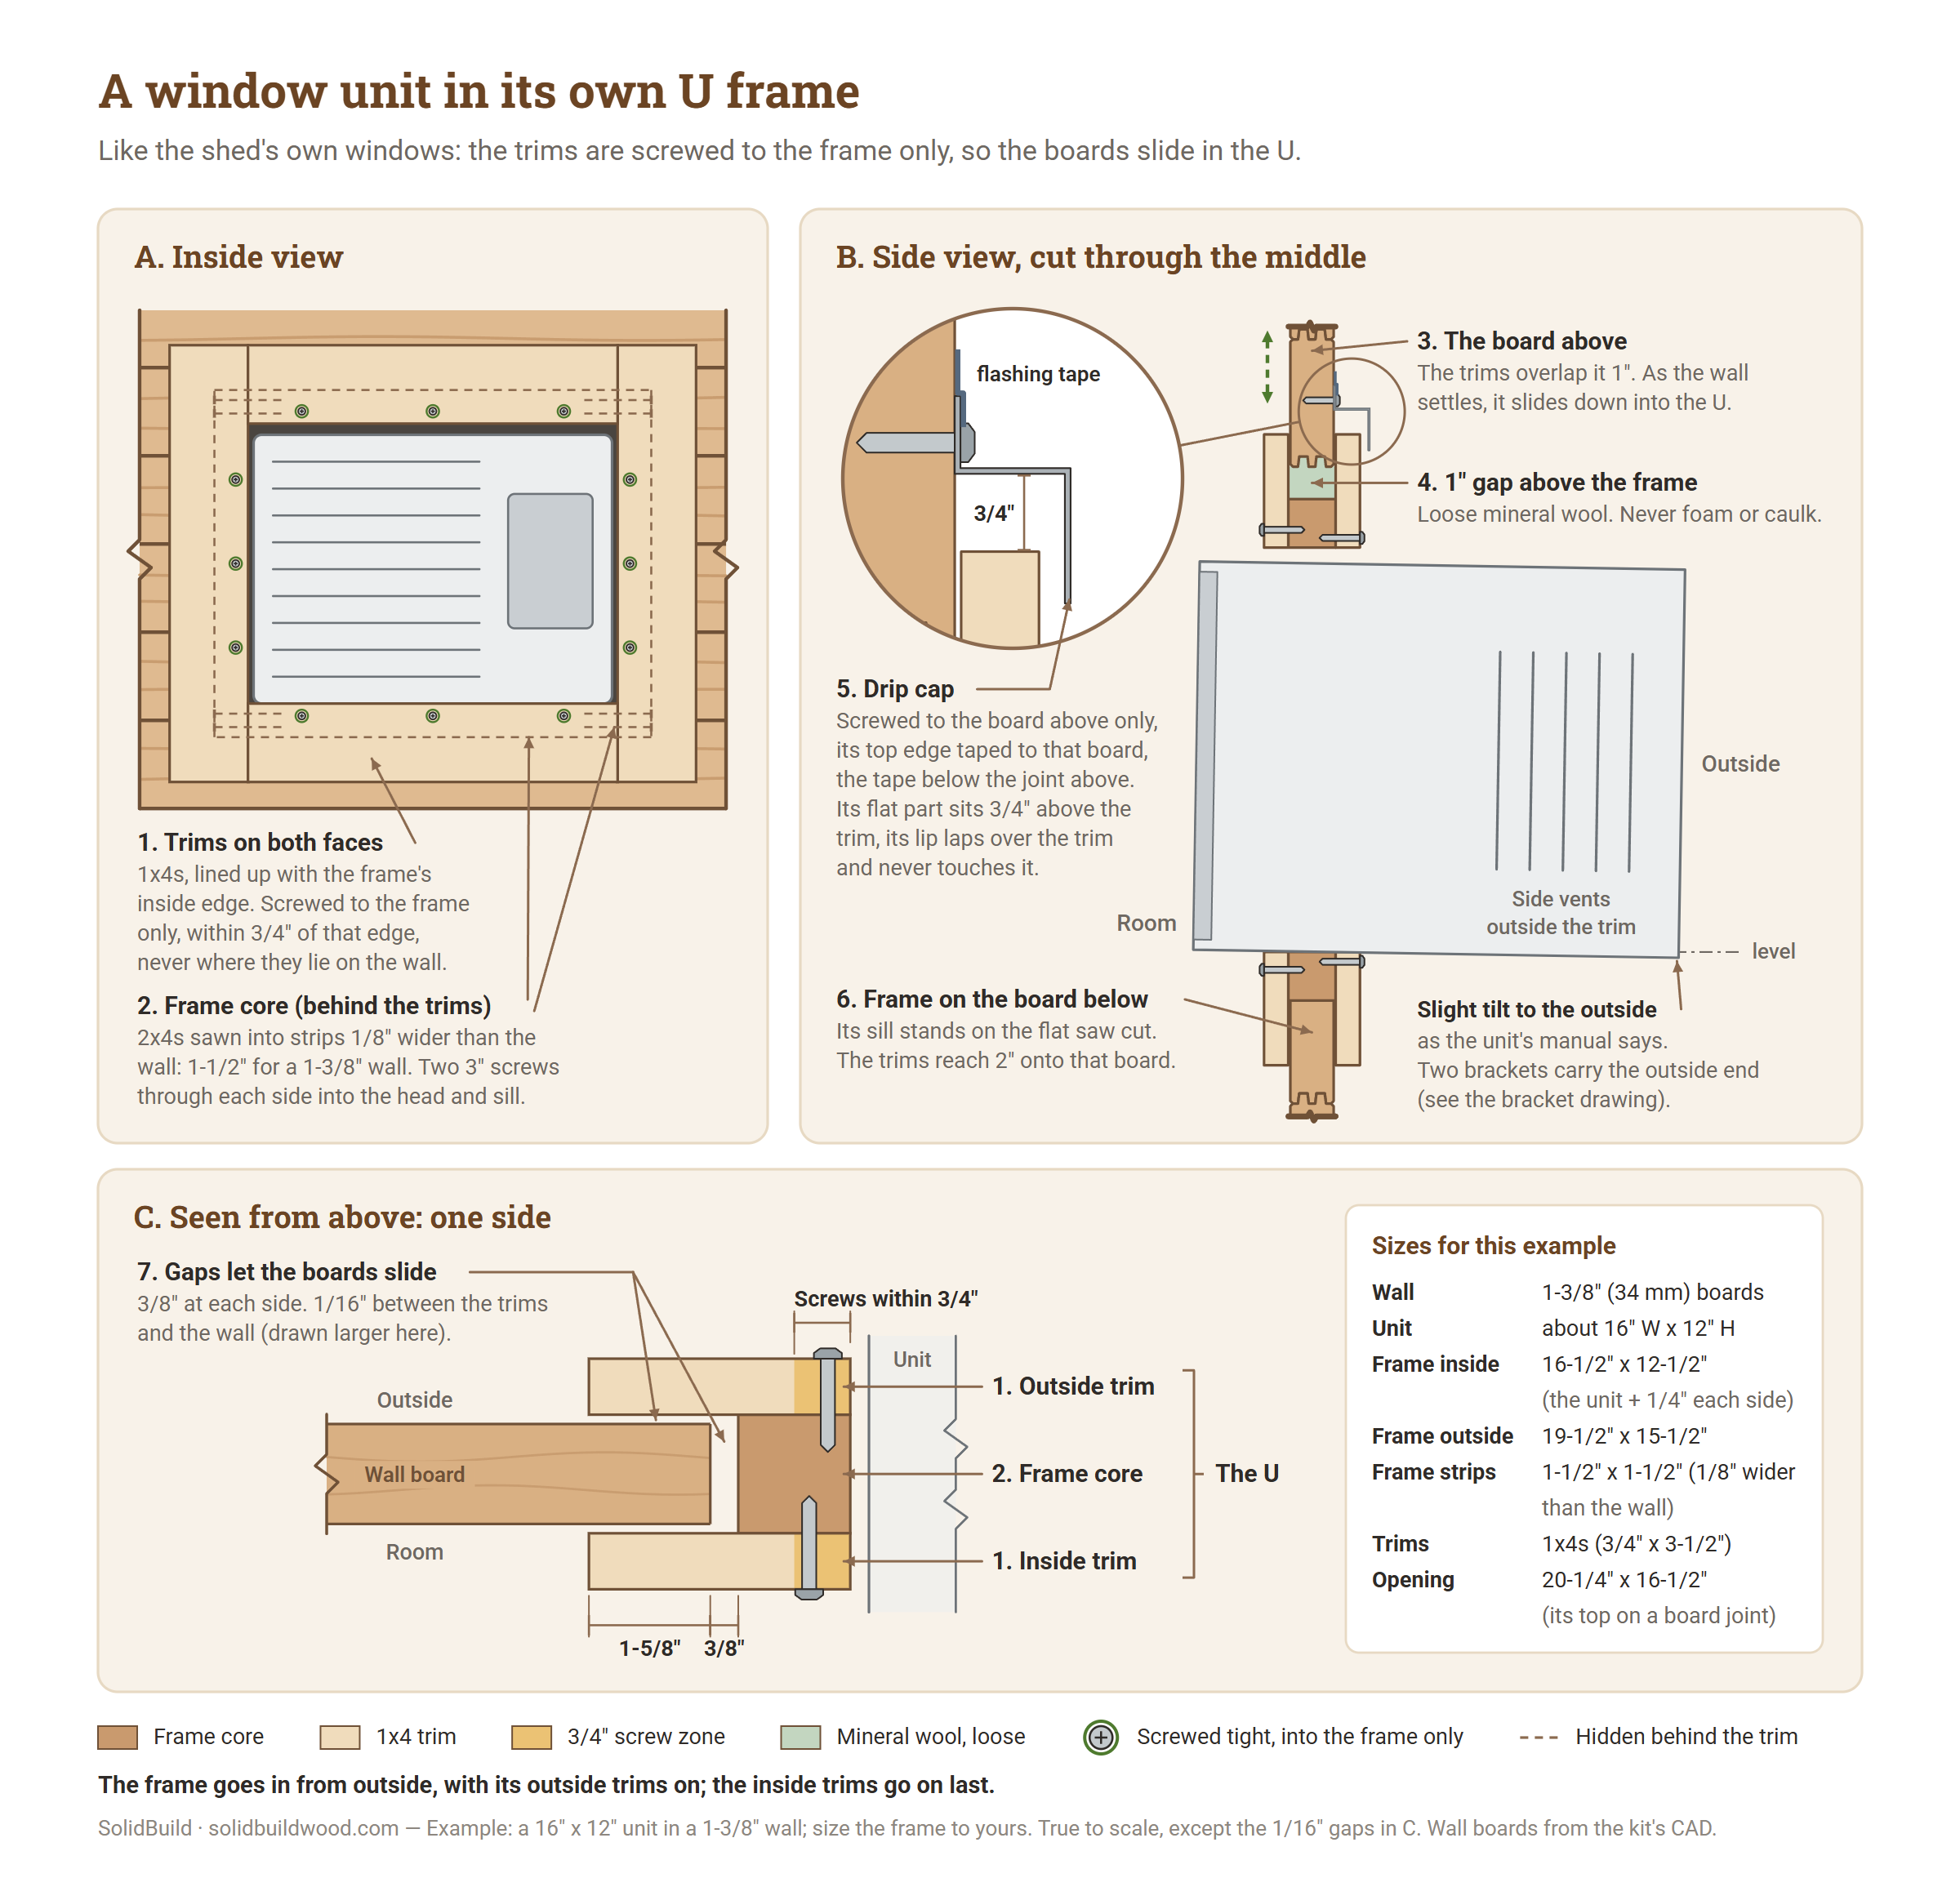
Pick the unit: one whose manual allows a through-the-wall installation. Some makers allow it if every side and top vent sits outside the wall; others say not to do it. If no small model allows it, choose a larger one that does. The unit, with any kit, must weigh no more than 40 lb [18 kg] (50 lb [23 kg] on 1-3/4" walls): that is what two brackets on a log wall can hold. If every suitable unit is heavier, choose a mini split.
Pick the spot:
- A back or side wall, where the outside of the unit gets shade if possible.
- At least 18" from a corner, and clear of the wind studs.
- Not in the bottom board, and with at least two full boards above the opening.
- Clear of the door and window trims.
- Near the outlet for the AC. Never use an extension cord.
Size the opening. Example for a unit about 16" wide and 12" tall:
- The frame inside is the unit's size plus 1/4" on every side: 16-1/2" x 12-1/2". Check the unit's manual for its size, and for how far it may go into the room: its side vents must be fully outside the wall and the trim.
- The frame outside is its inside size plus 3" (two 1-1/2" sides): 19-1/2" x 15-1/2".
- The opening is 3/4" wider than the frame (3/8" [10 mm] at each side) and 1" taller (the gap above): 20-1/4" x 16-1/2".
- Measure the height of one wall board: about 4" on most models, 5-1/8" on the Washington. Put the top of the opening on a board joint. The bottom may cut part way into a board. If it falls within 3/4" of a joint, never make the opening shorter: the 1" gap above must stay. Make the frame and the opening taller by the same amount instead: cut the frame sides longer, and fill the extra space above the unit with a wood strip screwed to the frame head.
Cut it:
- Mark the opening on the inside of the wall, level and square.
- Drill a hole inside each corner.
- Cut along the lines with a jigsaw or a handsaw, and take out the cut pieces.
Build the U frame:
- Saw 2x4s along their length into strips 1/8" wider than your wall is thick: 1-1/2" for a 1-3/8" wall (1-1/4" for 1-1/8", 1-7/8" for 1-3/4"). Each strip is 1-1/2" thick. The frame then stands 1/16" out from each face of the wall, so the trims never pinch the boards.
- Build the frame. For the example unit: two sides 15-1/2" long, and a head and a sill 16-1/2" long that fit between the sides. Screw each corner with two 3" screws through the side into the end of the head or sill.
- Cut trims from 1x4 boards (3/4" x 3-1/2") for both faces. For the example, on each face: two side trims 19-1/2" long, and a head and a sill trim 16-1/2" long that fit between them. Each trim lines up with the frame's inside edge and reaches 2" past the frame onto the wall.
- Screw the outside trims to the frame only. Put the screws within 3/4" of each trim's inside edge, where the frame is behind it, never in the part that lies on the wall.
- From outside, set the frame in the opening, on the board below, and push it in until it stands out the same amount from both faces of the wall (about 1/16"). Leave 3/8" at each side and 1" above it.
- From inside, push a strip of mineral wool loosely into the 1" gap above the frame. Never use foam or caulk there.
- From inside, screw the inside trims to the frame only, the same way. The cut board ends now sit inside a U on each side, and the board above sits inside the U at the top.
- Over the outside head trim, fit a drip cap: a bent metal strip that sheds rain. Screw its back leg to the board above only, and seal its top edge to that board with flashing tape. Set its flat part 3/4" above the top of the head trim, with a front lip at least 1-1/4" long lapping down over the trim's face, so the cap can drop with the wall without landing on the trim. Keep the back leg, its screws and the tape on that one board: the tape stops below the joint above.
Never screw the frame or the trims to the wall boards.
Fit the unit:
- Before the unit goes in, fit any flashing or support strips its manual asks for, on the frame only, not on the wall boards.
- Slide the unit into the frame. Tilt it slightly to the outside, as its manual says, so its water runs out of the back.
- Fix the unit to the frame as its manual says, so it cannot slide out. Use screws that end inside the frame: no more than 1-1/4" into the 1-1/2" frame, never into the gap or the wall boards.
- Seal the gap between the unit and the frame with compressible weatherstrip.
- Outside, run a bead of caulk between the unit and the frame to keep rain out. Never caulk the frame or the trims to the wall boards.
Support the outside end on two brackets. The wall is thin, so the unit's outside end needs support: always fit two brackets under it.
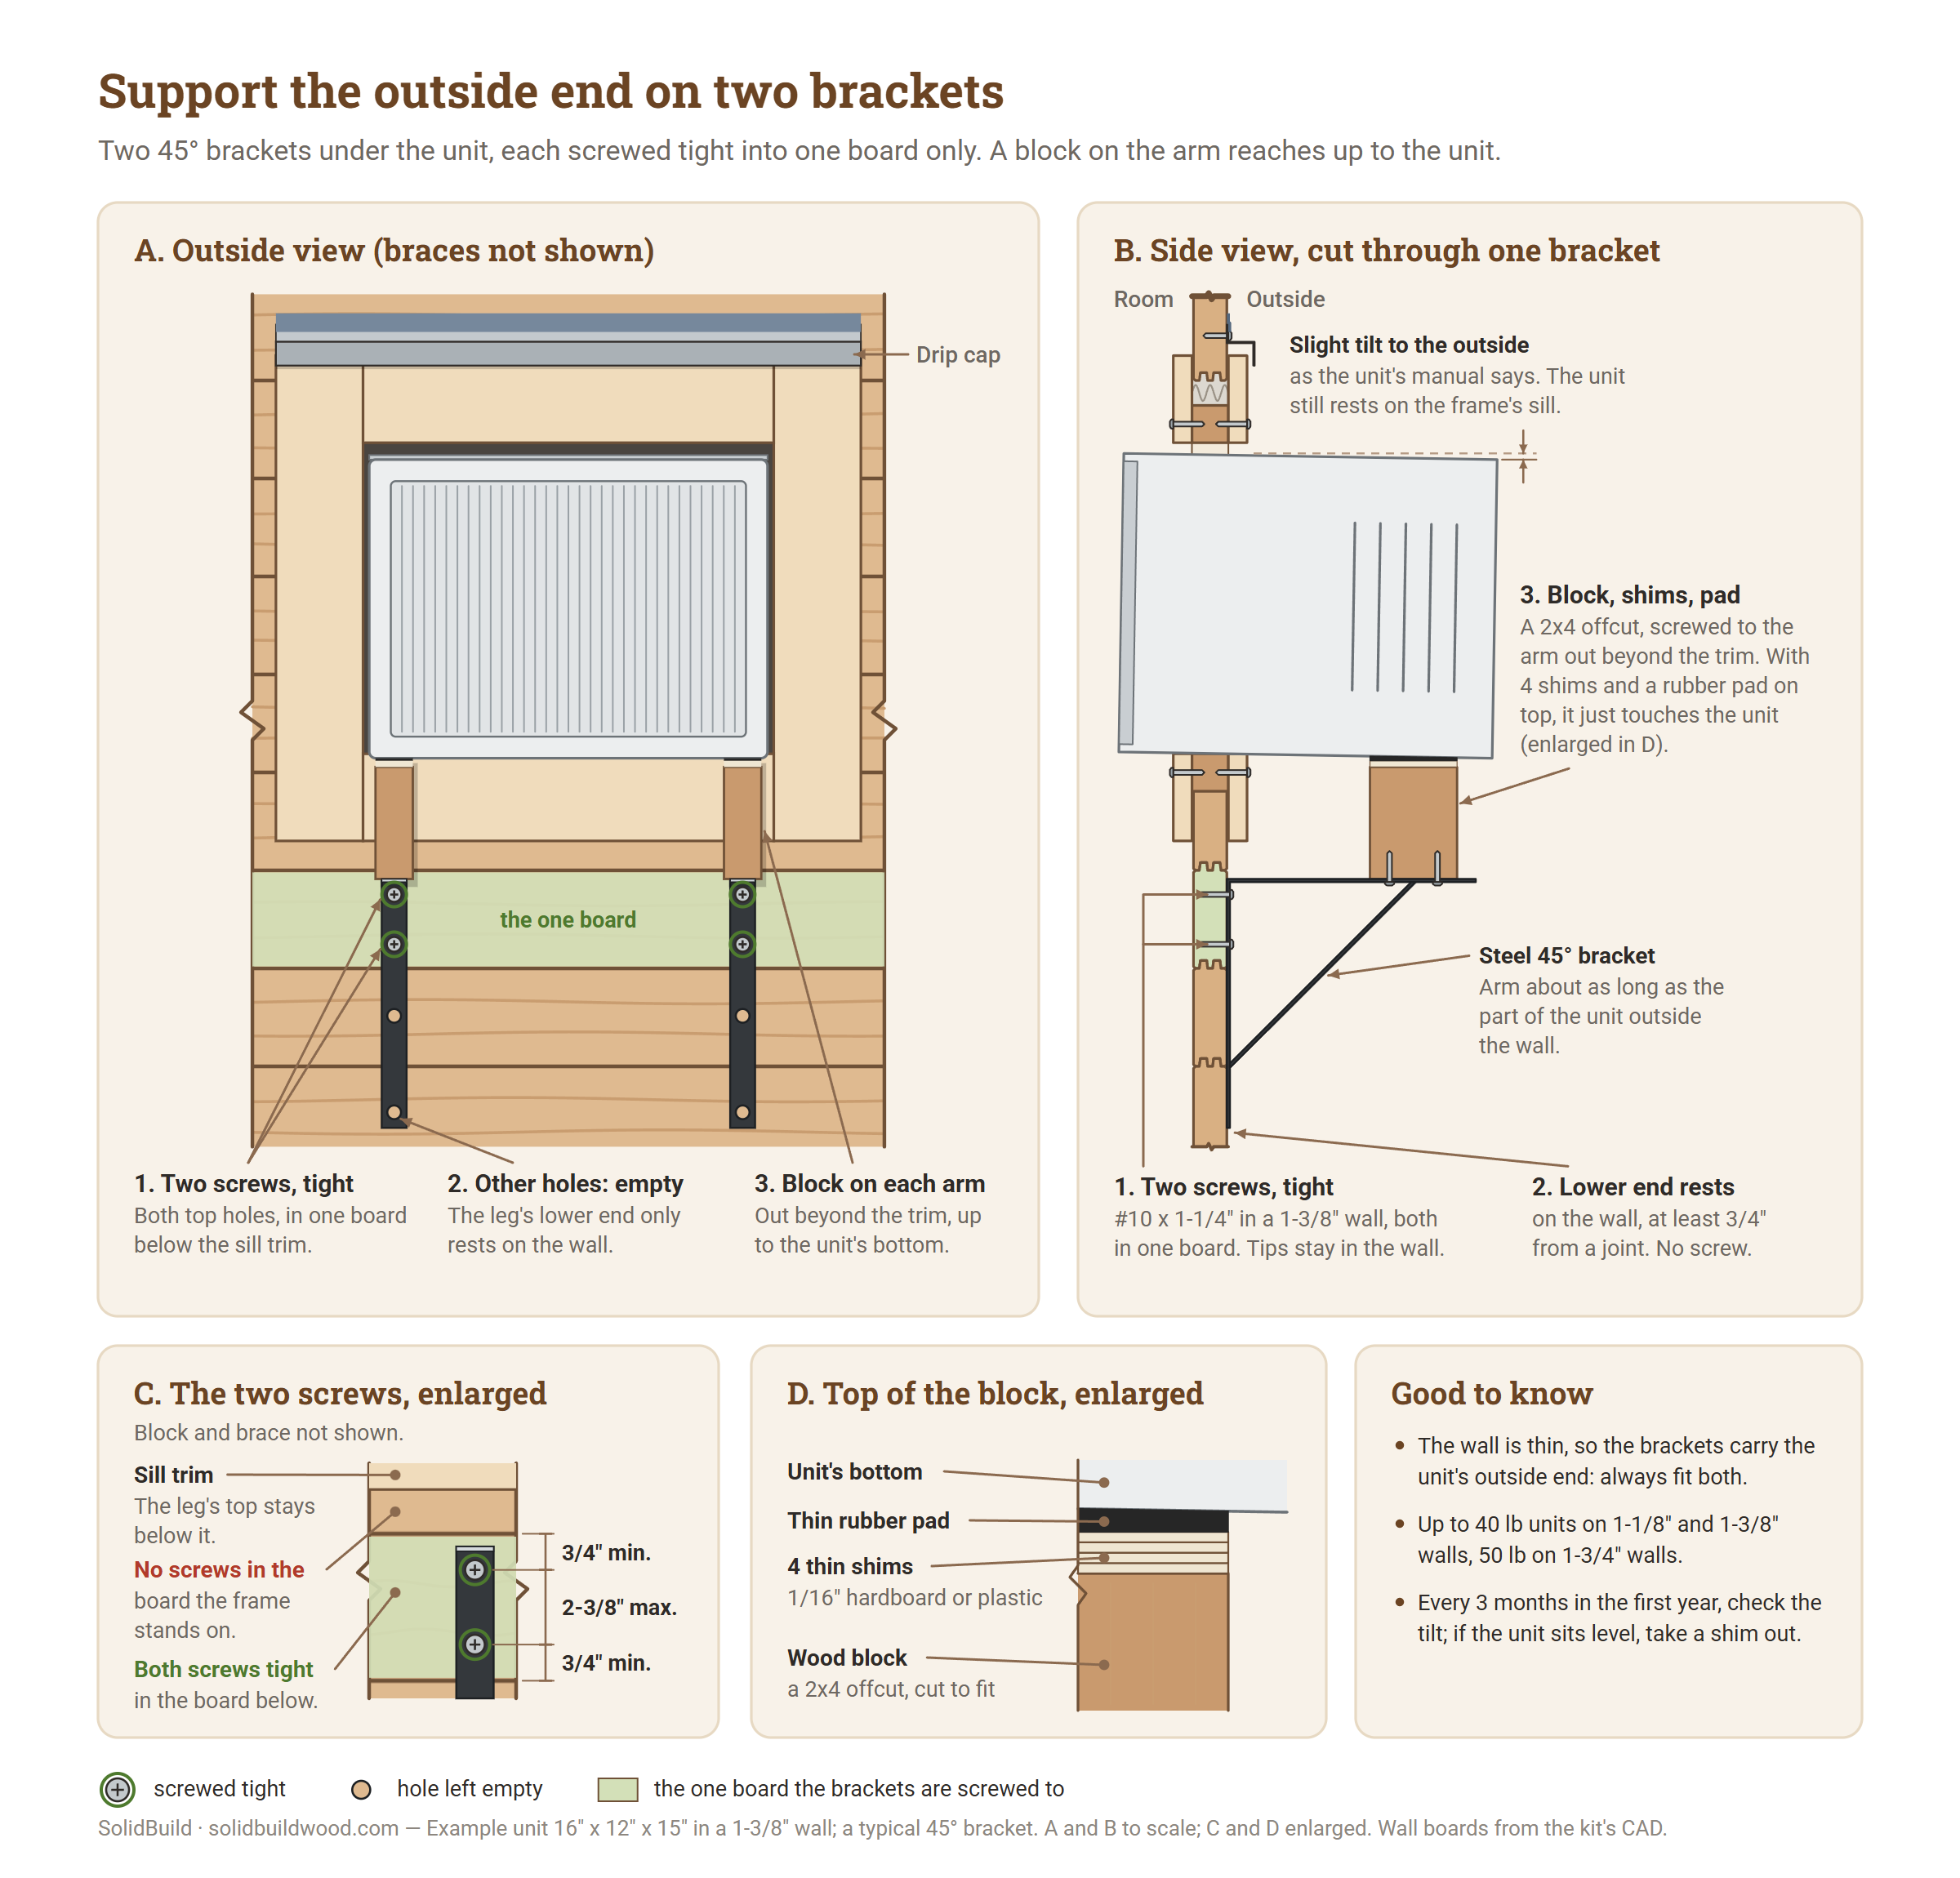
- Check the unit's weight. Two brackets fixed this way hold a unit of up to 40 lb [18 kg] on 1-1/8" and 1-3/8" walls, and up to 50 lb [23 kg] on 1-3/4" walls. Heavier? Do not use this method: choose a mini split.
- Use two steel 45° (triangle or gusset) brackets with an arm about as long as the part of the unit outside the wall, each rated for at least the unit's weight. For each arm you also need a wood block (a 2x4 offcut), a thin rubber pad and 4 thin shims (1/16" hardboard or plastic).
- Pick brackets with two wall holes near the top of the leg, no more than 2-3/8" apart, so both fit in one board at least 3/4" from its joints. If yours has only one hole near the top, drill a second 7/32" hole in the steel leg, 2" below it.
- Place them under the unit's sides. Screw the two top holes tight into one board below the outside sill trim, with the screws from our shelf guide's "Through a steel bracket" column. Never use the board directly under the opening: the frame stands on it. Keep the top of each leg below the trim.
- Leave the other holes in the leg empty: the leg's lower end only rests on the wall, so the boards below can slide past it. Check that it rests at least 3/4" from a board joint. If not, move both screws up or down within the same board as far as the 3/4" rule allows; if the foot still lands near a joint, use a bracket with a leg about 2" longer or shorter.
- The arm now sits a few inches below the unit, because the sill trim is in the way. Screw a wood block to each arm, out beyond the trim. Cut it so that, with the 4 shims and the rubber pad on top, it just touches the unit's bottom at the tilt its manual asks for, without lifting the unit off the frame.
- Every 3 months in the first year, check with a level that the unit still tilts to the outside. As the boards between the frame and the brackets dry, the frame drops a little against the brackets. If the unit sits level or tilts into the room, take a shim out from under each pad.
Water: keep it off the walls
An AC makes water as it cools. Wood that stays wet stains and can rot, so lead every drop away from the walls.
- Window unit: tilt it to the outside, as above, so the water leaves through its back, outside the wall. If it drips onto the wall below, fit a drain hose to the unit's drain port (if it has one) and lead it away.
- Mini split: the drain hose runs out with the pipes. Keep it sloping down all the way, at least 1/4" per foot, with no dips. End it on gravel, away from the wall and the foundation. In heating mode the outdoor unit drips too. Fit the drain fitting and hose that come with it. In cold climates keep that hose short and nearly vertical, so it cannot freeze.
- Rain: the drip cap over the outside head trim sheds rain past the gap above the frame. Keep the outdoor unit out of the water that runs off the roof edge.
Questions
Can I put a window AC in one of the shed's windows?
No. The opening windows tilt and swing inward; they do not slide up or sideways, so a window unit cannot sit in them. Cut a fitted opening in the wall instead (see "Window unit" above).
Do I have to wait for the walls to settle before I install the AC?
No. Install it when you like. Fix each part tight in one board, or hand-tight in slots: the backer of a mini split, the brackets under a window unit, the line-set cover and the conduit. The frame of a window unit is not fixed to the wall at all: it floats in its opening, like the shed's own window frames.
Can I screw the AC frame or its brackets to the wall?
The frame and its trims: never. They float, like the shed's own window frames, and the boards slide inside the U. The brackets outside: yes, but only their two top screws, tight, both in one board. The rest of each leg just rests on the wall.
Do you sell a mini split?
Yes: the MRCOOL DIY Easy Pro 5th Gen 9k BTU, with $200 off when you buy any shed. A line-set cover is sold separately.
Can I plug the mini split into a normal outlet?
No. It has no plug. It is wired to its own 115 V circuit on a 20 A breaker, by a licensed electrician.
Does the mini split heat too?
Yes. It is a heat pump: it gives 10,000 BTU of heat and works in outdoor temperatures down to about 5°F.
Can one mini split serve two rooms or two sheds?
Some systems run two indoor units from one outdoor unit; they are called multi-zone. The unit we sell is single-zone: one indoor unit and one outdoor unit.
Will the AC be enough on very hot days?
With the roof and floor insulated, customers report the shed stays comfortable up to about 100°F. A shed in full sun all day can still get too hot on the hottest days. Shade, a metal or light-colored roof, and a fan all help.
What about a portable AC?
It works, but it needs a hole in the wall for its exhaust hose, and it takes up floor space. For a shed you use every day, a window unit or a mini split is the better choice.
Sources
Pages checked on 2026-10-27 and 2026-10-29.
SolidBuild:
- Shed kit FAQ: insulation, settling, electrical wiring
- Insulation guide: roof and floor insulation, running costs
- Electrical guide
- Warranty policy
- MRCOOL DIY Easy Pro 5th Gen 9k BTU and the line-set cover
- Our assembly manual for the California: the window frames and the wind studs
- How to hang shelves in a log shed: the one-board rule, the French cleat and the screws
- Our answer on window AC units
Other sources:
- ENERGY STAR: room air conditioners: the sizing chart
- EPA: homeowner questions on refrigerants: Section 608
- USDA Wood Handbook (2021), chapter 4: the R-value of spruce and pine
- MRCOOL DIY Easy Pro installation manual and brochure: the indoor unit's size and weight, the mounting plate, the pipe hole, clearances
- MRCOOL 5th Gen DIY installation manual: hole sizes, wall brackets for the outdoor unit
- Tuin: expansion and contraction in log cabins: a slat fixed at the top, slots below
- GE AHE08 manual, through-the-wall installation and LG LW8016ER manual: window units in walls, power rules
- Green Building Advisor: heat pumps and log cabins: a plywood backer on log walls
- Tuin: adding a window to a log cabin: the gap above frames, clear boards above an opening
- EC&M: NEC rules for room air conditioners and Contracting Business: the 2026 GFCI rule
- Prices and noise: GE 5,000 BTU unit, Today's Homeowner: mini split installation cost, Frigidaire 5,000 BTU spec sheet