
You can hang shelves as soon as your shed is built. One rule lets the walls settle without gaps: screw anything tight into one wall board only. If a bracket or strip has to reach over several boards, only its top end is tight, and the other screws sit hand-tight in slots, so the boards can slide. Your shed's wind studs work the same way.
In short
For every SolidBuild shed: 1-1/8", 1-3/8" and 1-3/4" walls.
| What you want to hang | Use |
|---|---|
| One shelf, shelf board included: up to 6 ft long and 75 lb [34 kg] on 3 brackets, or up to 3 ft and 50 lb [23 kg] on 2 (50 lb [23 kg] and 33 lb [15 kg] on 1-1/8" walls) | Option 1: heavy-duty brackets in one board |
| A heavier shelf (on two or more battens), or several shelves on long battens | Option 2: a slotted 2x4 batten |
| A cabinet, a pegboard, or a shelf unit built as a box | Option 3: a French cleat |
| More than that | A shelf unit that stands on the floor |
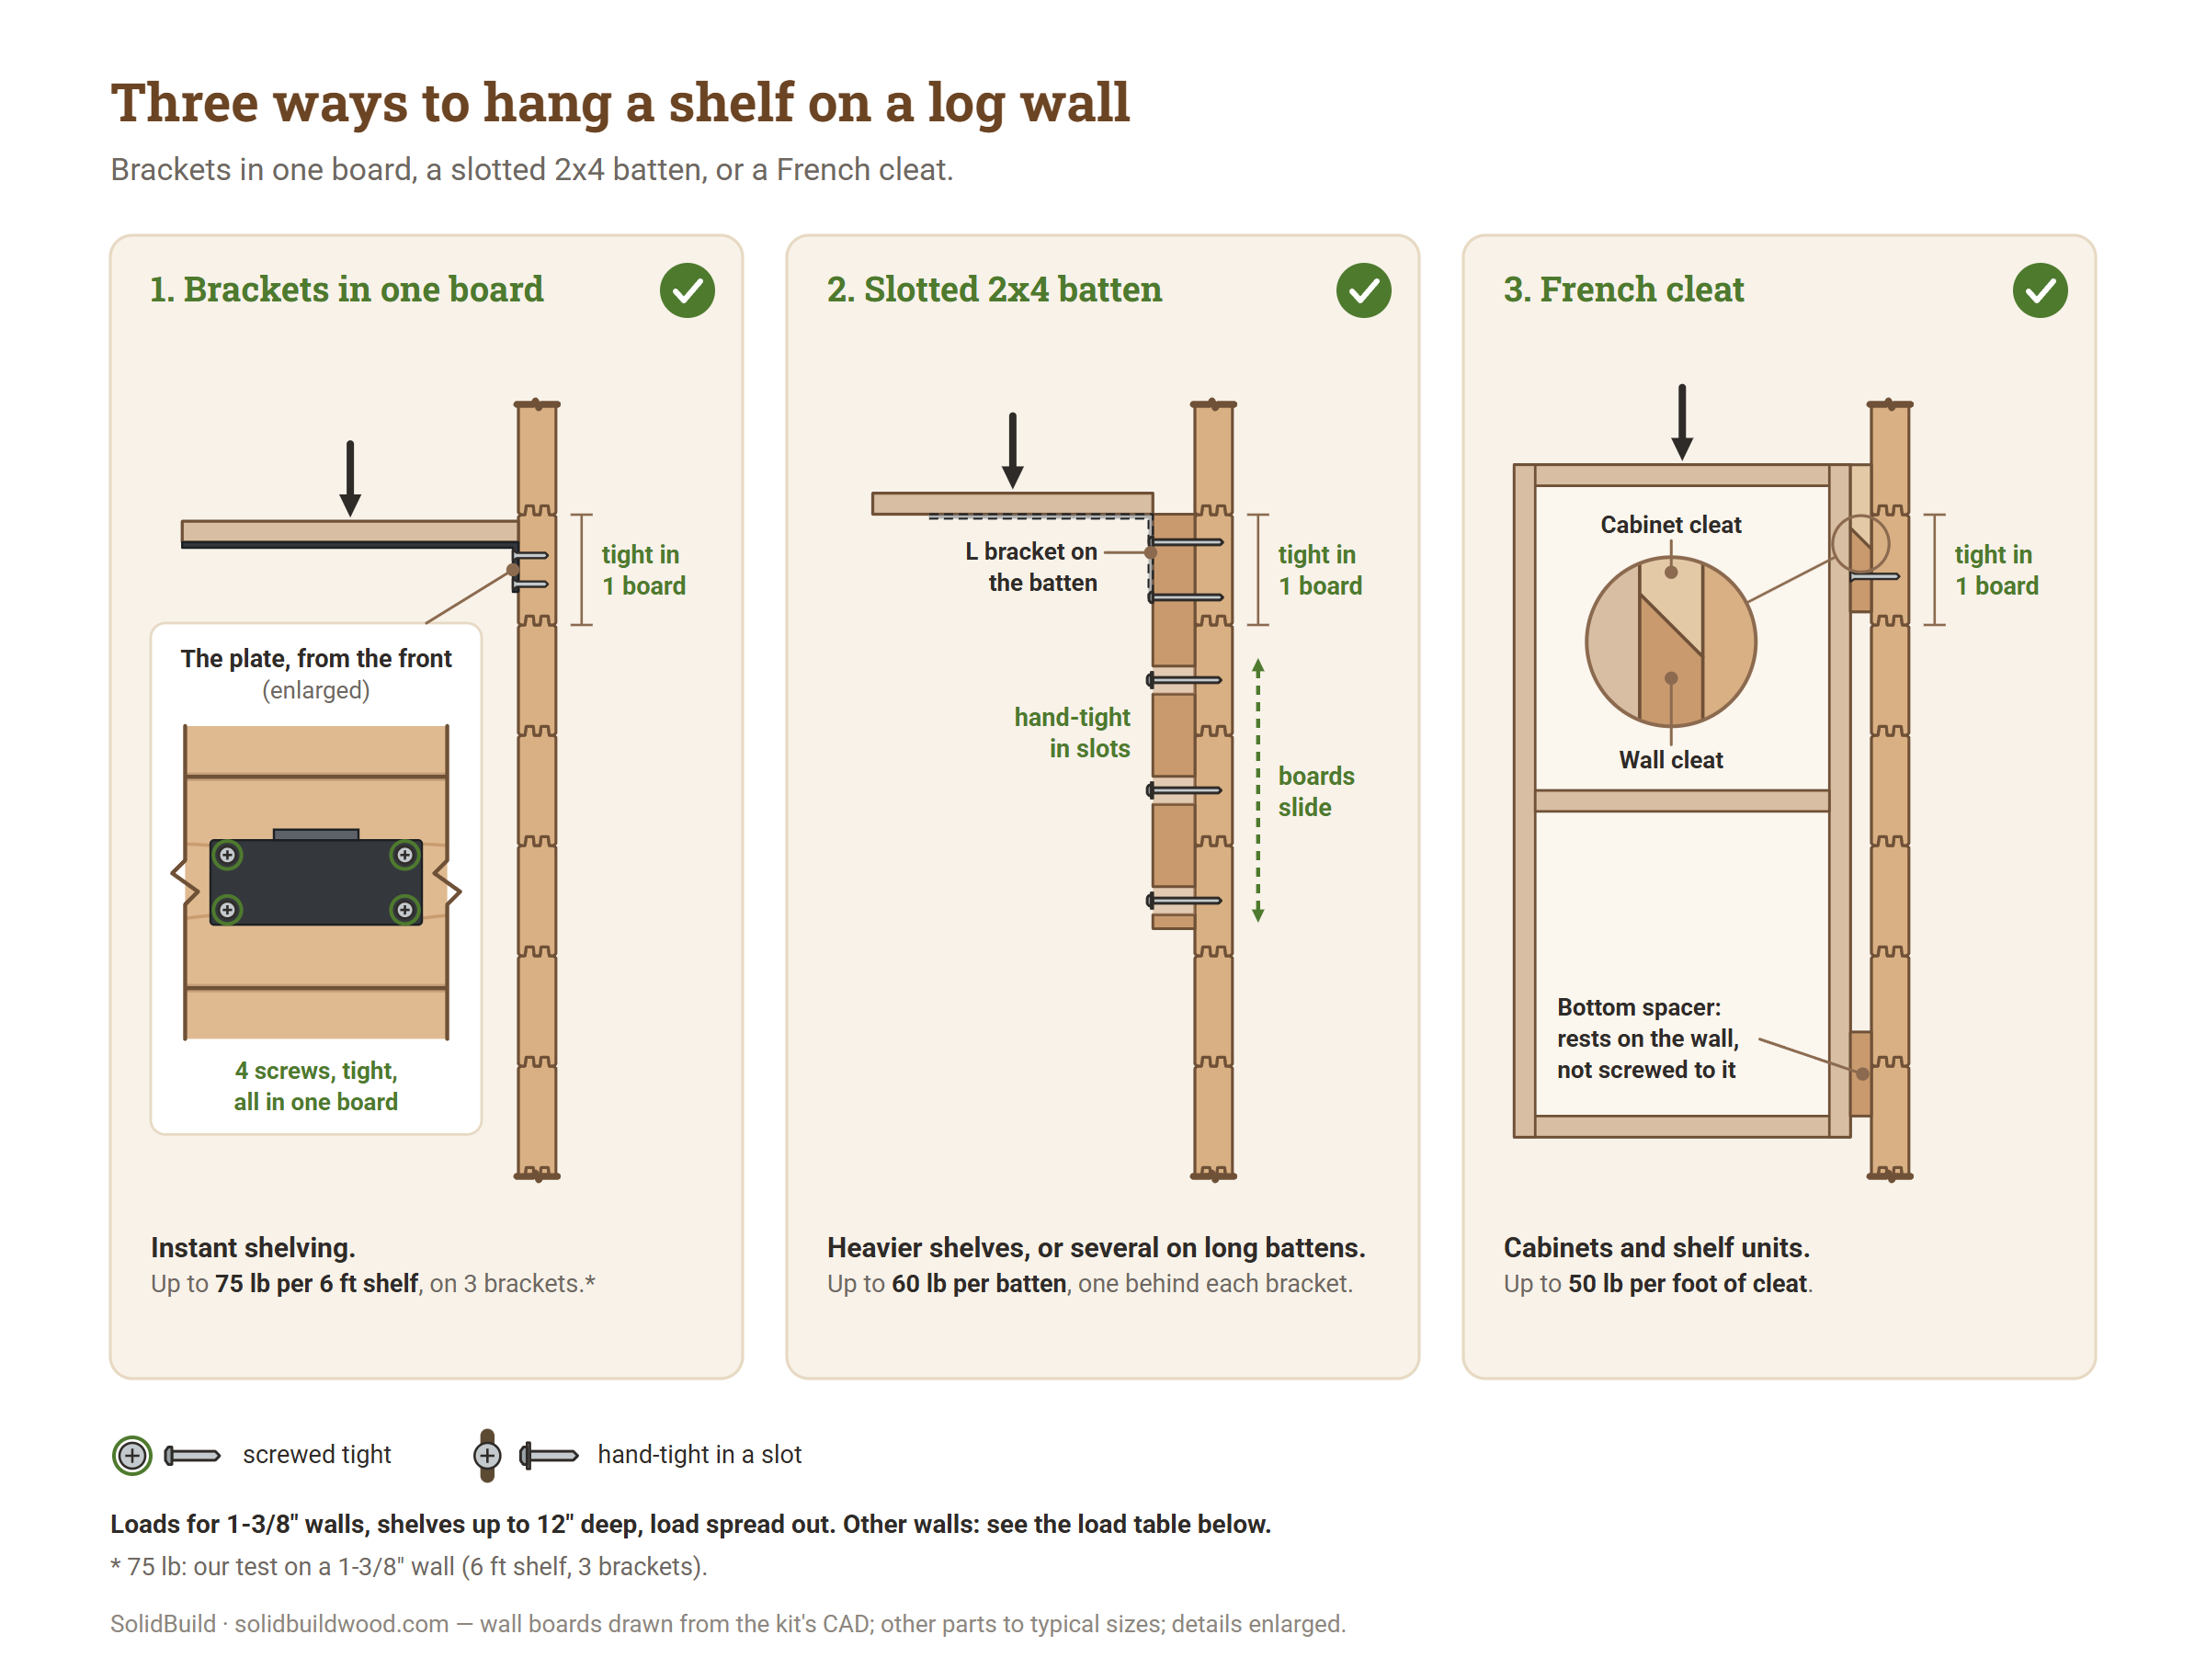
The rule: one board, or let it slide
- Screw anything tight into one wall board only. That board moves down with the wall, so no boards are pinned together.
- If a bracket or strip has to reach over several boards, screw only its top end tight, into one board. Put each of its other screws through a vertical slot, with a washer, hand-tight, so the boards can slide behind it. The wind studs on your shed work this way.
- Never glue, foam or caulk anything to the wall boards, and never fix anything rigid from the floor to the roof.
Tight means you drive the screw until its head pulls the part firmly against the wall. Hand-tight means you drive the screw until its washer just touches the wood, then stop: you can still turn the washer with your fingers.
Why the walls move. Your shed's walls are wood boards stacked on top of each other. The tongue of each board sits about 5/16" [8 mm] deep in the groove of the board above it.
- In the first 2 weeks or so, the boards seat into each other: the tongues go fully into the grooves.
- Then the wood dries, and each board loses a little height. A full-height wall drops by up to 2" [51 mm]. This can take up to a year, depending on the heat and humidity where you live.
- After that, the wall still moves a little with every season.
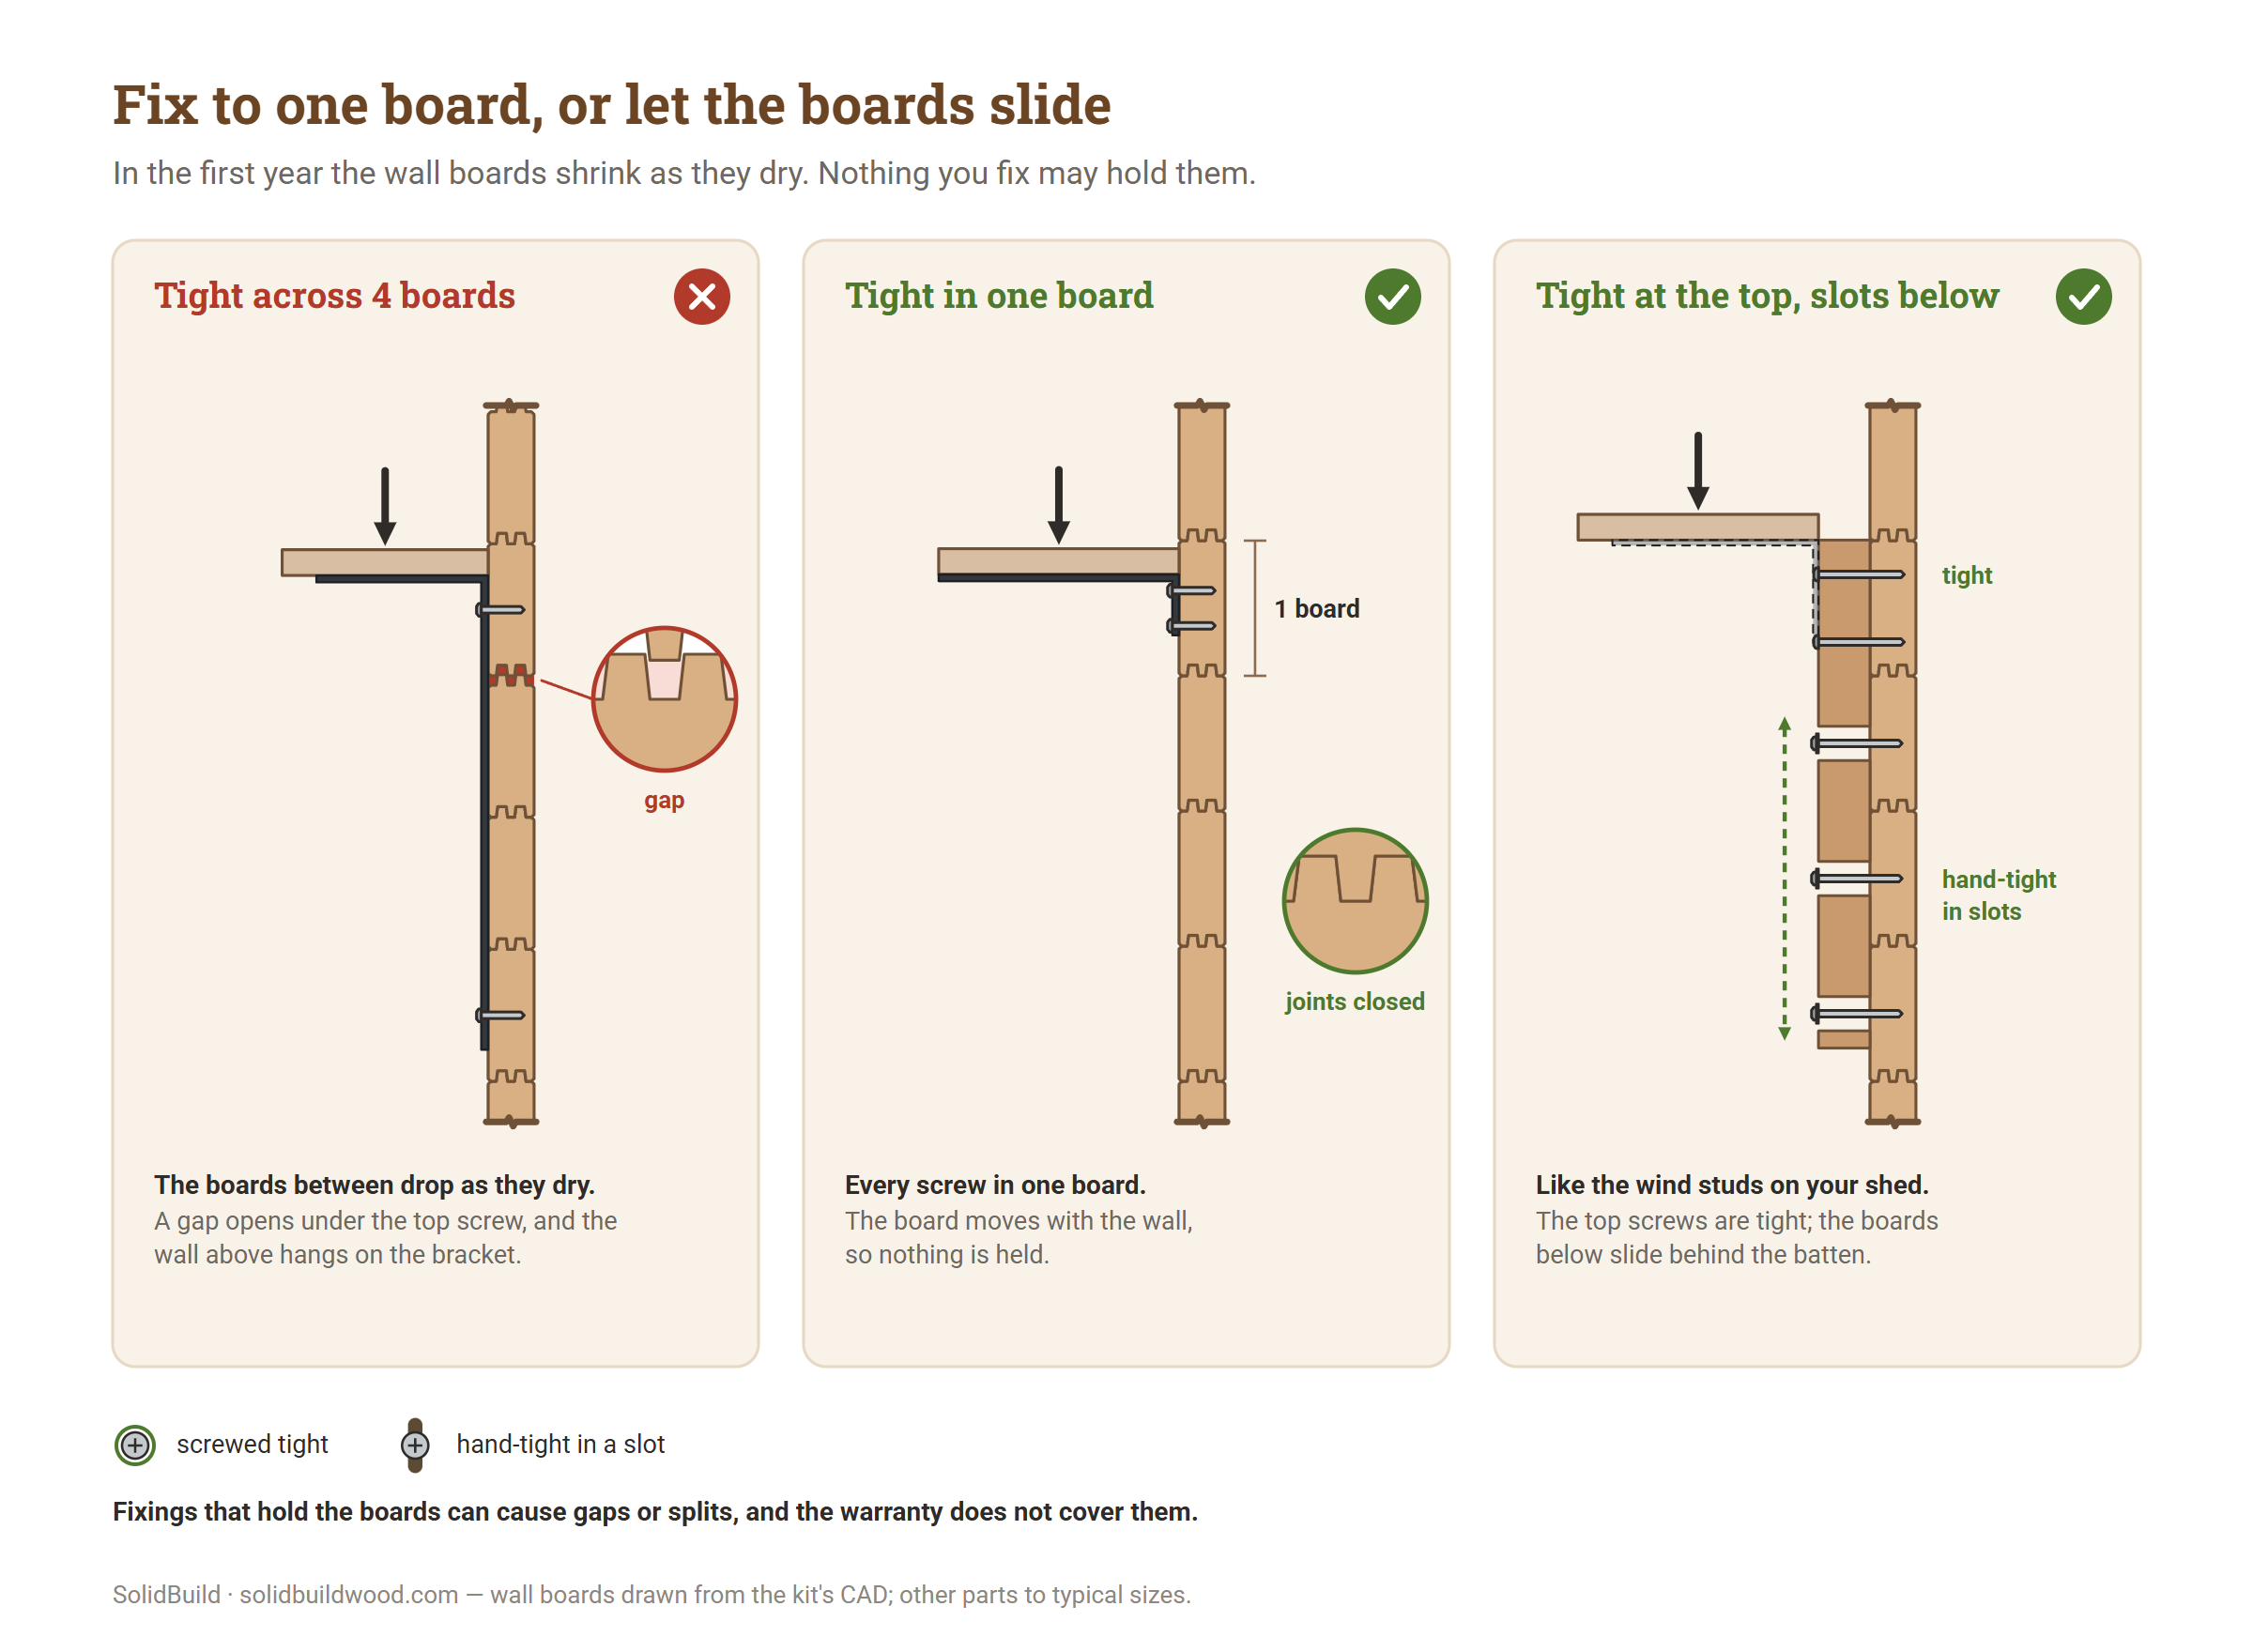
What happens if a bracket pins the boards. A bracket screwed tight into several boards holds them at a fixed distance, so they cannot settle. The boards between still shrink, so a gap opens:
- across 3 boards, up to 3/16" [4.6 mm];
- across 4 boards, about 1/4" [6.9 mm];
- across 5 boards, about 3/8" [9 mm]. That is deeper than the tongue, so you see daylight, and rain gets in.
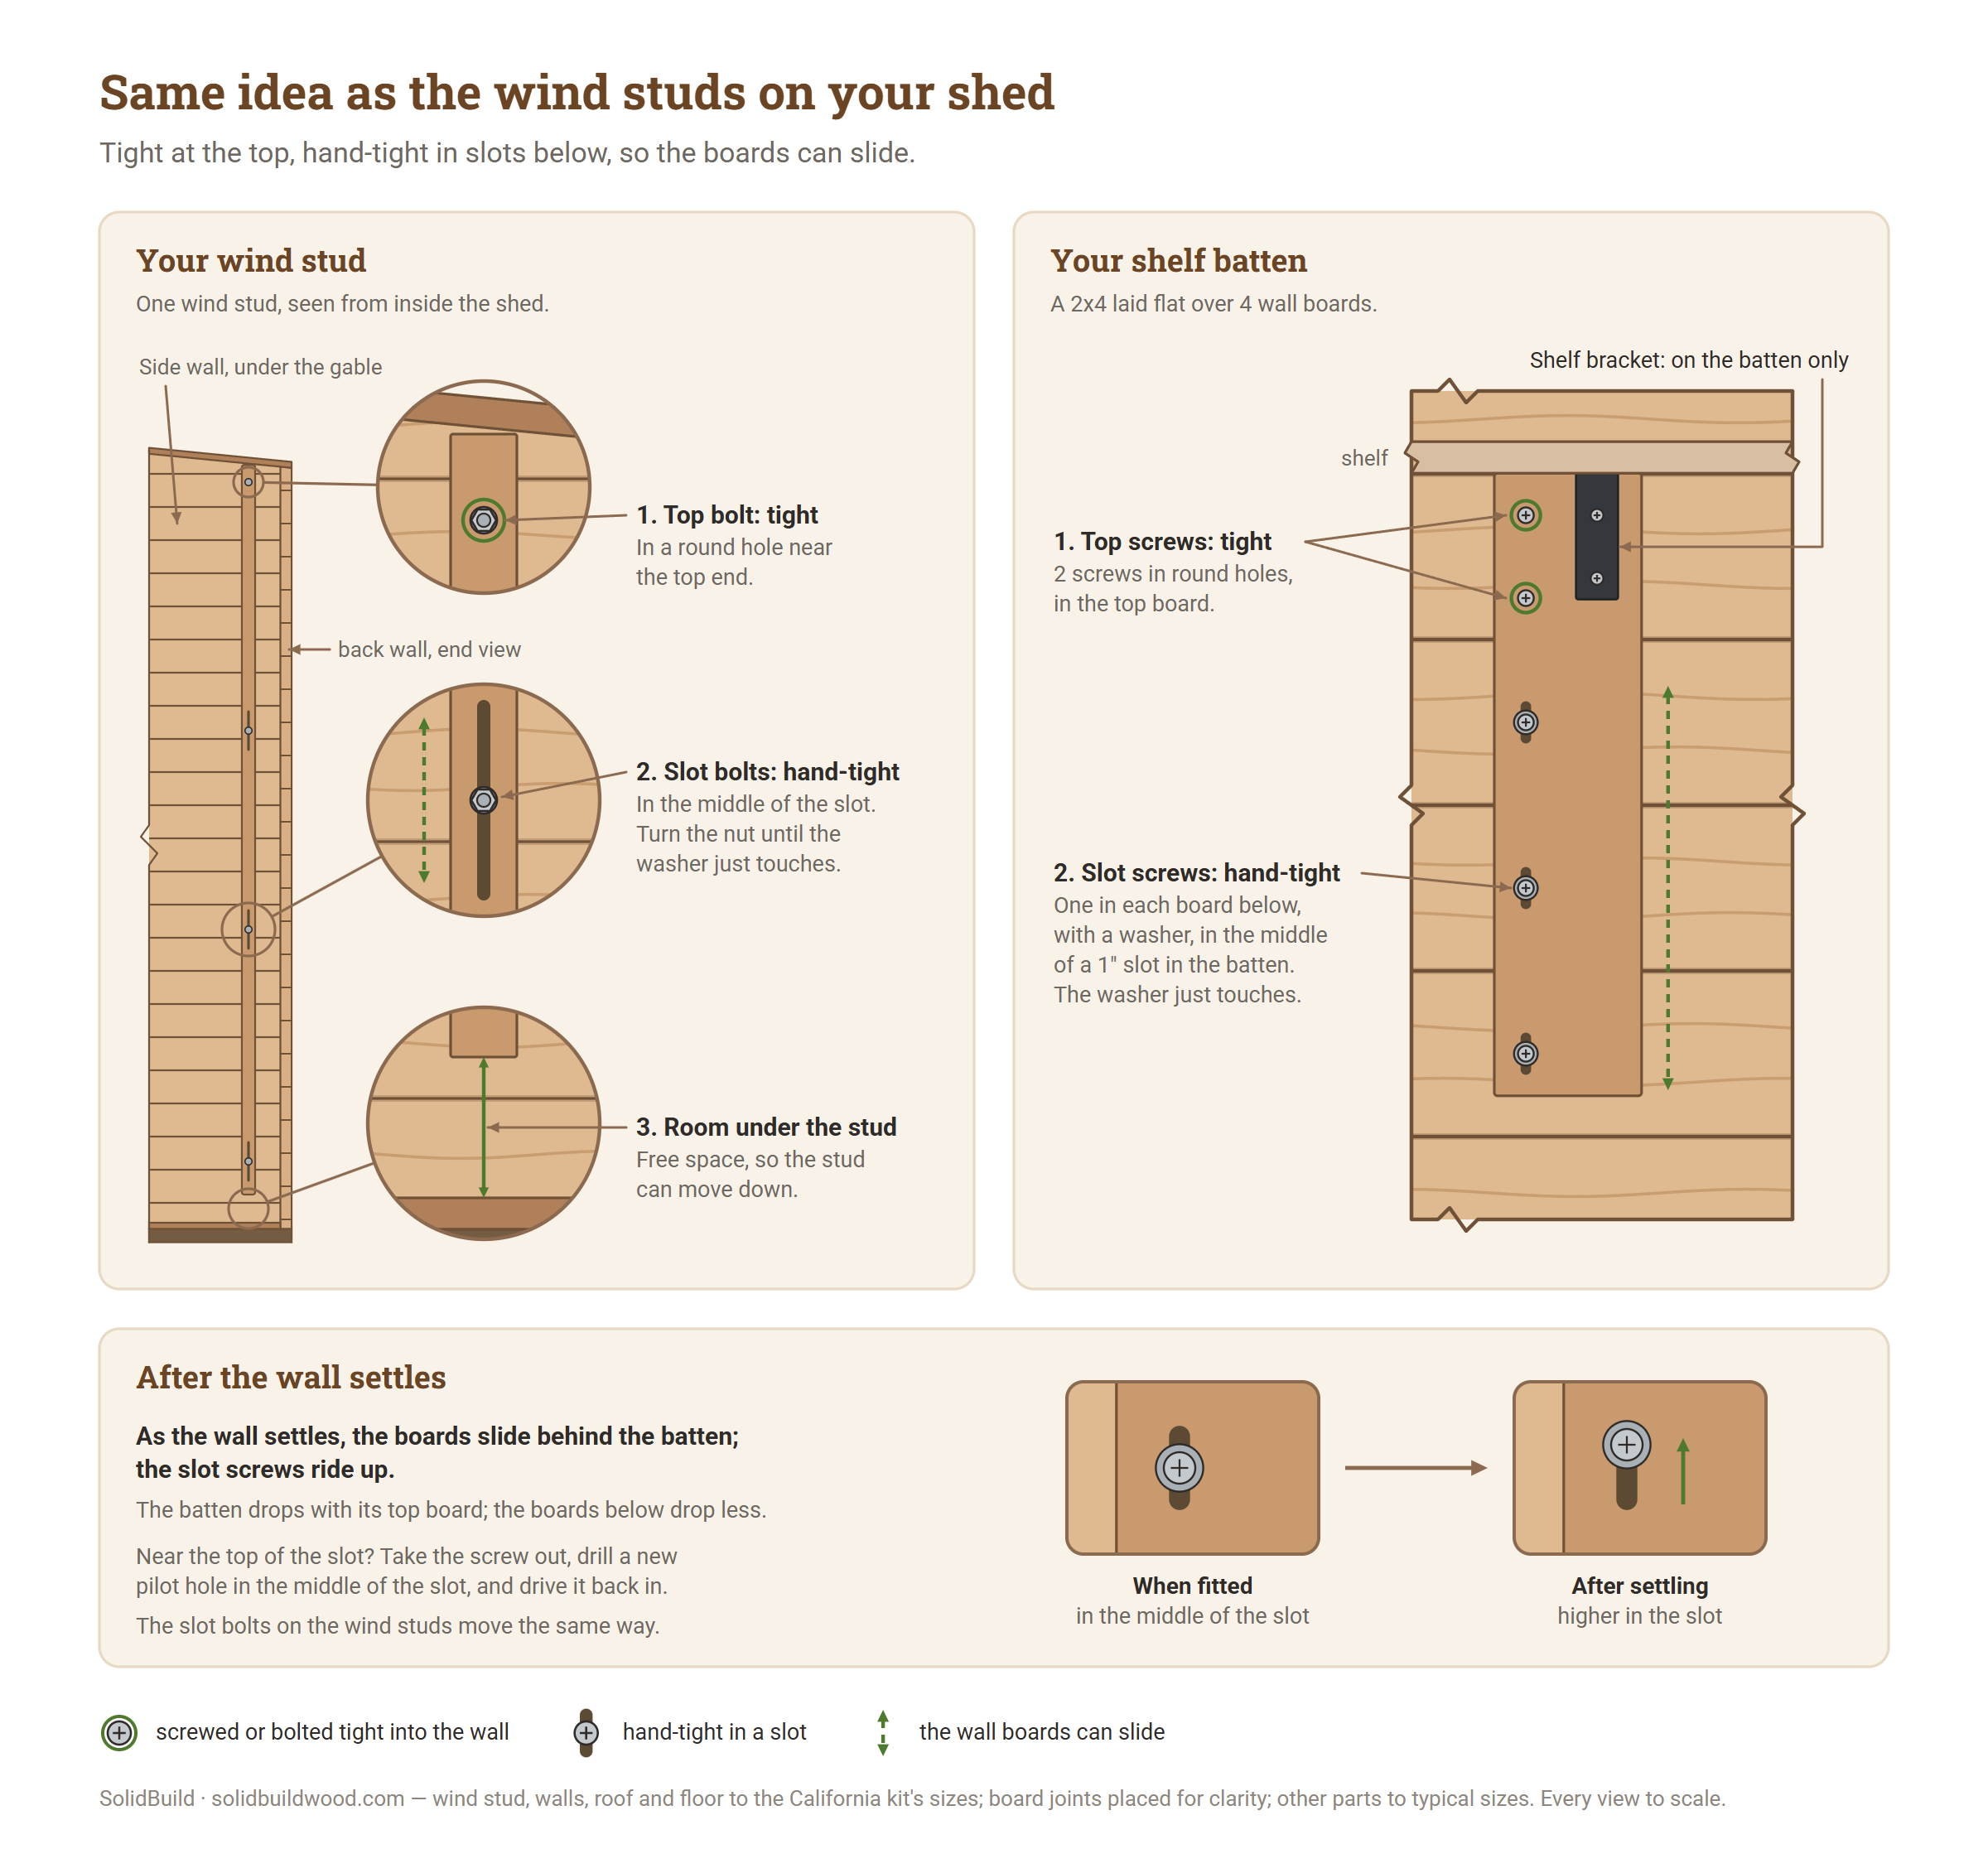
Your shed already works this way. The wind studs are the long upright wood strips bolted to the walls under the gables, near the corners. Each one is bolted tight at the top. Its other bolts sit in long slots and are only hand-tight, so the boards slide past them as the wall settles. Option 2 below uses the same idea for shelves.
Your warranty. Our warranty says you can hang shelves or attach items to the walls if it is done per the manual: "The wood must remain free to move vertically, so avoid anything that pins boards together — no gluing, no rigid floor-to-ceiling conduit, and no heavy shelving bolted across more than four board courses. Attachments that block wood movement can cause gaps or splits and are not covered." The one-board rule in this guide keeps you well inside that: as shown above, even 3 or 4 boards held tight can open a gap.
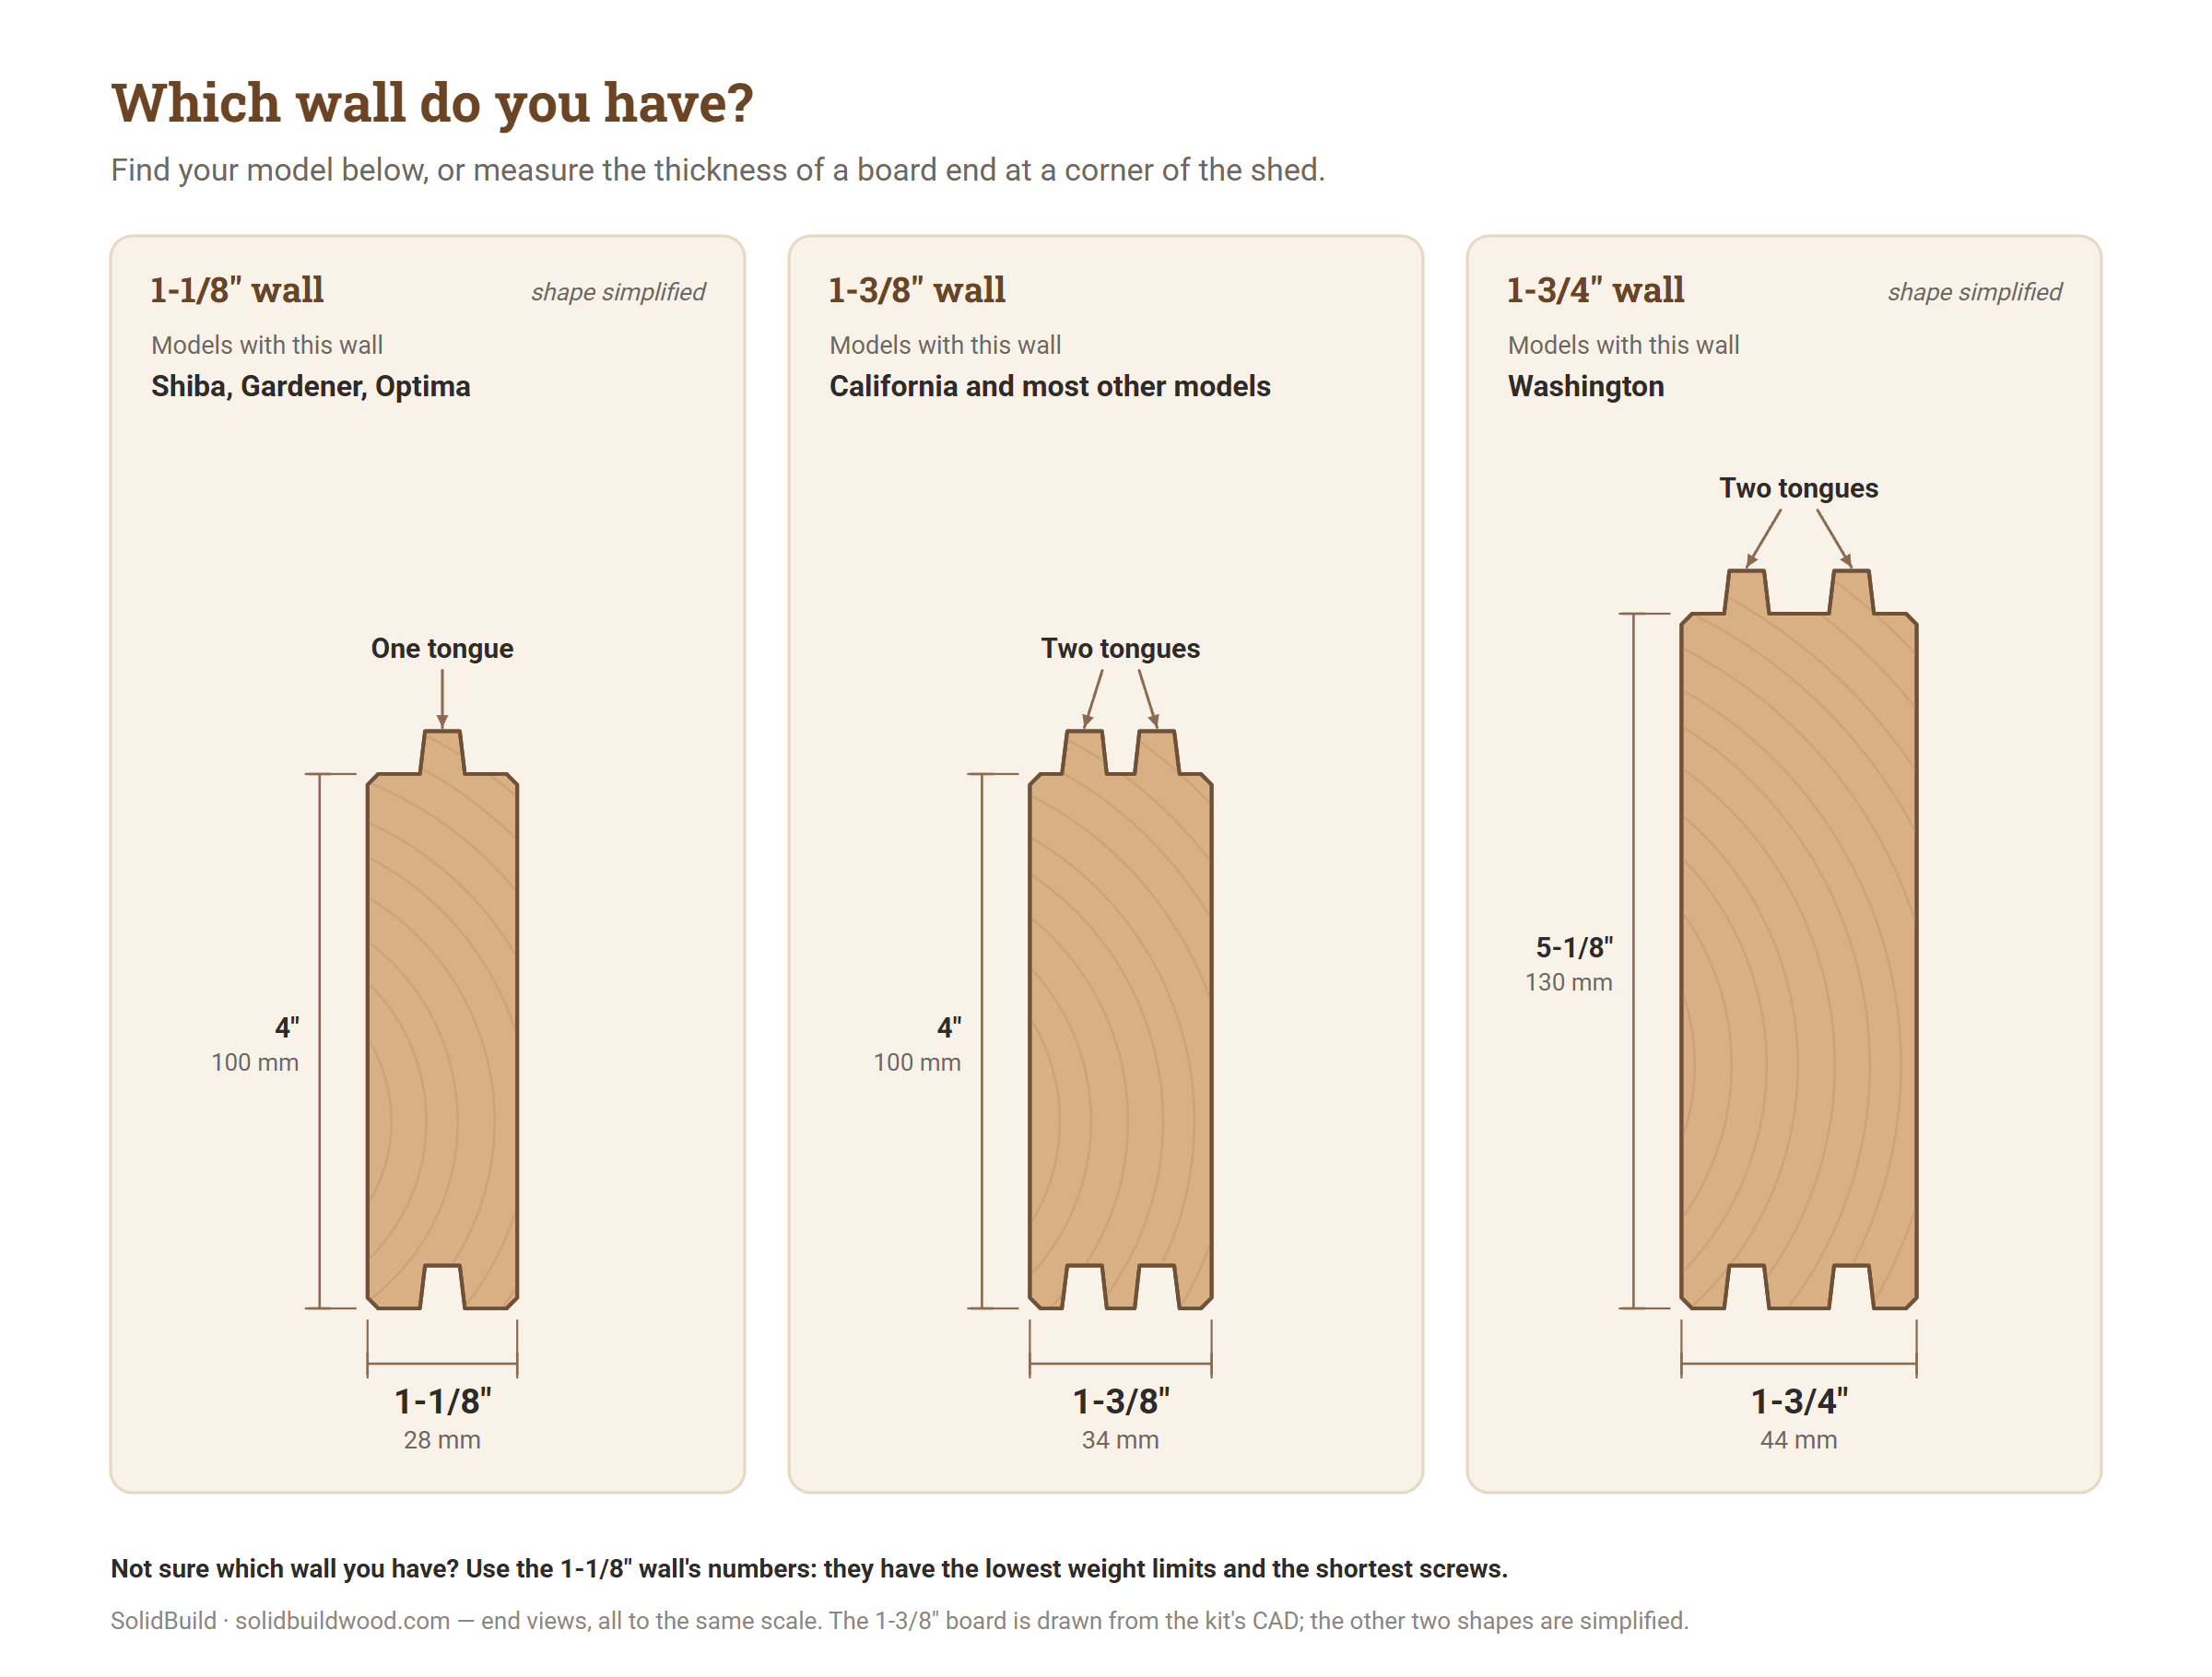
Which wall do I have?
Find your model below, or measure the thickness of a board end at a corner of the shed, where the board ends stick out past the wall.
| Wall board | Models | Height of one board |
|---|---|---|
| 1-1/8" [28 mm], one tongue | Shiba, Gardener, Optima | 4" [100 mm] |
| 1-3/8" [34 mm], two tongues | California and most other models | 4" [100 mm] |
| 1-3/4" [44 mm], two tongues | Washington | 5-1/8" [130 mm] |
If you cannot tell, use the 1-1/8" column everywhere in this guide. It has the lowest loads and the shortest screws.
Safe loads
The load is the shelf board plus everything on it, left there for years. For scale: a gallon of water weighs 8.3 lb [3.8 kg], and a full gallon can of paint weighs more.
Shelf up to 12" [305 mm] deep, load spread out:
| Option | 1-1/8" wall [28 mm] | 1-3/8" wall [34 mm] | 1-3/4" wall [44 mm] |
|---|---|---|---|
| 1. Heavy-duty brackets in one board: a shelf over 3 ft and up to 6 ft on 3 brackets | 50 lb per shelf [23 kg] | 75 lb per shelf [34 kg] | 75 lb per shelf [34 kg] |
| 1. Heavy-duty brackets in one board: a shelf up to 3 ft on 2 brackets | 33 lb per shelf [15 kg] | 50 lb per shelf [23 kg] | 50 lb per shelf [23 kg] |
| 1, small brackets. A small L bracket, all its screws in one board | 10 lb per bracket [4.5 kg] | 15 lb per bracket [6.8 kg] | 25 lb per bracket [11 kg] |
| 2. Slotted 2x4 batten, 4 boards tall (3 on Washington) | 50 lb per batten [23 kg] | 60 lb per batten [27 kg] | 90 lb per batten [41 kg] |
| 3. French cleat on one board, screws every 6" | 40 lb per foot [59 kg/m] | 50 lb per foot [74 kg/m] | 75 lb per foot [111 kg/m] |
Change the load for your shelf:
- Shelf up to 12" deep: use the values above. With heavy-duty brackets, the shelf is no deeper than the bracket arm.
- Shelf over 12", up to 16" [406 mm] deep (small brackets or option 2): multiply by 3/4. Deeper than 16": this guide does not cover it. Contact us.
- Heavy item at the front edge of the shelf (options 1 and 2): multiply by 1/2.
- Damp shed, where the wood stays above 19% moisture (a moisture meter shows it): multiply by 2/3.
- If more than one applies, multiply by each of them.
Small brackets and battens: how many?
- Put at least 2 under each shelf.
- With 2, each one carries half the load. With 3 or more, the inner ones carry more: divide the load by the number of brackets or battens less 1-1/2. For example, with 3, the middle one carries the load divided by 1-1/2.
- The bracket's own rating must also cover the load. Store ratings are for brackets screwed into house wall studs or masonry. On your shed, the lower of the two numbers counts.
Example. A 3 ft [0.9 m] shelf, 12" deep, on a 1-3/8" wall, carrying 100 lb [45 kg] in all (paint plus the shelf board):
- heavy-duty brackets in one board (75 lb per shelf): not enough;
- two slotted battens, one near each end (60 lb each, 120 lb [54 kg] together): enough.
Screws
The same rules for every option:
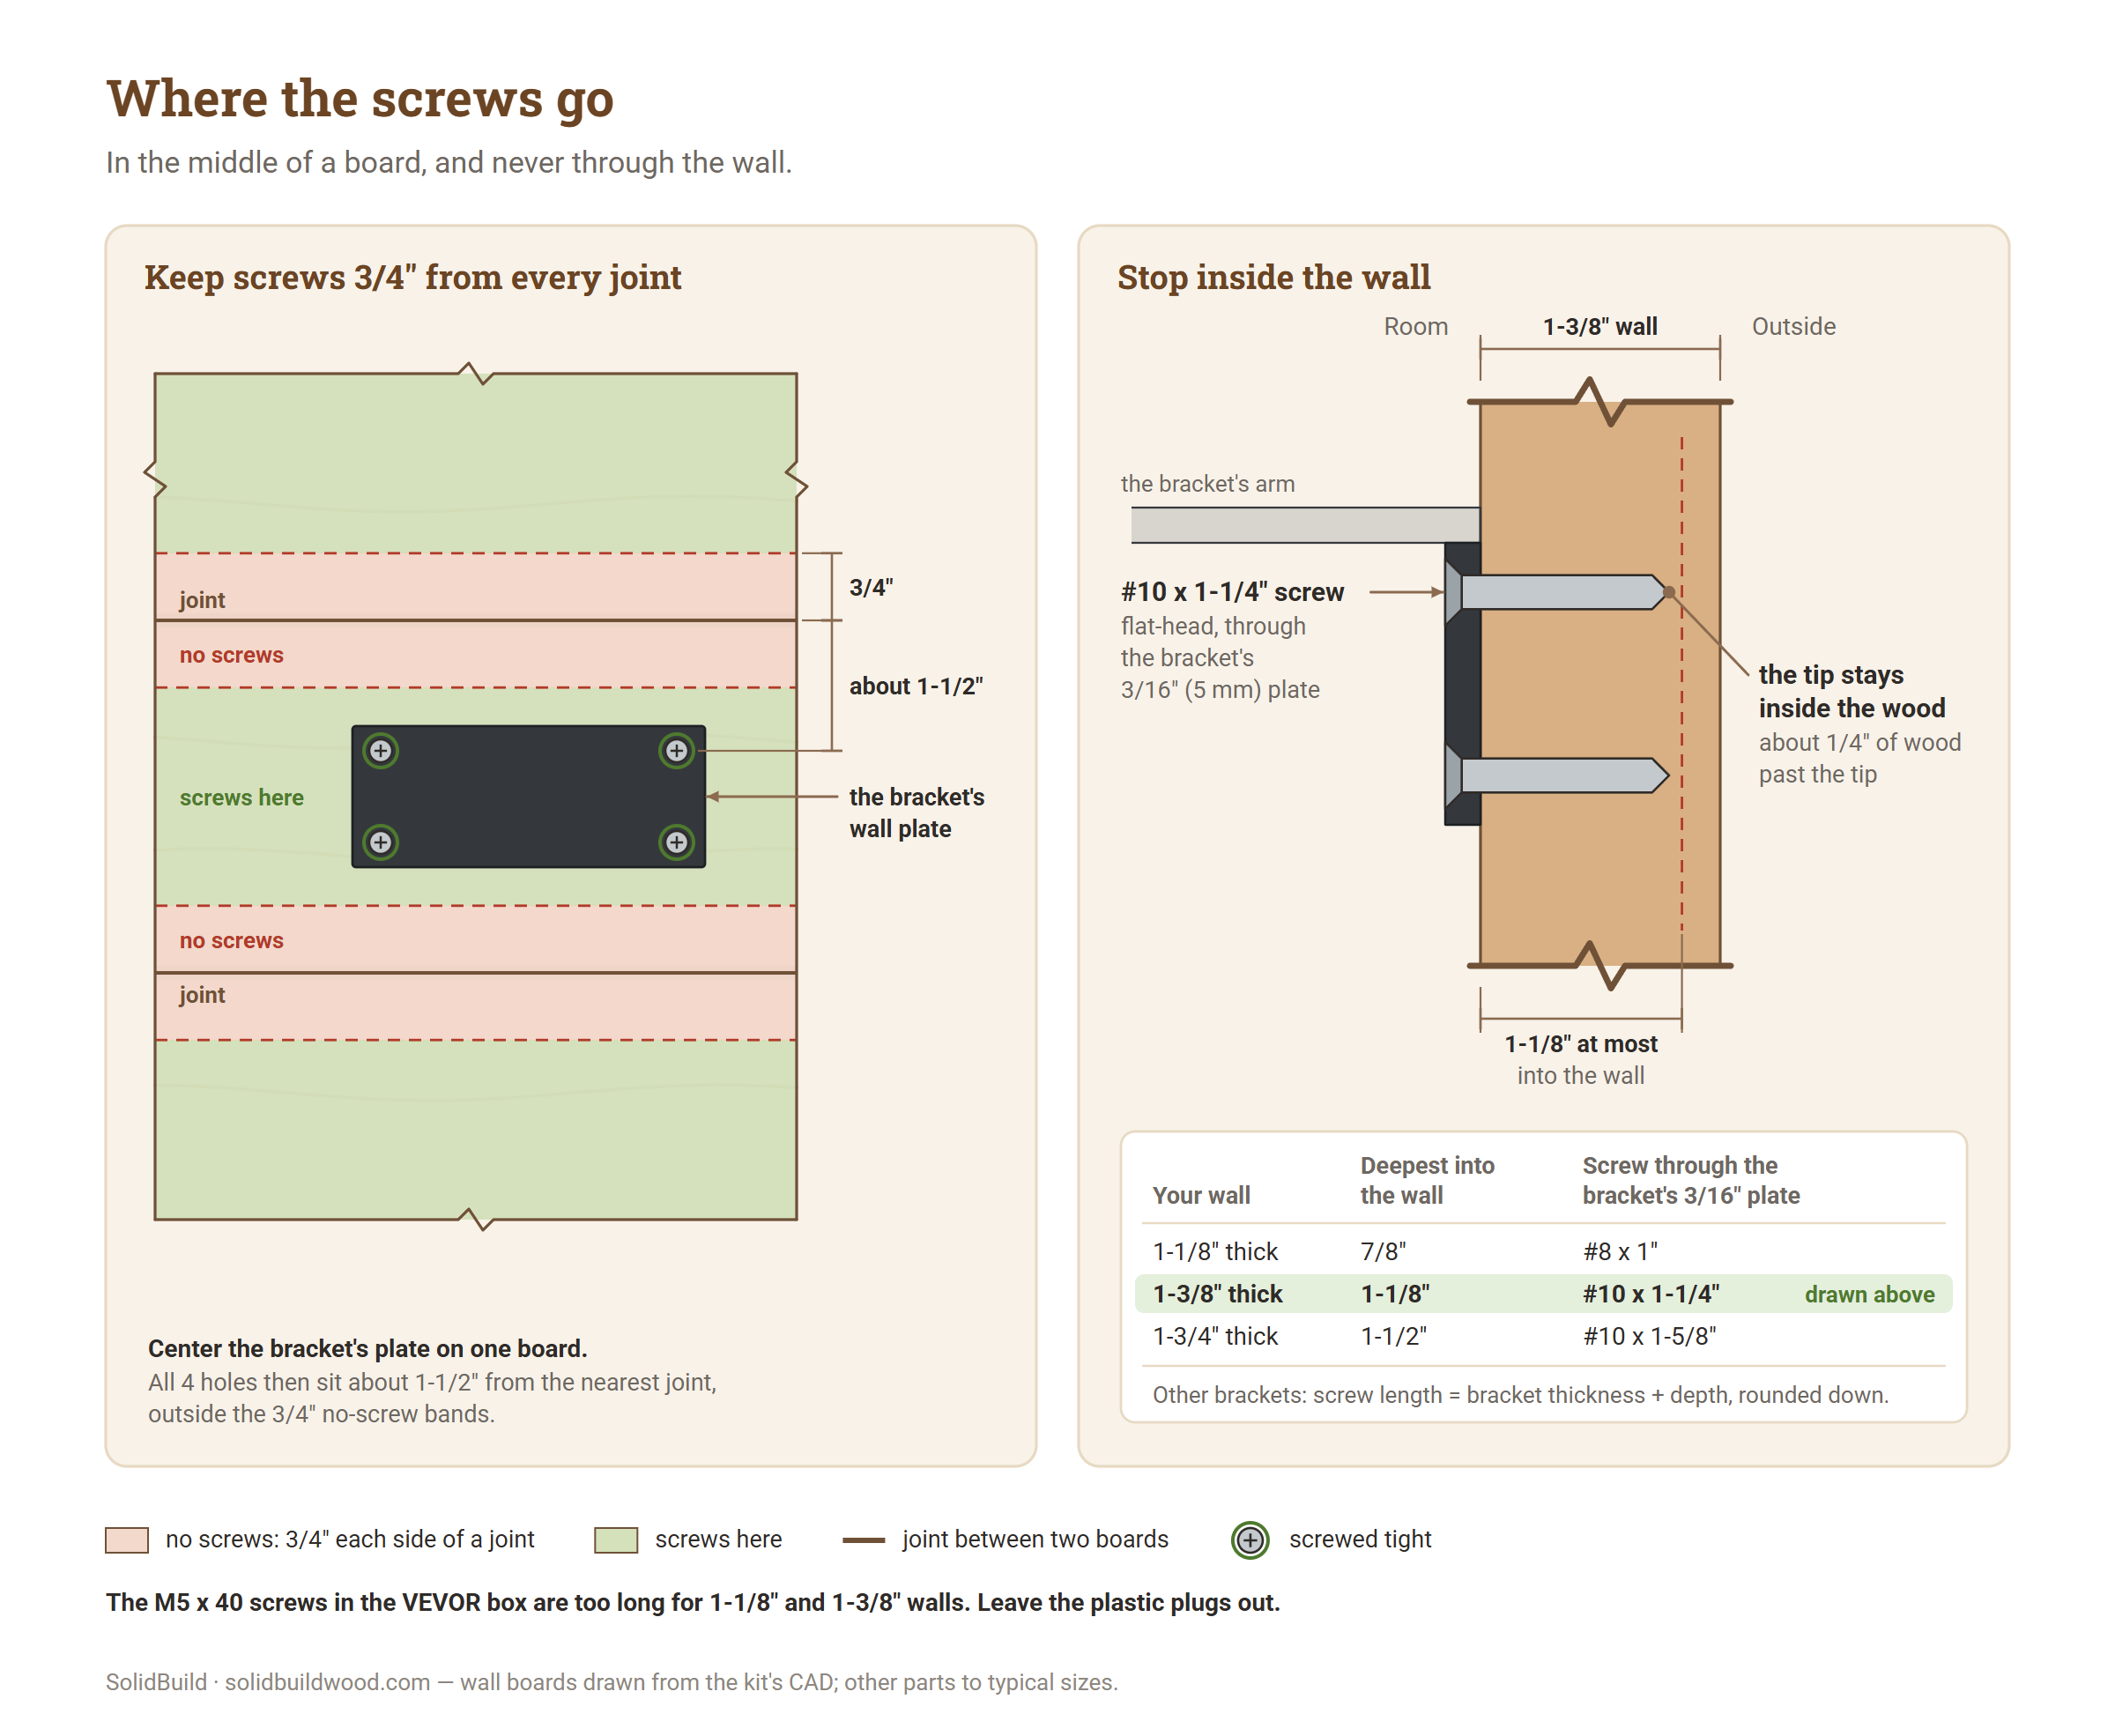
- Size: #10 wood screws. In 1-1/8" walls, #8.
- Pre-drill: a 7/64" bit for #10, a 3/32" bit for #8. Wrap tape around the bit to mark the depth, so the hole goes no deeper than the screw will.
- Never in the joint: keep every screw at least 3/4" [19 mm] from the joint between two boards.
- Never through the wall: a screw may go no deeper into the wall than the table shows, so its tip stays inside the wood. Screw length = the thickness of what you screw through + that depth, or less.
| Your wall | Screw | Pre-drill | Deepest into the wall | Through a steel bracket 1/8"-3/16" thick | Through a 3/4" cleat | Through a 2x4 batten |
|---|---|---|---|---|---|---|
| 1-1/8" [28 mm] | #8 | 3/32" | 7/8" [22 mm] | #8 x 1" | #8 x 1-5/8" | #8 x 2-1/4" |
| 1-3/8" [34 mm] | #10 | 7/64" | 1-1/8" [29 mm] | #10 x 1-1/4" | #10 x 1-3/4" | #10 x 2-1/2" |
| 1-3/4" [44 mm] | #10 | 7/64" | 1-1/2" [38 mm] | #10 x 1-5/8" | #10 x 2-1/4" | #10 x 3" |
For a bracket thinner than 1/8", use the next shorter screw: #8 x 7/8", #10 x 1" or #10 x 1-1/2".
Option 1: heavy-duty brackets in one board
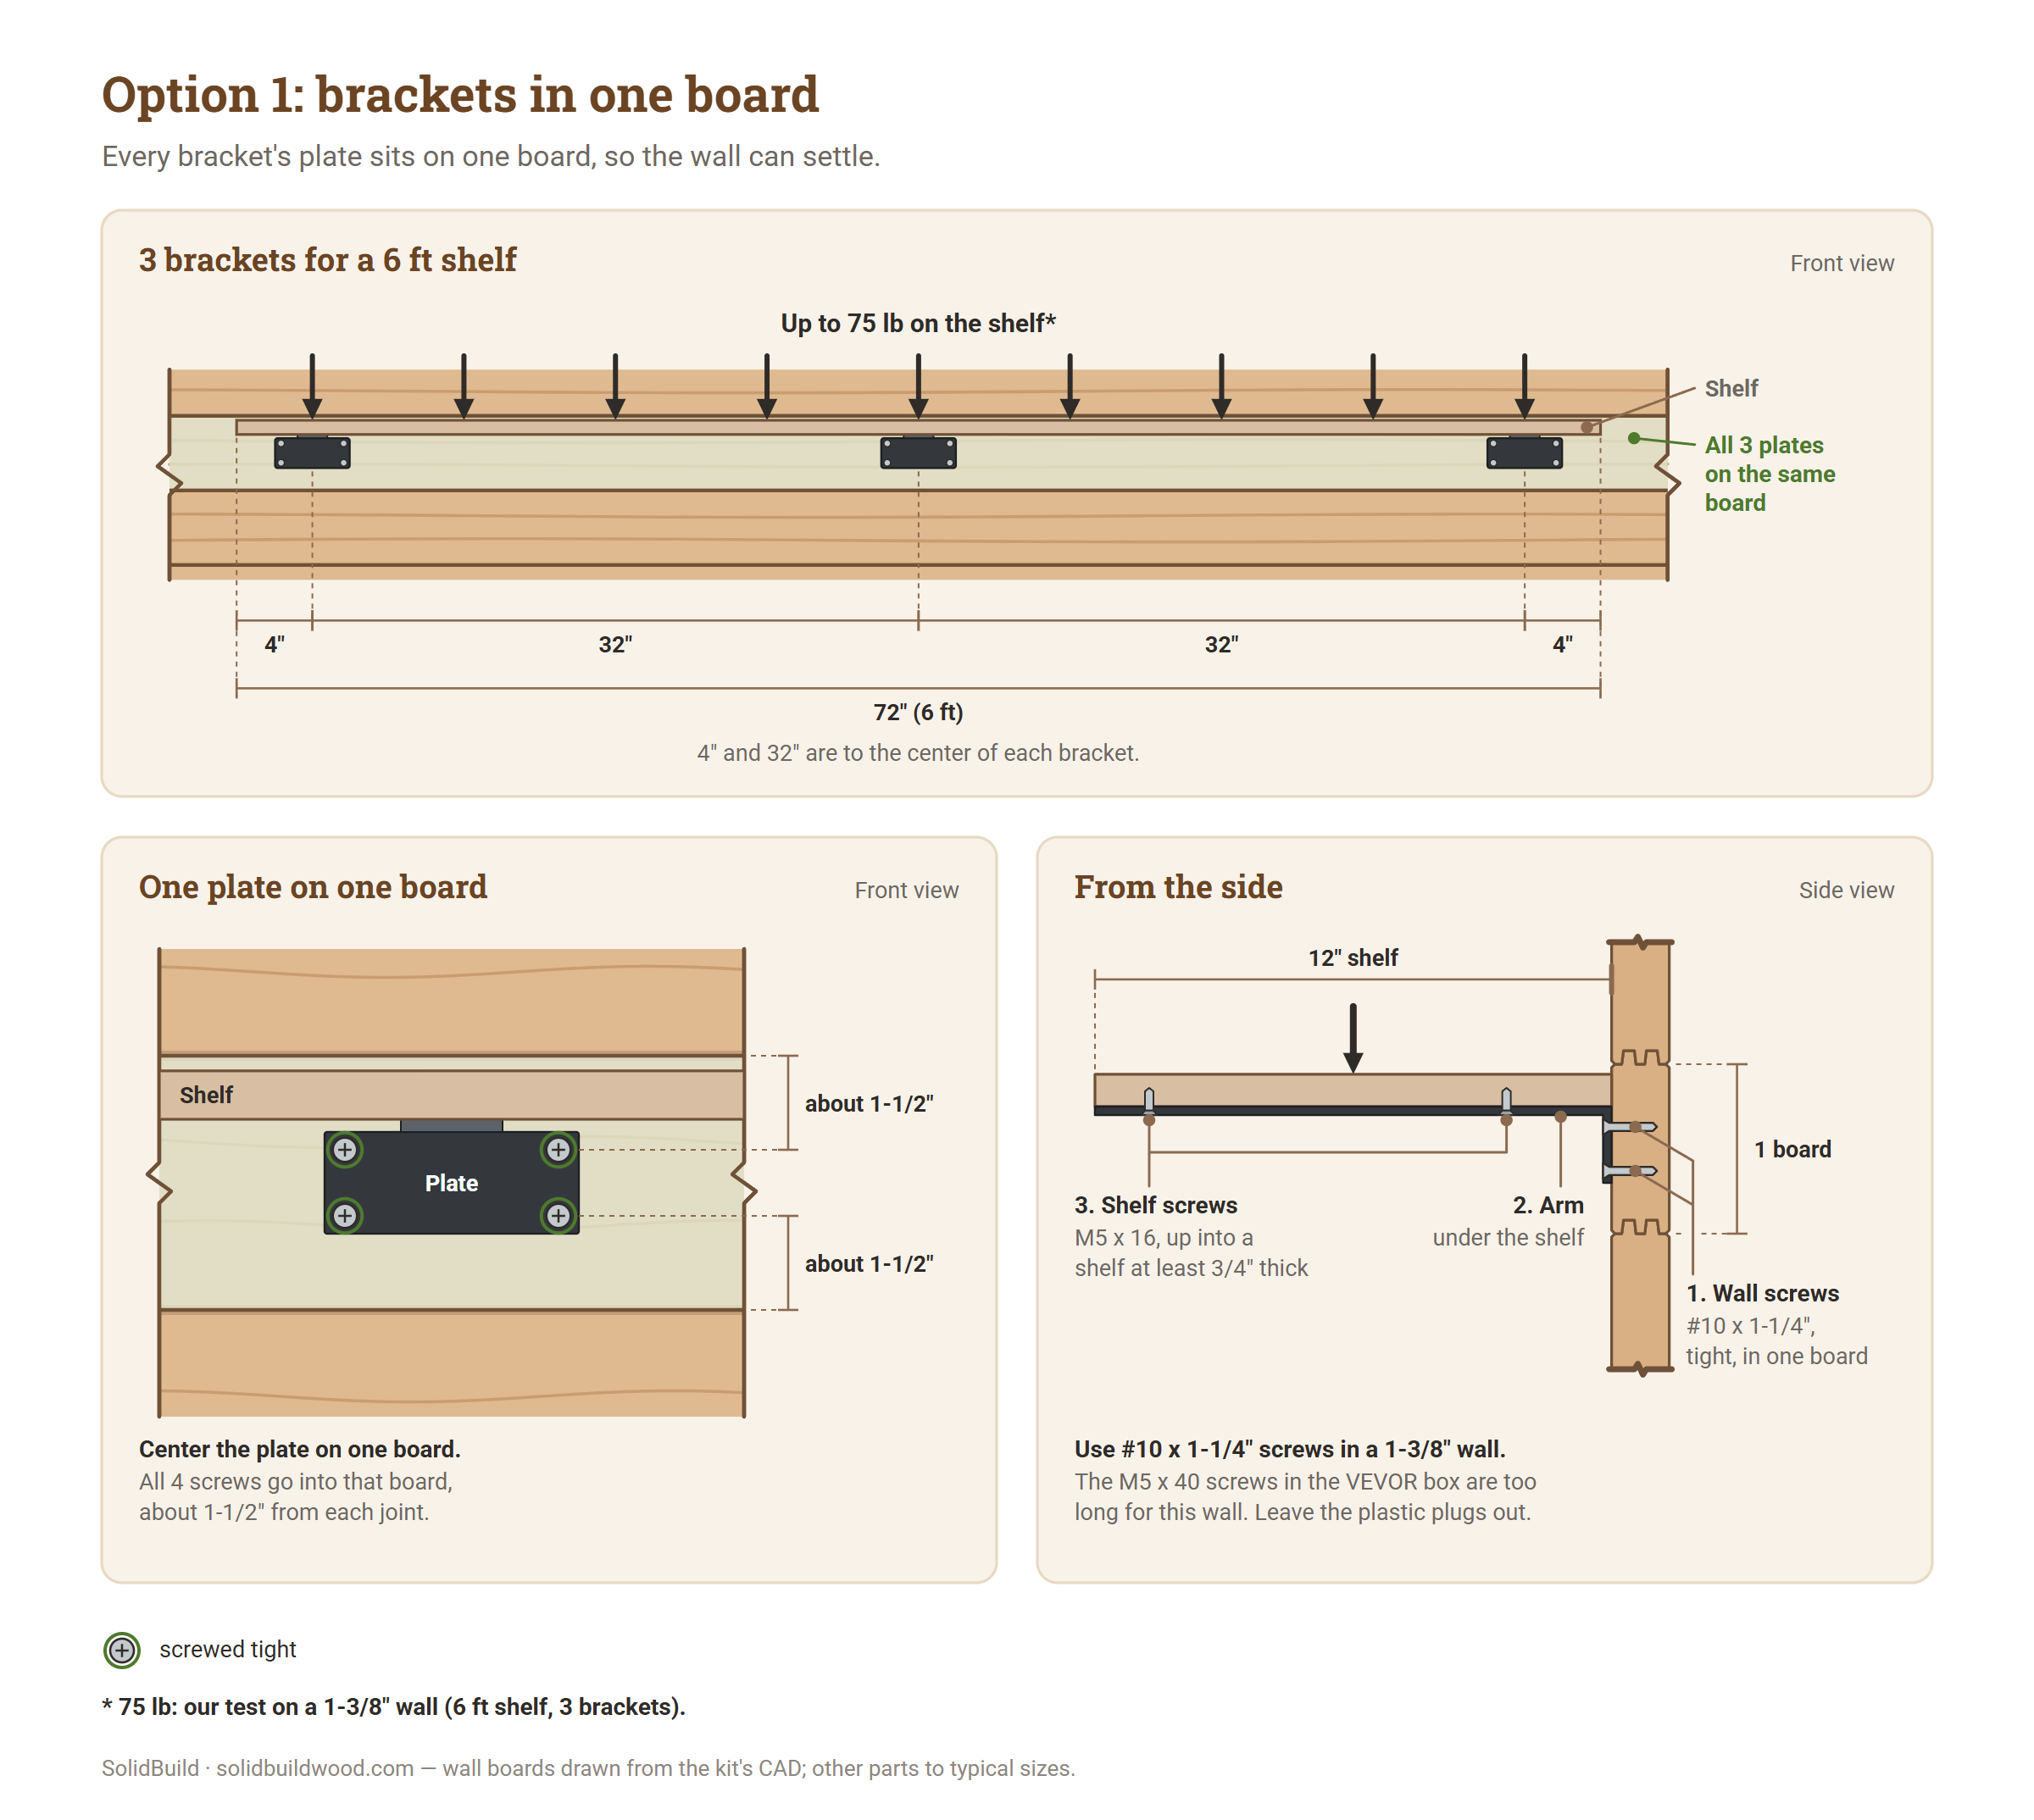
Use it for: one shelf, ready in minutes. Safe load, shelf board included: 75 lb [34 kg] on a shelf up to 6 ft long on 3 brackets, 50 lb [23 kg] on a shelf up to 3 ft on 2 (1-3/8" and 1-3/4" walls); 50 lb [23 kg] and 33 lb [15 kg] on 1-1/8" walls. This is for the whole shelf: a fourth bracket does not raise it.
What to buy:
- Heavy-duty steel shelf brackets with a flat arm under the shelf and a wall plate about 4" [100 mm] wide and no more than 1-3/4" [45 mm] tall, with 4 screw holes. Some stores call them heavy-duty floating shelf brackets. Do not buy the hidden-rod type that pushes into holes drilled in the shelf. The brackets in our test were VEVOR's 12" heavy-duty brackets, 3/16" [5 mm] steel, rated 160 lb each; their 10" size has the same wall plate.
- 3 brackets for a shelf over 3 ft and up to 6 ft long. 2 brackets for a shelf up to 3 ft.
- A shelf board at least 3/4" [19 mm] thick, no deeper than the bracket arm: 12" brackets for a 12" shelf, 10" brackets for a 10" shelf.
- Wall screws from the screw table, "Through a steel bracket" column: 4 for each bracket. The long screws in the bracket box are too long for 1-1/8" and 1-3/8" walls: their tips can come out on the outside. Leave the plastic plugs out too: they are for masonry.
How to fit it:
- Choose one board at the height you want. Every bracket of this shelf goes on this same board.
- Draw a level line along the board, 1-1/8" [29 mm] below the joint above it (1-3/4" [45 mm] on the Washington). The top edge of each wall plate goes on this line. The plate is then in the middle of the board.
- Mark the center of each bracket on the line: one about 4" [100 mm] in from each end of the shelf, and on a shelf over 3 ft, one in the middle.
- Hold each bracket with its plate on the line, and mark its 4 holes. Check that every hole is at least 3/4" [19 mm] from a joint. On a 4" board each hole sits about 1-1/2" [38 mm] from the joint.
- Pre-drill the holes.
- Screw each bracket on with all 4 screws, tight.
- Lay the shelf on the arms. Screw it on from below, through the holes in the arms, with the short screws from the bracket box.
- Put heavy things near the wall and over the brackets.
Smaller brackets also work if all their screws fit in one board, at least 3/4" from each joint. They hold much less: 15 lb [6.8 kg] per bracket on a 1-3/8" wall (10 lb on 1-1/8", 25 lb on 1-3/4"), from our calculation of the board's joint.
Longer than 6 ft? Use two shelves, each on its own brackets, or use option 2.
Why it works: every screw is in one board. The board moves down with the wall as it settles, and the brackets and the shelf move with it. No boards are pinned together.
Option 2: slotted 2x4 batten
Use it for: shelves with heavier loads, or several shelves on long battens. Safe load per batten: 50 lb (1-1/8" wall), 60 lb (1-3/8"), 90 lb (1-3/4").
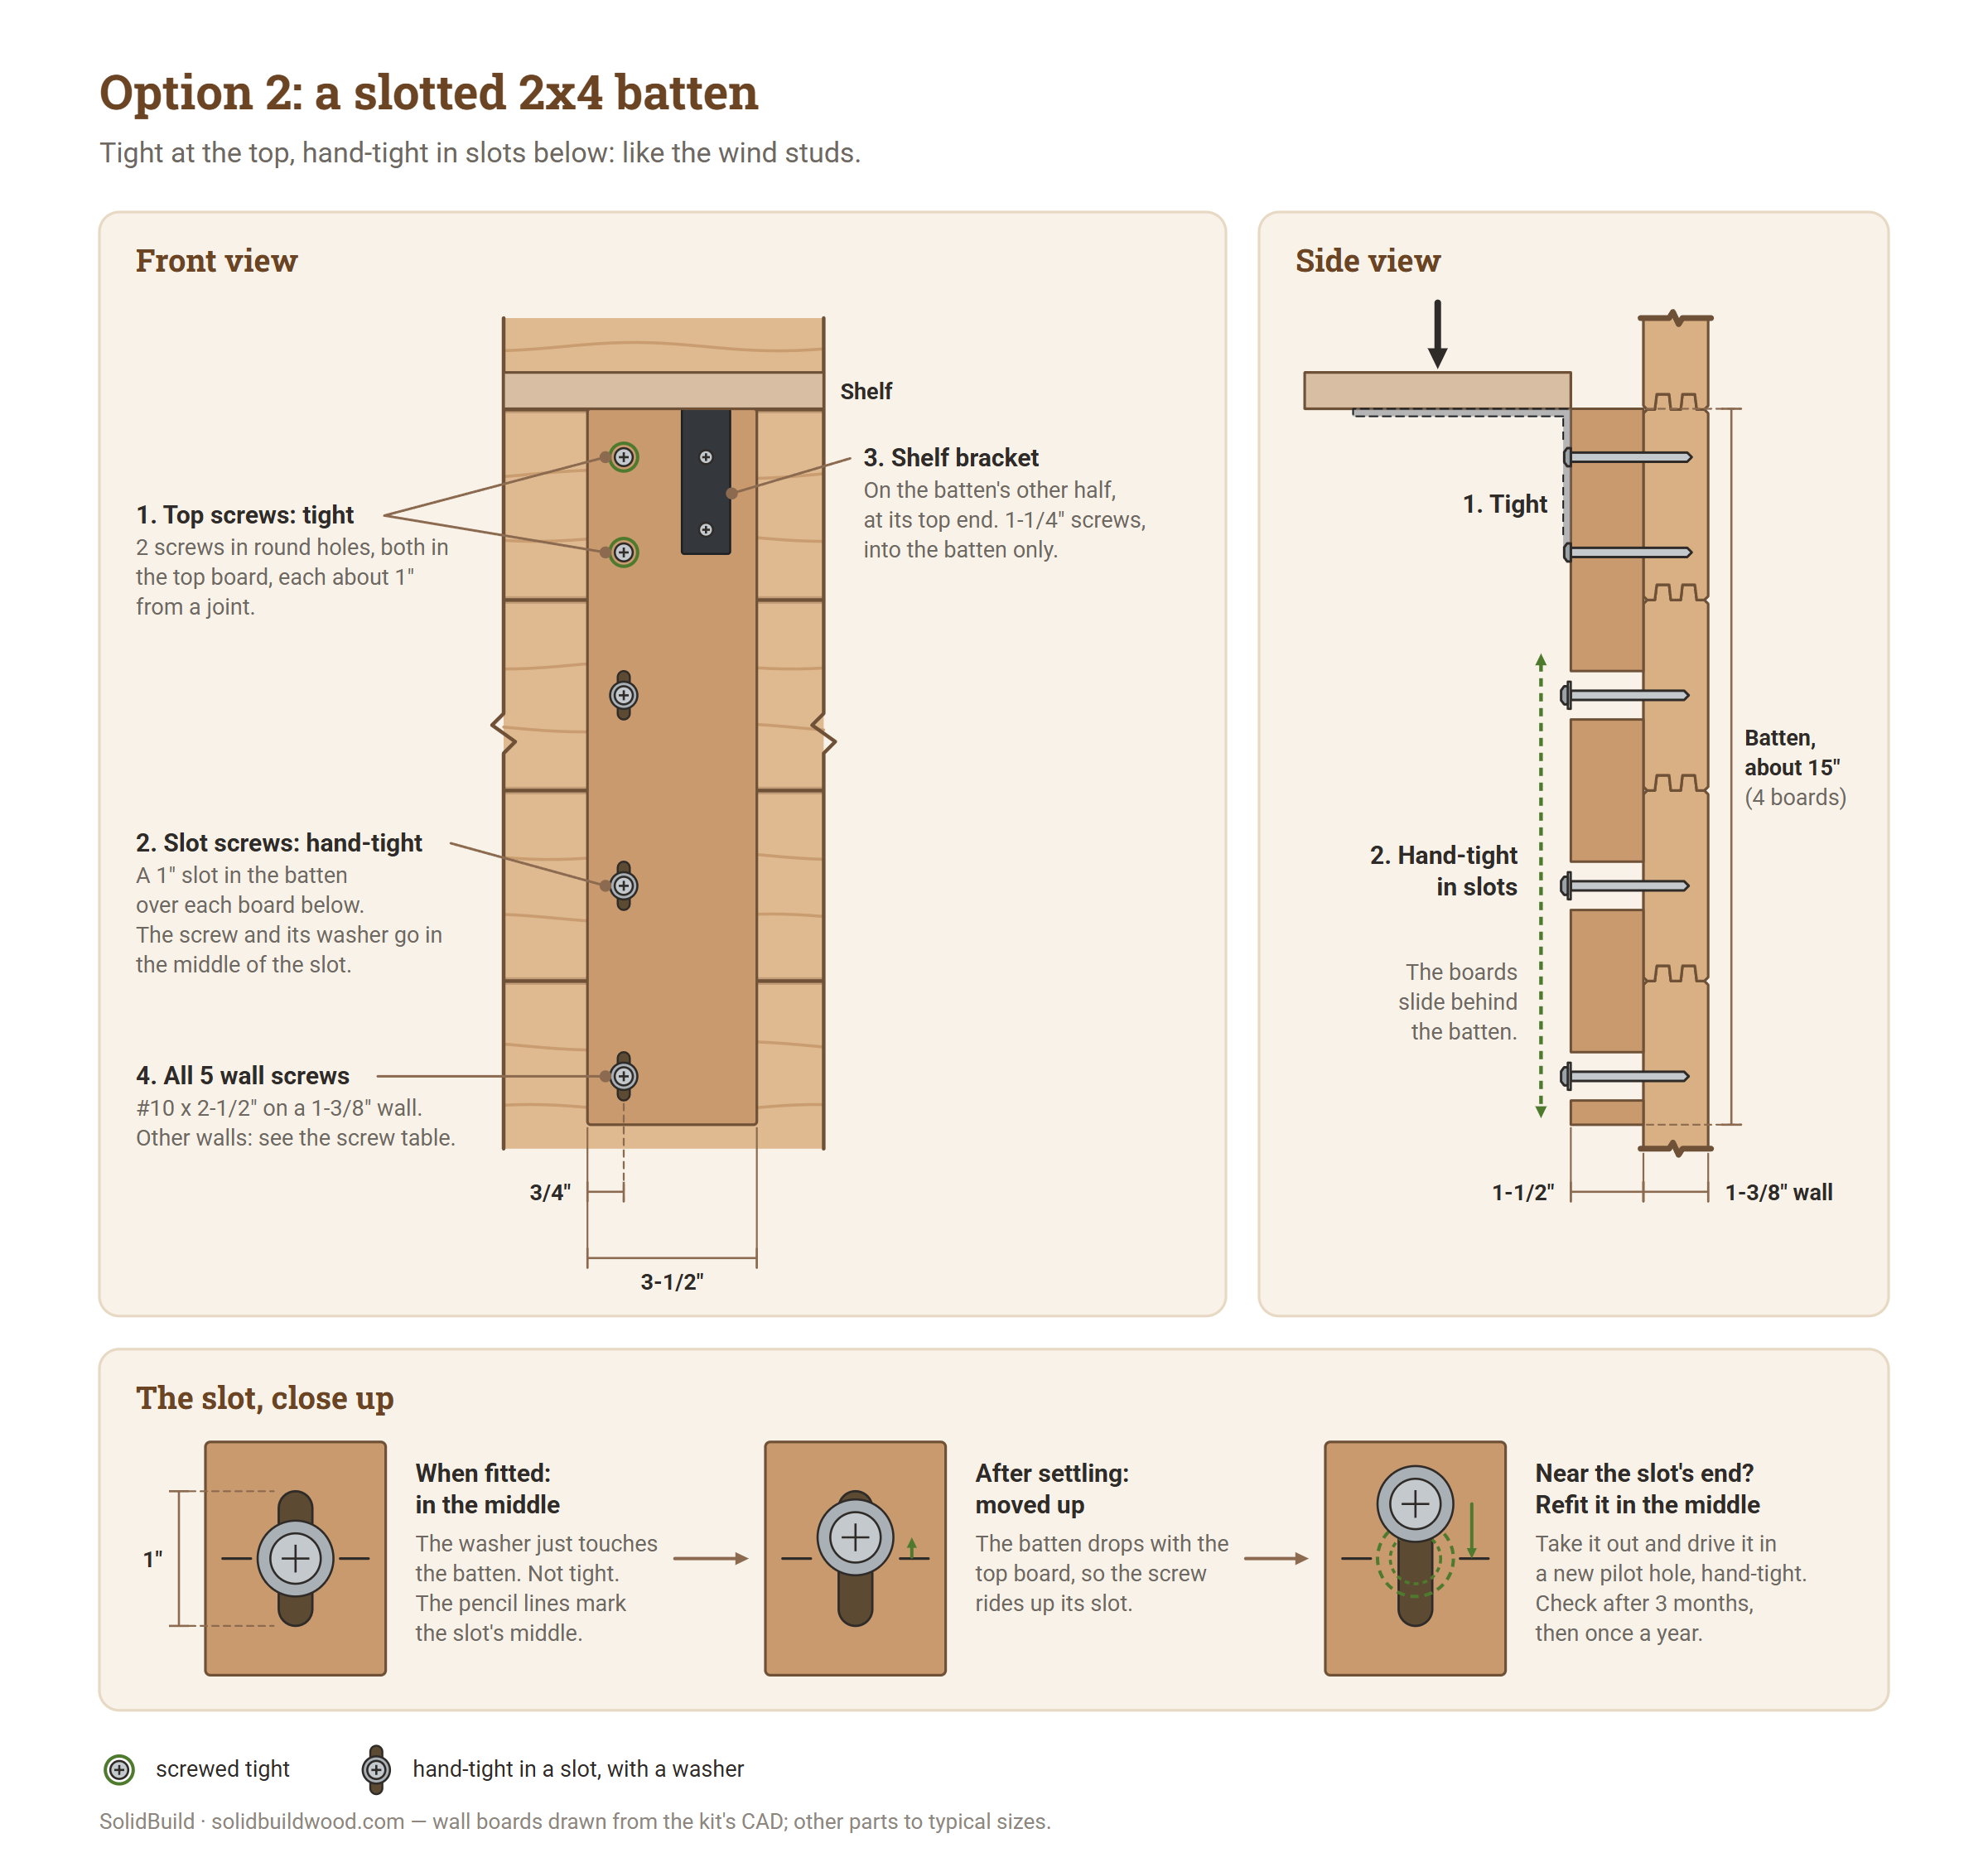
Steel shelf brackets with vertical slots are hard to find in US stores. So you make the slotted part from wood: a short 2x4 batten on the wall, with an ordinary L bracket screwed to it. It works like the wind studs on your shed: tight at the top, and hand-tight in slots below, so the boards can slide.
What to buy, for each bracket:
- A straight, dry 2x4, cut about 15" [380 mm] long, so it covers 4 boards. On Washington: about 14-1/2" [370 mm], 3 boards.
- One steel L bracket, rated for at least your load, and 1-1/4" screws to fix it to the batten. These screws must not reach the wall.
- Wall screws from the screw table, "Through a 2x4 batten" column: 2 for the top board, plus 1 for each board below. Use pan-head screws in the slots.
- A flat washer for each slot screw.
How to fit it:
- Hold the 2x4 upright and flat against the wall, wide face on the wall, where the shelf will go.
- Line its top end up with the top of one board. This is the top board. For a shelf on two or more battens, line up every batten's top end on this same joint: one about 4" in from each end of the shelf, and on a shelf over 3 ft, one more in the middle (see "how many?" above for the load).
- Mark the middle of each board on the batten.
- All the wall screws go in one line, about 3/4" [19 mm] in from one long edge of the batten. The bracket goes on the other half, so it does not cover them.
- Take the batten down and lay it on a bench for steps 6-8.
- Top board: drill 2 round holes through the batten, one above the other, each about 1" [25 mm] from the joint above or below. Use a 1/4" bit, so the screw passes freely.
- Each board below: mark a vertical slot at least 1" [25 mm] long, centered on the middle of the board.
- Drill a 1/4" hole at each end of the slot, then more holes side by side between them. Clean out the wood left between the holes with a chisel or a file, until a screw slides freely from end to end.
- Hold the batten on the wall again, its top end on the same joint, straight up and down (plumb). Pre-drill into the wall through the round holes, and through the middle of each slot.
- Top screws: drive the 2 top screws tight.
- Slot screws: put a washer on each screw. Drive it in at the middle of its slot until the washer just touches the batten, then stop: hand-tight. The batten must be able to slide.
- Screw the L bracket to the other half of the batten, with its shelf leg at the top end. Use the 1-1/4" screws.
- Check that the ends of the batten touch nothing: not the floor, not a window or door trim, not a wind stud, not another batten.
Later: check each slot screw after the first 3 months, then once a year. If one has moved near the end of its slot, take it out, pre-drill a new hole at the middle of the slot, and drive the screw there, hand-tight.
A longer batten can carry several shelves.
- Each slot is at least 1" long. A slot more than 16" below the top screws is 1" long plus 1/2" for every foot it sits below them: for example, 3" long at 4 ft below.
- The safe load is for the whole batten: 50, 60 or 90 lb in all (see above), however many shelves it carries.
- Never let it reach from the floor to the roof.
- It does not pin the boards, however many it covers: only the top board is tight, and the others slide behind the slots.
Why it works: the batten hangs from one board. It presses on the boards below, so the shelf's twist is spread over 4 boards instead of one. As the wall settles, those boards move behind the batten, and their screws move along the slots.
Option 3: French cleat
Use it for: cabinets, pegboards, and open shelf units built as a box. Safe load per foot of cleat: 40 lb (1-1/8" wall), 50 lb (1-3/8"), 75 lb (1-3/4").
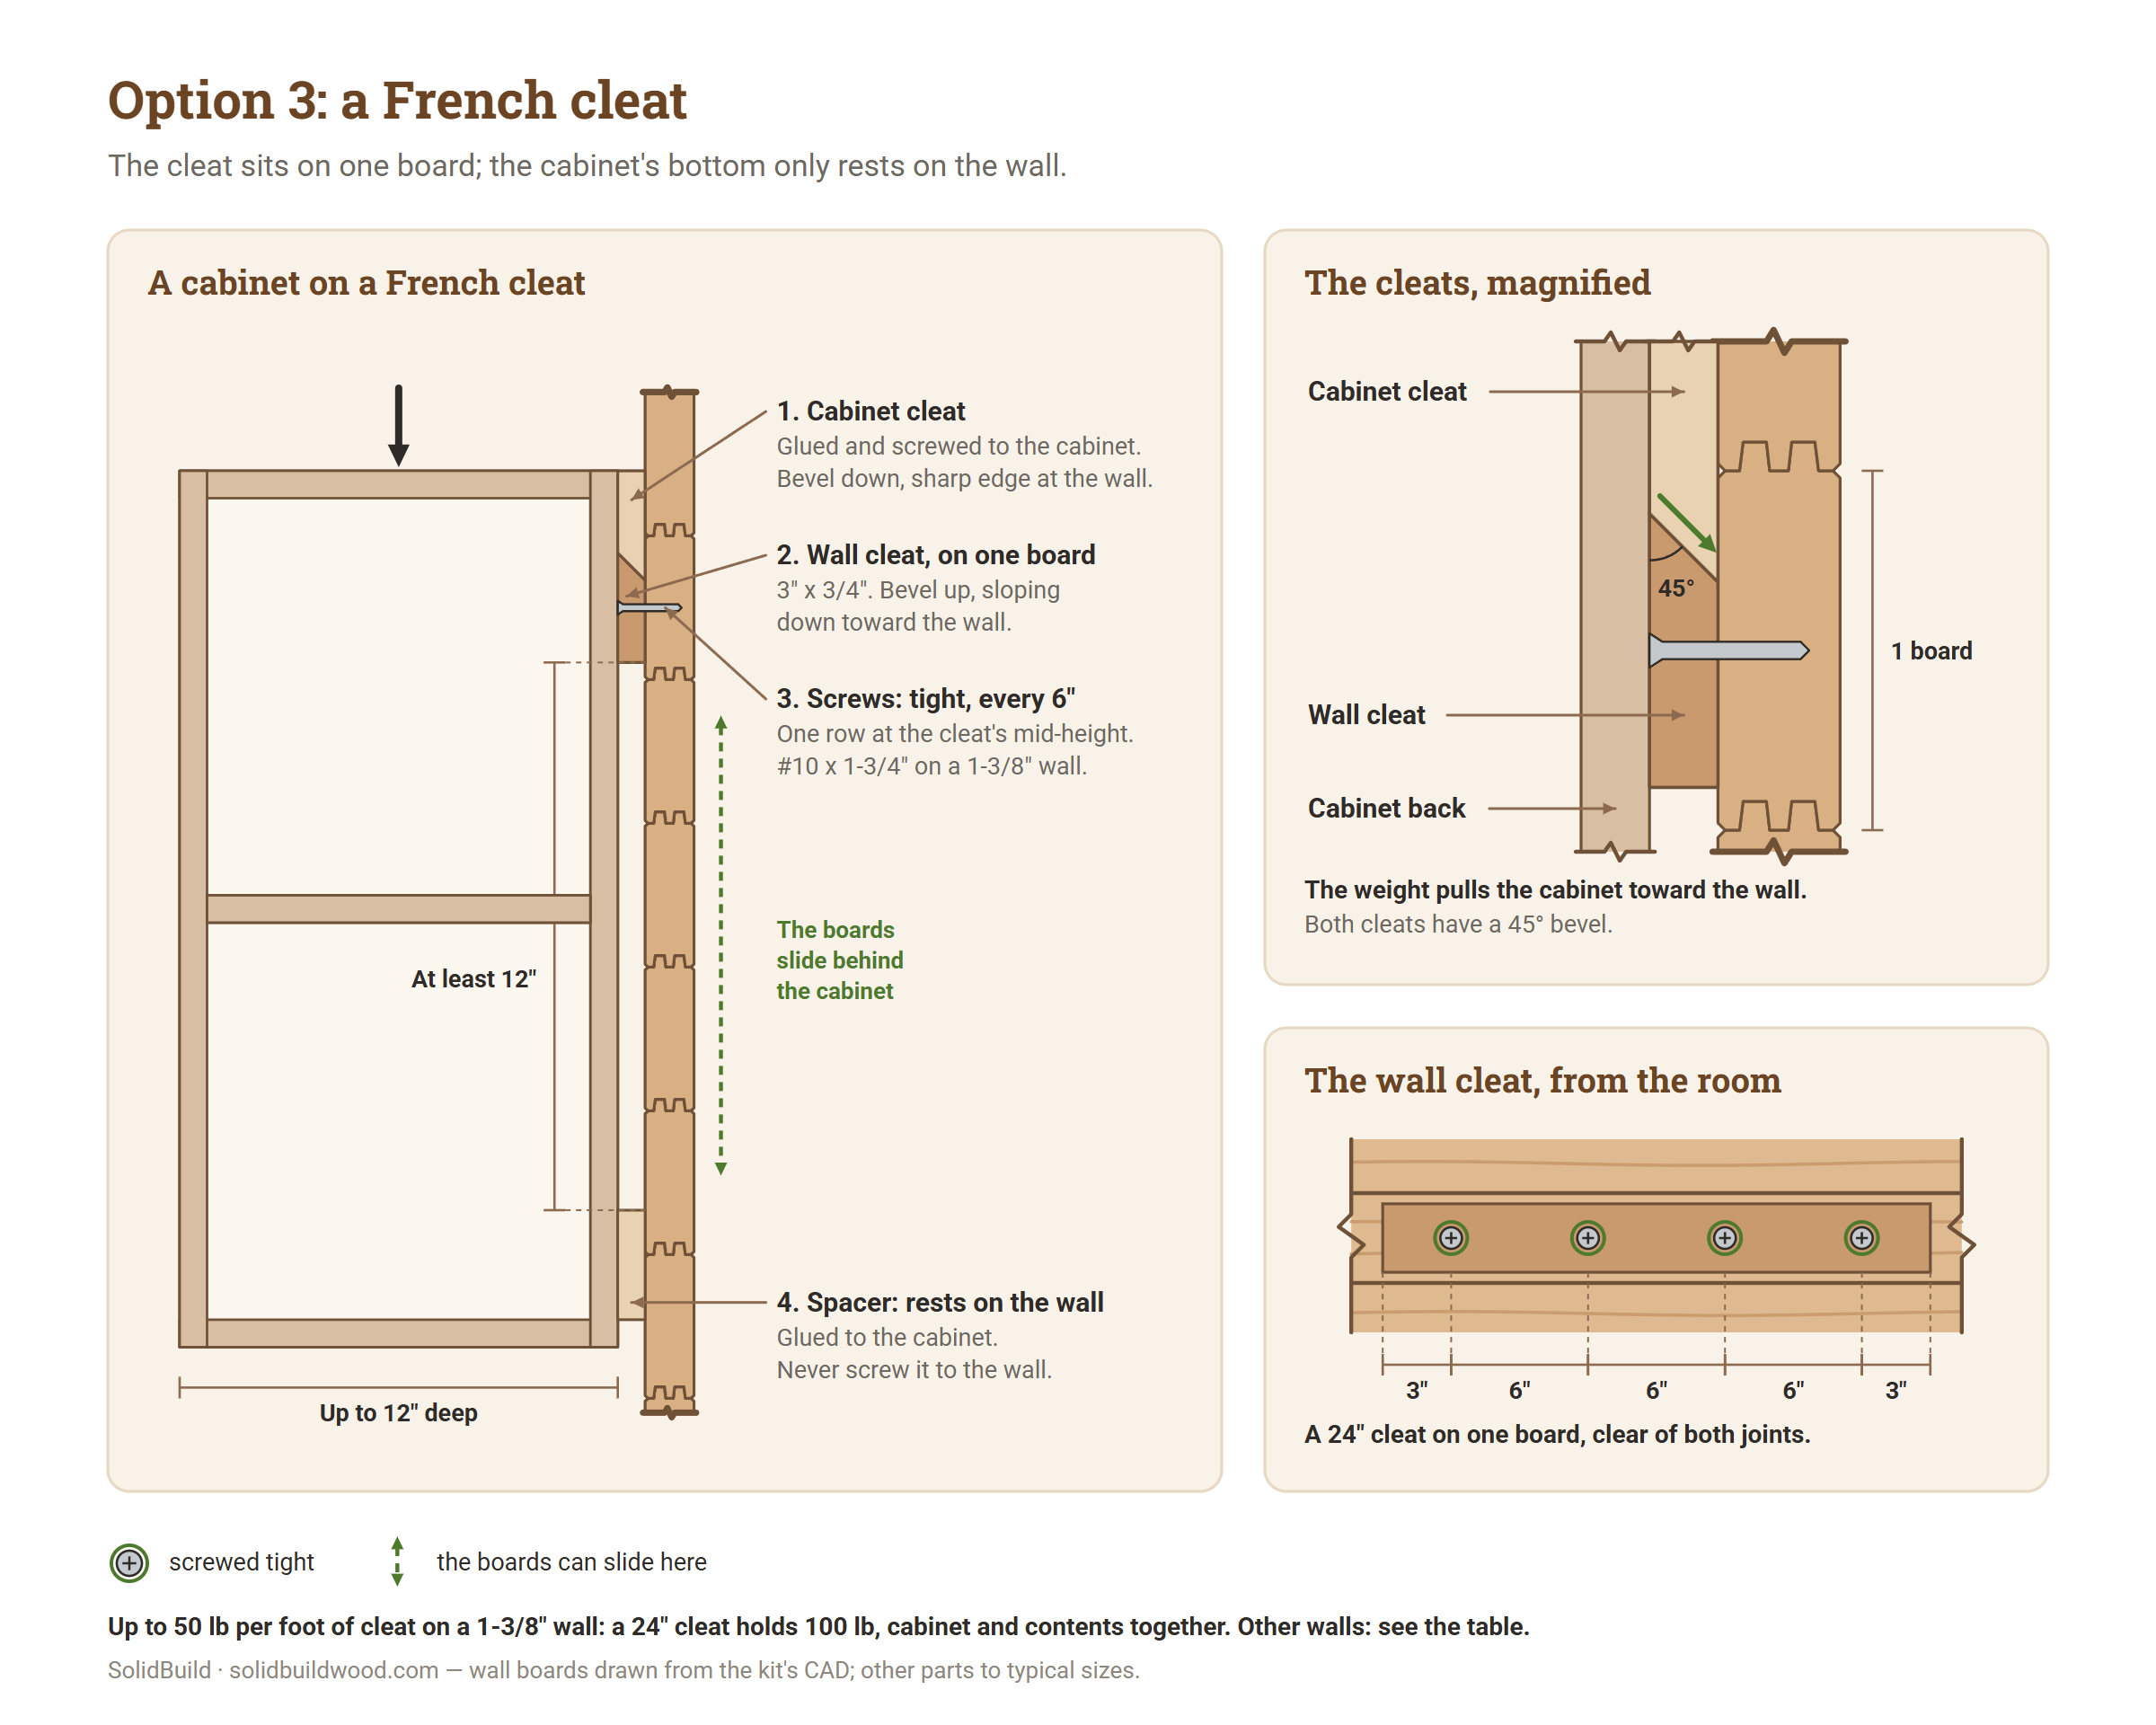
A French cleat is two strips of wood, each with one long edge cut at a 45° slope (a bevel). One strip is screwed to the wall, the other to the cabinet. The cabinet hooks over the wall strip.
What to buy:
- A straight 1x6 board (3/4" x 5-1/2") as long as the cleat, or a 5-1/2" strip of 3/4" [19 mm] plywood. On Washington, a 1x8 for taller cleats.
- Screws from the screw table, "Through a 3/4" cleat" column: one for every 6" [152 mm] of cleat.
- A strip of the same 3/4" wood, for a spacer at the bottom of the cabinet.
- Wood glue and screws to fix the cabinet cleat and the spacer to the cabinet.
How to fit it:
- Saw the board down the middle, along its length, with the saw blade tilted to 45°. You get two cleats about 3" [76 mm] tall: one for the wall, one for the cabinet.
- Center the wall cleat on one board, along its whole length. It must not reach over the joint above or below.
- Hold the wall cleat with its sloped edge on top, sloping down toward the wall, so its sharp edge is at the top, away from the wall.
- Level the cleat.
- Pre-drill one row of holes at the cleat's mid-height, every 6", starting about 3" from one end, with the last one no more than 3" from the other end.
- Drive a screw into each hole, tight.
- Glue and screw the other cleat to the back of the cabinet, near the top, with its sloped edge at the bottom: its sharp edge points down, on the wall side.
- Glue and screw the spacer to the back of the cabinet, near the bottom, at least 12" [305 mm] below the cleat. It rests on the wall. It is not fixed to the wall.
- Lift the cabinet and hook its cleat over the wall cleat.
- Never screw the bottom of the cabinet to the wall.
Limits:
- The cabinet is up to 12" [305 mm] deep.
- Safe load = the value above × the length of the cleat in feet. For example, a 24" [610 mm] cleat on a 1-3/8" wall holds 100 lb [45 kg], cabinet and contents together.
Why it works: the cleat is on one board, so the wall settles freely. The weight hangs on a whole row of screws, and the spacer at the bottom presses on the wall, so no single board is twisted.
Heavier than this?
Use a shelf unit that stands on the floor. If it is tall, stop it from tipping with a furniture anti-tip strap screwed to one wall board near the top. Fix the strap to the wall about 2" above the point where it meets the unit, and leave it slightly slack, so the settling wall only makes it slacker.
Do not
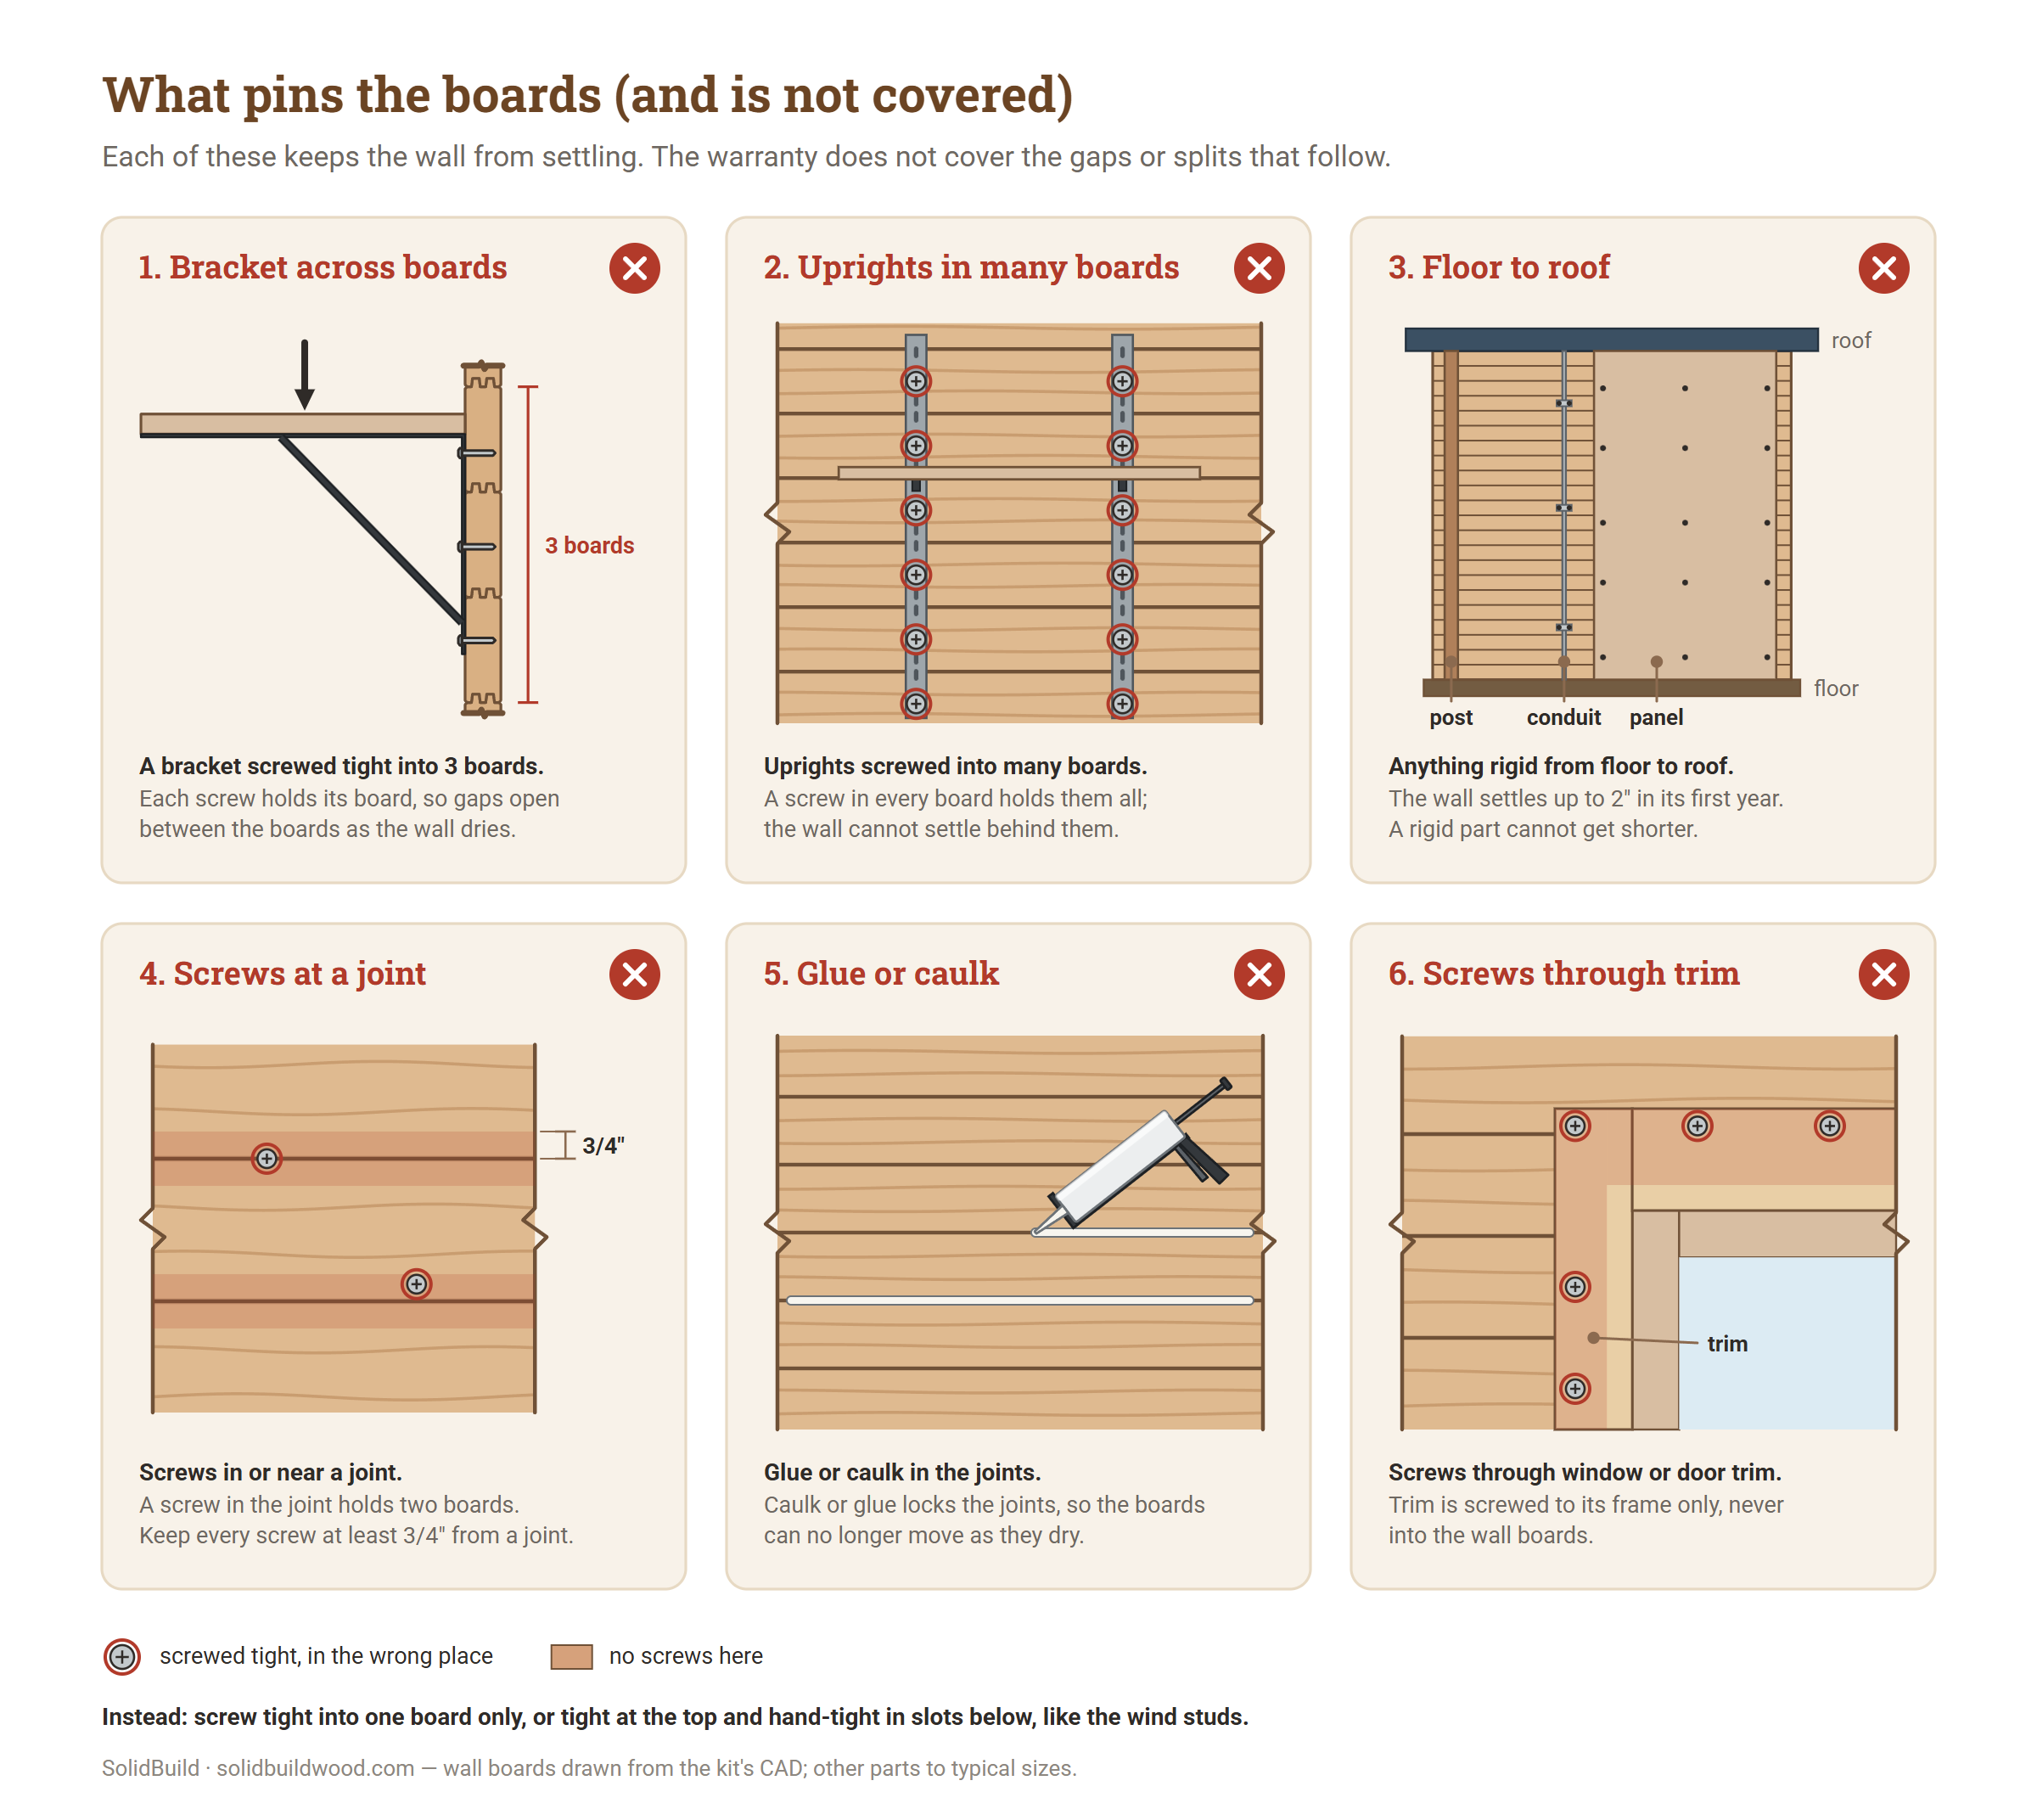
- Do not screw a bracket, rail or panel tight into several boards. Screw it into one board, or use slots as in option 2.
- Do not screw shelf standards (slotted metal strips) or a track system (a wall rail with hanging uprights, as in closet systems) into the wall boards. They tie many boards together.
- Do not fix anything that runs from the bottom of a wall to the top, such as rigid conduit, posts or tall frames. Do not screw pegboard or plywood into many boards either: hang a pegboard on a French cleat.
- Do not put a screw in or next to the joint between two boards. Stay at least 3/4" [19 mm] away.
- Do not glue anything to the wall boards, and do not glue boards together.
- Do not caulk or seal the joints between boards, or around a shelf, batten or cleat. It sticks the boards together, and a joint that has opened cannot close again.
- Do not screw through window or door trim into the wall boards.
- Do not screw anything to a wind stud, or through it into the wall boards. It must hang free from its top bolt.
- Do not load a shelf beyond the safe loads above, or use longer screws than the screw table shows.
If a gap has opened under a shelf
- Take out the screws in the lower boards, or take the shelf down.
- With a rubber mallet, tap down the boards above the gap, at the corners of the shed where the board ends cross. Let the wall settle.
- Hang the shelf again with one of the options above: in one board, or with slots.
If the gap does not close, contact us.
Questions
Do I have to wait before I hang shelves?
No. Every option in this guide works from the day the shed is built, because each one lets the boards move.
Can I hang shelves or attach items to the walls?
Yes. Screw anything tight into one board only, or use slots as in option 2. Anything that pins boards together can cause gaps or splits, and the warranty does not cover them (see "Your warranty" above).
Can I screw a bracket into several boards?
Not tight. Screw tight into one board only. If a bracket or strip has to reach over several boards, screw only its top end tight and put its other screws in vertical slots, hand-tight, as with the slotted batten in option 2.
Can I use the screws that come with my brackets?
Check their length first. On 1-1/8" and 1-3/8" walls, the long screws that come with heavy-duty brackets can come out on the outside of the wall. Use the screws in the screw table.
How do I hang a pegboard?
Hang it on a French cleat on one board, with a loose spacer at the bottom, like a cabinet. Do not screw a pegboard or a plywood panel into many boards.
Can I use a wall-rail shelving system?
No. Its uprights tie many boards together. Use slotted 2x4 battens or a French cleat instead.
Can I mount an air conditioner on the wall?
Yes, with the same rule. Our air-conditioning guide shows how.
Where the numbers come from
- Option 1 (heavy-duty brackets): from a load test in a real shed, on a 1-3/8" wall: a 6 ft shelf on 3 heavy-duty brackets in one board, with the article's screws, carried 200 lb [91 kg] of sand for a week. The safe load, 75 lb, is less than half of that. This number comes from the test, not from a calculation: by the wood code alone, the screws would be rated lower. For 1-1/8" walls we lowered it in the same proportion as our small-bracket limits (10 lb against 15 lb); for 1-3/4" walls we kept the tested value. With 2 brackets on a shelf up to 3 ft we allow 50 lb, two thirds of the three-bracket value (33 lb on 1-1/8" walls, in the same proportion).
- Screws: design values from the US wood code (NDS 2018, American Wood Council), for spruce. They are about one fifth to one sixth of the average load at which screws pull out in tests.
- The wall joint (small brackets, battens, cleats): no code and no published test covers a tongue-and-groove joint loaded like this. We calculated it from the strength of spruce across the grain and the shape of the boards: the exact CAD profile of the 1-3/8" board, and the 1-1/8" and 1-3/4" boards as read from drawings. The safe load is one fifth of the load we expect to crack it. For the slotted 2x4 batten, the calculation includes the 1-1/2" that the batten sets the shelf out from the wall.
- How sure we are: the screw values are well established. The joint values are estimates. Knots, drying cracks or a loose fit can lower them, in the worst case to about half. Even then, the calculated safe loads keep a margin of more than 2. Option 1 rests on one test that held for a week: it shows the 75 lb is safe with a margin of more than 2.5 in the short term, but not where the bracket or the board would fail.
- What we are doing next: we plan to test more shelves, for longer, and the other options on real wall boards too. We will update this page with the results.
This is general guidance for SolidBuild sheds. It is not an engineering design for a particular installation.